Showing posts with label Studio Calico. Show all posts

Monday, March 31, 2014

STITCHED Class Sneak and Oh So Darling with Gossamer Blue

I've been having so much fun the past couple of weeks playing with with my new Gossamer Blue goodies and creating a project or two for the new STITCHED class at Studio Calico.

Before I show you what I made using the Main kit from Gossamer Blue, I thought I'd show you a sneak peek at my project for the STITCHED class because today is the LAST DAY to sign up.  I've seen other sneaks of the projects and I can tell that this is going to be an amazing class. DON'T MISS OUT!

The class kit along with the stitching templates, digital die cuts, printables and embellishments is soo amazing. And Paige Evans is teaching the class and has lined up AMAZING contributors. What more can you ask for??? I hope to see you in the class room tomorrow.  Register HERE.

Okay, let's chat Gossamer Blue. The April kit is full of bright, gorgeous Spring colors. If you are thinking of getting their April kit and add-ons, run, don't walk, over there now because she is selling out FAST.

I couldn't resist scrapping this photo of my girls with these gorgeous Sunflowers.

This layout was creating using the Main Kit Only. The add-ons are incredible but I wanted to show you an example of what you can create with just the main kit. Not only that, but I created this one in just 50 minutes. That has to be a record for me. Ha ha ha...seriously.

I started this page by just layering the transparency and the green under the photo. The transparency wasn't showing through enough to I added a pop of yellow and a bit of black. I then decided that I needed some white between the green and the grey background and voila!, I had my layers. These are all from various American Crafts Plus One or Day Dreamer collections and Studio Calico Lemon Lush.

Once I adhered it down, I added the "darling" and arrow rub-ons and the "oh so" from Thickers, all from the American Crafts Amy Tangering Plus One collection.

The page needed a top and bottom border so I cut some very rough strips on blue, green and black and added my borders, topping the upper right corner with an embellished triangle.

The page just needed a bit more happiness so I added mist splatters using Studio Calico Taxi and Bonnet Blue. Then I did the unthinkable (to me). I pulled the centers off the Dear Lizzy Day Dreamer wood buttons and used them like enamel dots on my page. You can see the wood around the "2" in the top photo and how they look peeled off in this photo.


Saturday, March 1, 2014

Studio Calico STITCHED Class

Hi everyone! I wanted to let you in on really great, super fun opportunity for you to hone in on your machine sewing or hand stitching skills.....I've been asked to be a class contributor to Paige Evans' upcoming Studio Calico class: STITCHED!

Registration for the class is open now and the class starts on April 1, 2014.
  

Let's take a look at what you will get:
  • 4 videos from Paige
  • 24 unique ideas for stitching - we'll cover ideas tailor made for paper crafts from different stitch types to quilting paper to adding dimension with stitching
  • Technique tutorials and tips for using hand and machine stitching on layouts, cards, Project Life® and more
  • PDF lessons posted each week in April
  • 24 all new projects, including layouts, Project Life® spreads and cards


There's a class kit, which includes journaling cards, a stitching template, exclusive stamp set, a stitching template, stitchable wood veneer tag, embroidery floss and more! There's also bonus files - die cuts, printable and just a ton of yummy things.

Head over to Paige's blog to learn more, view the class sneak peek video and see sample projects. Or, you can go ahead and sign up for STITCHED right now. But before you go, check out this exclusive offer.

I hope to see you there!
xoxo Heather

Monday, January 27, 2014

Always Sweet, Always Silly Renaissance Girl

I have a ton of projects to share with you this week. The first is one I created in December using my January Gossamer Blue kit. I had to wait until January to show it and then well, someone let the craziness of CHA projects, attending CHA, her birthday and family time keep take over and that is A-OK with me.


I was drawn to the scalloped paper in the Studio Calico Printshop collection. It's a 12x12 sheet with pinks, blues and oranges. I wanted to use it for my background but it was a bit too much as a full sheet so I cut out the blues and pinks and then using my Xacto knife, cut out some individual scallops to add dimension.

This layouts was inspired by the peacock face painting my daughter got at the Renaissance Festival. I snapped these photos of her peeking at her new face paint in the mirror, or mir-rah, as she says.

I added pops of gold with rub-ons and mist.  The title is a combination of what's at the bottom "Renaissance Girl" and the sentiments at the top.  I used the black/tan striped word sentiment and papers to anchor the layout down and then embellished around it.

And I guess I wasn't the only one with this idea. There was a layout in the Studio Calico booth at CHA, using the same pink and blue scallops cut out. The design was very different but I just have to say that I created this as an original idea and posted it HERE in the Gossamer Blue gallery in December WAY before I saw that one. LOL Great minds think alike I guess.

Come back every day this week for some goodies using American Crafts and more Gossamer Blue layouts.


Wednesday, September 5, 2012

Big Daddy | Creative Scrappers Blog Hop

Hi there! If you're looking for the Creative Scrappers blog hop, you are in the right place and if you are one of my friendly loyal visitors who is stumbling across this from my blog, today might be your lucky day!

I'm taking part in the Creative Scrappers blog hop. We will be showing off some of our favorite Creative Scrappers Sketches and Layouts and not only can you participate in our hop but you have a chance to win a Creative Scrappers ebook of Sketches "Creating with Sketches" by Kristine Davidson. 

I created this layout of my daughter and her grandfather aka my dad. We call him Big Daddy. That's what I called my dad's dad and since my dad is a Jr., it was most fitting that he be a Big Daddy too! Anyway, we found this fun crazy hair hat and gave it to him as part of his Father's Day gift. He and Rheagan had a great time playing with hats and I was lucky enough to capture a few of them with Instagram!


Supplies: Scrapbook Circle June 2012 Field Notes Kit: Crate Paper Story Teller Archives, Studio Calico Abroad Continental, Studio Calico Abroad Boarding Pass, My Mind's Eye Caroline Curious Planks, Simple Stories Documented Chevron, Echo Park This & That Numbers, Echo Park This & That 12 x 12 Alpha Stickers, Bella Blvd Teal Washi Tape, Jillibean Vacation Soup Label, 7 Gypsies Travel/Date Stickers, misc star punch, misc circle punch (3 sizes), Janome sewing machine, Imaginisce i-rock & glam rocks, Mr Hueys Mist in Bonny Blue & Calico, Bazzil Tape Runner, Zig black pen in .5mm.

Creative How To: I used Creative Scrappers sketch 187 by Kristine Davidson. I created 3 little stories on the page with layers of paper and embellishments. I strategically placed certain words, like "misdirected", "historic landmark" etc around the photos. I then misted over the papers, punched stars and 3 different size circles. I splattered them out on the page and when happy with where they landed for the most part, I on;y had to move a few of them around.

Journaling reads: A classic case of the sillies with Big Daddy on Father's Day 2011.

Giveaway #1
Leave a comment here on this post for your chance to win the ebook of Sketches that I am giving away on my blogThis is a separate then the giveaway from Creative Scrappers and all the other gals you'll "meet" on the hop. Next, hop around to the design team blogs for a chance to win more goodies and increase your chances to win an ebook offered by each of them. Once you are done with the hop, please leave a comment and a link to your blog on our main Creative Scrappers Blog Hop Post. This ghope ends on September 8 and winners will be announced on Sept 10.

Giveaway #2: 500 Followers!
Follow my blog to be entered into my 500 followers giveaway! When I reach 500 followers I will randomly select a few winners from my follower list to get special RAKs from me! This will include random assortments of paper, stamps, alphas, embellishments or whatever I am in the mood to throw in the package. Some will be new and some will be "vintage". LOL To enter and become my newest follower just click "Join" in the upper right hand of my blog under my photo. This giveaway ends when I reach 500 followers so check back often. Winners will be announced on my blog. You don't have to become a follower to be eligible for the Creative Scrappers ebook giveaway!

3. Heather Leopard <--That's ME!


I hope you enjoy the hop! You have until September 8 to leave your comments with winners being announced on the Creative Scrapper blog on September 10th. 

Now HOP on over to Juliana's blog!! Good luck and thanks for stopping by today!


Tuesday, July 17, 2012

Little Miss Innocent

I went back a few years when digging for photos for this week's sketch at Creative Scrappers! I am trying to keep up with each year as I'm in it but sometimes I get the urge to reminisce and work on the "oldies".  Anyway, these photos are of my daughter doing what she did best at the time...pulling the toilet paper off the rolls.


I created this using Creative Scrappers sketch 219 and the Scrapbook Circle July 2012 kit, Sunshine Day.

Creative notes:
  • I faux stitched around the yellow distressed paper; the grid lines on the paper made it super easy to follow and keep my "stitching" in a nice straight line.  
  • Prior to adhering the layered pieces to the background paper, I cut some of the scallops out of the background paper and re-purposed them again over the yellow paper. 
  • I used wood circle frames to highlight the doily in the banner and the "memories" brad embellishment. It adds just the right amount of attention to those bits that might have gone unnoticed.
  • I used actual toilet paper on my layout.  I gave the toilet paper a scallop treatment by folding it in half again and again until it was the size of one scallop and then I cut a scallop with my scissors, like you do to make snowflakes. Then I ruffled them on the page under my photos.
  • To make the word "innocent" stand out a bit more I outlined around each alpha and again over the top edge of the letters.


Thanks for stopping by today.

Sunday, January 15, 2012

It's Cookie Time

Yep, it's that time a year again. Time for the Girl Scouts to be out in full force knocking on doors and accosting you as you enter AND leave the store.  Well there's no avoiding it so you might as well order some from my little Brownie so she can earn a sleepover at the Aquarium!!!

We spent a couple of hours last week knocking on our neighbors' doors. We only made it down the cul-de-sac and over one small street and she sold 20 something boxes. Not too bad! I was so proud of her, politely asking, figuring out the check/cash/change thing and thanking them, whether they bought or did not buy. Yes, there was someone who turned her down but she just smiled and moved on. Of course I took pics of her doing her thing.
Pin It


I am just loving these Authentique papers included in this month's Birds of a Feather kit. I think Amy might have a few left! Thanks for stopping by today!

Friday, January 6, 2012

My Girl...and Her Dog

This month marks the end of my term on the Birds of a Feather design team.  It was great to be on Amy's inaugural team and the decision not to reapply was a hard one but I love the community over there so I'm not going anywhere.  If you've never seen her kits you should definitely check them out.  And this coming design team is sure to inspire you!

Here's a a couple of the layouts I've made from this kit. 
Supplies: Bo Bunny Double Dot "Chiffon Journal" and "Shitake", Authentique Gathering "Harmony", "Together", "Grow", "Bloom", Classic Type Alphas Item #SCC002; Making Memories “Paper Reverie Brun Antique” Lacy Stripe Artisan Die-cut paper; Kaiser Craft Fozz Fontz "Fonzo Alphabet Set" in Teal; Color-Me-Crazy Velvet Butterflies (misted bonny blue); Creative Impressions Twill - Caramel; Not in Kit - ADORNit Buckaroo alphas; Studio Calico Mr Huey Mists in 3 colors: Orchard, Pony, Bonny Blue; misc brown thread, Glue Arts Glue Glider Pro, Zig Marker .5 mm Black

The photo above was actually taken while my hubby and daughter were playing around.  We were on the hayride at the Pumpkin Patch and she was making crazy faces and he would just reach the camera out and click, not knowing if he was even getting her in the shot.  Most of them came out blurry but there were a few jewels in there.  This was one of them.

This next layout is of the day we met our new dog, Spot.  I was dead-set on adopting a dog that needed rescuing. I really owe the awareness of the importance of adoption to Pets Alive in NY, of which my favorite singer/songwriter, Rob Thomas and his wife, Marisol (and her family) support through volunteer work as well as through their Sidewalk Angels Foundation. I started following their Tweets (PA & SWA) and get their emails and it really took my heart.  So back to Spot, we found her on PetFinder.com.  We immediately fell in love with her (look at that face) and hoped that she was still available and also that she'd be a good fit for us. I love it that so many organizations post their animals (of all types) to it and you can look at most of those that are available for adoption and it takes you directly to the rescue facility. Spot came from Twyla's Friends and she was 7 months old when we got her.  She's such a wonderful little pup. She's a mix but I found lots of full bred babies and adult dogs (they need a home too) so the next time you are looking at adding a new "furr-ever" family member, please consider adopting!!!! Thanks for reading through my PSA!
Pin It
Supplies: Authentique Gathering "Harmony", "Together", "Grow", "Bloom", Classic Type Alphas Item #SCC002; Bo Bunny Double Dot "Shitake"; Kaiser Craft Fozz Fontz "Fonzo Alphabet Set" in Chocolate; Studio Calico Classic Calico Chip Shapes Assortment~Butterflies, Studio Calico "Classic Calico" Die-cut Cardstock Pieces - Tags; FabScraps Die-Cut Chipboard Embellishment – Fleur Frame; Clearsnap Smooch Pearlized Ink – Ocean Soul; Creative Impressions Twill - Caramel; Not in Kit - ADORNit Buckaroo alphas; Studio Calico Mr Huey Mists in Piglet & Orchard; My Little Shoebox small alphas pink(?), misc button; misc pink thread, Glue Arts Glue Glider Pro, Zig Marker .5 mm Chocolate


So apparently I was in a banner type state of mind when I put these together.  I know banners have been around a while but they're still "in", especially if you can find clever ways to mix it up.

Thanks for stopping by today!

Thursday, December 22, 2011

Whoo Loves You Baby?

OMG, I just realized I haven't yet posted one of my favorite new layouts yet so I am sharing it with you today. I remember that I was holding it back because I had found these adorable little owl hats and had to get one for my girls and one for my friend, Audrey's, newest addition and I would have probably slipped up and mentioned it.

Both of my girls immediately put their hats on as soon as they arrived so of course I snapped a few shots.  WHOO could not resist this adorable little owl (and the hat too)???
Supplies from Scrapbook Circle Note to Self December 2011 kit: American Crafts Chap Cameron Paper (background), Tab Bits; Jillibean Soup Sweet and Sour - Raisins, Crushed Tomatoes, Die-cut Shapes; October Afternoon Sidewalks - Marbles, Red Light Green Light, Word Stickers, Little Flyers, Basic Grey Indie Pom Poms, Echo Park Happy Days Bottle Caps Paper, Alpha stickers (small alphas); Pink Paislee Wood Shop Sawdust alphas (large alphas). Not in kit - Studio Calico Mr Huey mists.

I just love these Wood Shop alphas by Pink Paislee.  It's thought about leaving them raw but they weren't showing very well on the background paper so I misted them pink to match the hat and then unscrewed the tops off the blue and green misting bottles  lightly touched them to the wood and watched the ink spread in the grain.  The alphas don't come with a question mark so I turned it into a statement and made a kind-of exclamation point out of the hearts. It was an experiment but I'm happy with how they turned out.

I also wanted to use this green circle frame but it's so big that one pattern paper just looked odd and it looked worse to leave it empty so I punched a bunch of strips of paper, layered them and then adhered the green scallop circle over it. I added a sentiment, flower and butterfly to top it off!

Thanks for stopping by today. If you love the Note to Self kit as much as I do, run over to Scrapbook Circle while you can still get one!

xoxo Heather

Thursday, October 20, 2011

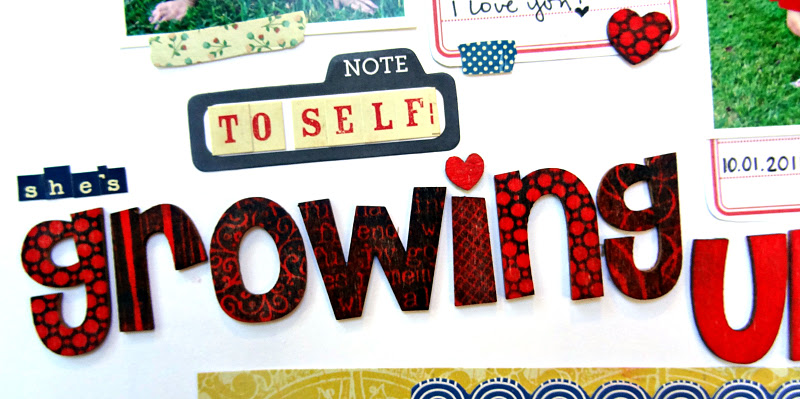
She's Growing Up Too Fast!

My oldest daughter turned 8 on October 1 and all I think about when I think of her age is how fast it's gone by.  Seriously, too fast. 

We took the family out for a birthday celebration and let her choose the restaurant.  If you know my daughter, you would understand how WONDERFUL it was that she wanted to get so dressed up, from the headband to the fancy shoes.  Then, she was willing to pose for these photos...AMAZING, trust me!

Supplies from Scrapbook Circle Fresh Picked October 2011 kit: Pebbles Fresh Goods Windows Display paper, Pebbles Fresh Goods Embossed Masking Tape Stickers, Crate Paper Textile 12X12 Random Collection Paper, Fancy Pants School Days No.2 Pencils paper, Studio Calico Scrap Pad, Pink Paislee Sawdust Wood Alphabet, Girls' Paperie Tiny Alphas Tinsel, .05 black pen, Glue Arts Glue Glider Pro, Close to My Heart Red Ink


I created this layout with the Scrapbook Circle Fresh Picked October 2011 kit and this week's Sketchy Thursdays sketch.  This layout was a total breeze to pull together. I mean, I had to put some thought into the photos and sizes and do some fussy cutting and place everything "just so" so it still took me a while but not as long as usual.

The alphas are actually wooden alphas that I inked red and then stamped over in blue, using different stamp designs.  I love how they turned out.

What I don't love is how messy they made my layout, AFTER I ADHERED EVERYTHING TO THE PAGE! You see, after I glued everything down I wrote all my journaling.  When I was done, I looked at my layout and this is what I saw:
[insert GASP! here]  I looked around my page and as suspected, there were red and blue random smudges here and there.  I looked at my arm and yep, my palm and arm were covered in ink. I washed it off again and again and again. 

I debated on adding "artistic" smudges to the rest of the layout but it wasn't going to work and wasn't the look I wanted so I resigned myself to start over. FUN...NOT! Most of it came off the page easily, except the border at the top that ripped and the alphas and hearts that I glued with super ultra bond glue.  Can you hear my sarcasm as you read this?


Yay for me (again, sarcasm)! This is what I get for scrapping under the influence (of seasonal allergies) and being impatient waiting for the ink to dry. Luckily, I was able to salvage it but like I said, I did have to re-work the whole thing. Oh and I looked at my arm again 4 hours later, and I found a distinct backwards "ro" that I missed in my initial scrub-down. And there's still traces of ink on my hand and fingertips too.  [ sigh ]
Thanks for looking today. Tell me I'm not the only one who has had to re-make a layout for one reason or another.

Now head over to Sketch Thursdays and play along with us! You could something great from Let's Capture Our Memories

Tuesday, August 23, 2011

Sittin' on the Dock...

I just abso-FREAKIN-lutely love this captured moment of Reese with her big brother.  It's one of those photos that I've been wanting to scrap but I needed the right elements so as to not overshadow the photo yet give the page some pop.  The mistables that came in this month's Scrapbook Circle You Are My Sunshine kit were perfect. 

Here's the layout and I'll walk you through how I created this page.
Supplies from Scrapbook Circle You Are My Sunshine Kit: American Crafts Kraft Cardstock, Pink Paislee Mistable Stickers; Basic Grey Out of Print "Punblication"; Not in Kit - Studio Calico Mr Hueys in Piglet, Bonny Blue, Clover, Lemonade and Pickle.

To make this layout I fussy cut the tree from the mistables sticker sheet and laid it over my Kraft cardstock (since many trees are brown) so that the mistable side was facing down.  That was to avoid getting the mist on the flowers still attached to the tree that I would later cut out of the tree.

 Then I misted the tree with my green mist - "pickle" color because I wanted it to signify the green leaves in the photo. I also misted 2 other areas of the paper to complete my triangle. I carefully listed the mask from the page and this is how it looked...
I then doodled around the tree limbs to give it a more defined look, cuffy cut each flower and misted them in several different colors, being careful to remember where each flower was to be placed on the tree. Here is what the tree looked like when it was all said and done.
I then misted the larger flowers and layered them over each other to give them a bit of dimension. For some reason however the colors were more saturated on the larger flowers than on the tree's flowers. Oh and to make the leaves, I misted a smaller flower with green and cut it in half.

I am satisfied with this layout but I have to tell you that for some reason it just looks WAY better IRL than in the photo.  Also, this layout is more simple than usual because I really didn't want to take away from the photo or the tree but I have to admit it's not my typical style.  I still really like it but I think I'll stick to my layers.

Monday, May 23, 2011

Sweet Little First Grader

It's hard to believe 1st grade is over in a little over a week. If this is any indication of how the rest of her years will fly by then I'm going to go sit in a corner and cry. It's just flying by WAY too fast.
Supplies from Scrapbook Circle Anniversary Kit: Studio Calico Elementary Library, Lily Bee Happily Lost Stroll, October Afternoon 5 & Dime Jaw Breakers, Lily Bee Happily Lost Hammock, Daily Junque Tabs; Girls’ Paperie Jubilee Sticker Market; Daily Junque Ephemera

These photos are from the Spring 2011 school pics but they are not the yearbook pics. They are the "Lifetouch" photos that every school seems to do so I feel compelled to buy them and scrap them every year. The lift I was given to do this month for Scrapbook Circle was PERFECT for these photos. I loved the design so I kept the lift pretty true to the original. Here's the original lift. Thanks for the inspiration, Sara!