Showing posts with label Bella Blvd. Show all posts

Thursday, March 24, 2016

Happy Easter

CHA 2016 Project 10 of 10

How adorable is this little squirrel?  My daughter saw her when I was looking through all the new collections and fell in love with her so I decided she'd be perfect for her Easter card.


To create this, I used the Invisibles Fresh Air to create a sky background.  I added a green grass border from the sticker sheet and then created a little scene with the tree (where the squirrel lives), the Easter basket sentiment and then the cute little squirrel.  I can't wait to give this to her!

Supplies: Invisibles: Fresh Air; Sweet Sweet Spring: Treasures & Text 12x12 Stickers, Paper Pieces Die Cuts; Enamel Dots: Ice, Milk White, Guacamole

Wednesday, March 16, 2016

Sweet Baby Girl | Silhouette CAMEO Die Cut Tutorial

I wanted to document how precious the little moments are with children.  Here, my daughter is enjoying playing with a pine needle. My daughter is 7 now but I stumbled across this photo as I was looking for something to create with the new Bella Blvd. Baby Girl collection and found this gem.


I had completely forgotten how something so simple was so interesting to my daughter.  I knew when I spotted it that I needed to document it.  Since this photo was outdoors and she was wearing a cute little polka dot floral outfit, I decided to cut flowers using my Silhouette.


I backed each of the flowers with a coordinating paper, which at initial thought sounded like a bad idea but I used a function in the Silhouette software to make it easy peasy.  I included a tutorial about how I did this below.


Once I had my flowers, I arranged them in two opposite corners, leaving plenty of space for my photo and title.  The journaling will go right under the photo. The other corners were feeling a bit bare so I added a few borders and stickers to balance it out.


Supplies: Bella Blvd. Baby Girl collection: Pretty as a Posie, Sweet Safari, Just a Wink, She Stole My Heart, Mrs. Teddy 12x12 papers, Ciao Chip Icons, Treasures & Text; Ciao Chip: Whatnots; Amorie Alphas: Guacamole, Peep; Enamel Dots: Guacamole, Milk White; Enamel DooDads: Punch; Illustrated Faith Cute Clips: Adam's Mix

Thursday, March 10, 2016

Go. See. Do.


I was asked to create a project using the Bella Bows. I decided to embrace the bows by creating cut files similar to the Bella Bows. You can DOWNLOAD the CUT FILE HERE for free. I repeated the bow pattern, mixing Bella Bows with bows cut from the cardstock background and backed with various pattern papers. Repeating a pattern multiple times adds a sense of whole while allowing you to create a relatively fast project that is visually appealing.


Supplies:
Let's Go: Perfect Weather, Air Traffic Control, Go See Do, Baggage Claim, Tourist Spot, Taxi, Paper Pieces, Chipboard Icons, Treasures & Text; Color Chaos: Scallop Strandz; Ciao Chip Elements: Hearts & Stars

Thursday, February 25, 2016

Be-ing You-rself

The design of my layout was literally inspired by the food my daughter was eating in this photo.  I just snapped this every day moment while we were enjoying a beautiful day on the patio of a nearby restaurant.  I love how this just shows her sweet-little-happy personality.

I just snapped this every day moment while we were enjoying a beautiful day on the patio of a nearby restaurant.

I decided to create 2 sets of tulips in a quilt type design, which I created in Silhouette by mixing triangles with different size squares.

Download the Quilted Tulip Silhouette cut file.


 I laid the tulips out in a symmetrical format but you could use them in so many fun ways on a layout. The photo is slightly larger so that once layered, it overlaps all the tulips, leaving just enough space on the sides for a long title and an area below for journaling. For my title, I chose to highlight specific words within words to add a little more fun to the page. It also serves as an underlying message to my daughter.

Supplies: Bella Blvd. Sweet Sweet Spring: Her Bunny Hop, To Dye For, Paper Pieces; Let's Go: Taxi; Color Chaos: Words of Wisdom; Just Add Color: Treasures & Text, Trinkets B & W; Invisibles: Amore; IF Whatever is Lovely: Treasures & Text; Tiny Text: Bold & Beautiful, Wild Berries, White, Black; Ciao Chip Elements: Flowers & Clouds, Hearts & Stars; Enamel Dots: Punch

Friday, February 12, 2016

DIY Valentine Canvas Decor

I wanted to create something fun-loving and festive for our entryway for Valentine's Day.  I was strolling through the craft supply store looking for items to make a different project when I stumbled across some canvases and that's when inspiration hit me.  It wasn't anything specific that hit me, it was really a rack of small canvases that caught my attention.


How to: I originally planned to paint the horizontal lines on the canvas and as fun as that would be, I changed my mind at the last minute and decided to use pattern paper.  I'm glad I did because I love the subtlety of the "love" words in the background.  I cut those in 1" strips and used mod podge to adhere them to the canvas.  Next, I cut 1" flowers from one sheet of ombre pattern paper. My original plan was to mix up the colored flowers throughout the heart but another last minute decision came along and I decided to arrange the flowers in the ombre design.  Lastly, I added white, pink, dark pink and red enamel dots to some of the flowers.


Supplies:Bella Blvd Valentina collection: See You Soon, Love 12x12 paper; Enamel Dots: Milk White, Cotton Candy, Punch, McIntosh

Saturday, February 6, 2016

Love mini Album {Clique Kits | Bella Blvd Blog Hop}

Hello everyone and welcome to my blog.  I'm so excited to share with you what I created for the Clique Kits | Bella Blvd Blog Hop.  The XOXO kit was packed full of fabulous items from the Bella Blvd Valentina collection, Crate Paper Hello Love, Clique Kits exclusives and more....

I created this mini album for my love. I still need to add photos but here's how it looks for the time being.


This entire album was inspired by the vellum pockets that was used as packaging for some of the embellishments.  I added some sequins from the kit and then sealed the edge so that they would not escape. 


I created the inside pages using several sheets of pattern paper that I cut down to approximately 5.25" h x 7"w. Once I had all the papers cut, I stitched them and the envelop together by sewing right down the middle.


As you can see, I have lots of space for love notes and photos.  After all was complete on the inside, I decorated the outside.


The first thing I did for the cover was adhere the ribbon around the front and back, leaving plenty of room to tie it closed on the side. Oh and like I said earlier, I added sequins to the inside of the cover and sealed the edges. I even added some dabs of glue inside the envelope for a few of the sequins to stick to so some stay where they are and some move around.  Then I added the gold foil doily heart and sentiments.

Make sure to follow me if you are on Instagram (@heatherleopard). I have several giveaways planned this year (with one coming up this next week).

Now, head over to Candice's blog for more fabulous inspiration.

Make sure to participate in the entire blog hop for a chance to with a XOXO kit. from Clique Kits.

Full blog hop list: Clique Kits | Becki Adams | Maryam Perez | Jennifer Chapin | Nicole Martel | Me! |  Candace Perkins | Corri Garza | Bella Blvd


Tuesday, January 26, 2016

Bushel and a Peck...

CHA 2016 Project 8 of 10


This is one of my favorite layouts that I created for CHA. I'm so excited to share it with you today!


What's black and white with pops of color all over?  This layout, that's what!  While I love the shapes of the Invisibles and how they can really dress up a project with the fun scallops, I focused more showing you how I've used it for the sole purpose as a fun see though pattern on your layout.


To create this layout, I thought about my title and photo first and determined how much space I would need to a long title with some larger alphas wrapped around each of the circles. I also had to take into account that I would need to trim the white background around the edges so it would fit inside the black and white pattern paper border. Once I had those measurements, I cut three different sized circles using my die cut machine and then stitched the Invisibles to the back of the cuts. The title is a combo of Tiny Text alphas, letters from the chipboard icons and sticker alphas.  By mixing my alphas, I was able to fit a rather long quote on the page without overwhelming the layout and it really added some nice variety to make it more pleasing to the eye.  One thing I love so much about the Tiny Text Alphas is that you can add a longer title, you can add a sub-title or you can even use it in your journaling.


Supplies: Invisibles: Amorie, Click!, Click!, Chit Chat; Let's Go! collection: Tourist Spot, Perfect Weather, Borders 12x12 Papers, Treasures & Text, Paper Pieces, Chipboard Icons; Tiny Text Alphabet Stickers: Black; Amorie Alphabet Chipboard: Blueberry; Bella Bows: Blueberry; Enamel Dots: Blueberry, Milk White, Ice, Oreo Black; Enamel DooDads: McIntosh, Ice

Monday, January 25, 2016

Life's One Big Adventure

CHA 2016 Project 7 of 10

Life is most definitely one big adventure. My girls have been begging for a road trip, so against my better judgement (I'm kidding), we are planning for Spring Break in March. I'm going to give them this card to surprise them with the details of the when and where.


No matter the occasion, this card can be used for practically any reason. To create this, grab two of your favorite Clear Cuts chevron sheets and arrange them so that they fit perfectly between the open spaces of each other, leaving the slightest white border between the lines.  Tie some twine around the suitcases at the top of the card and then add your banner and embellishments. Simple as that and you are ready for your next big adventure.

Supplies: Clear Cuts Chevies - Pickle Juice and Blueberry; Let's Go! collection: Paper Pieces, Pumpkin Spice Cute Clips, Borders 12x12 Paper

Sunday, January 24, 2016

Bee Happy!

CHA 2016 Project 6 of 10

I absolutely love the buzzing bees in this Spring collection.  While I stay clear of them in real life, I think I used every one of them up from this collection in various projects.


This entire design was inspired by the single die cut.  I love the sentiment and as I was laying it out, I knew I wanted to portray the bees buzzing around the card.  The rest of the design was a combo on borders to bring it all together.  I hope to brighten someone's days soon with this card.

Supplies: Sweet Sweet Spring:  Borders, Daily Details 12x12 papers, Paper Pieces Die Cuts; Bella Bows: Saltwater

Saturday, January 23, 2016

Adventure Awaits

CHA 2016 Project 5 of 10

I'm posting this lovely card today on PURPOSE! Not only am I excited for all the adventures 2016 will bring for us as a family but I'm especially excited about some personal adventures I am undertaking and since it's my birthday, I thought it was fitting to share some thoughts on why this year will be different.  I'm making goals, writing them down and creating action plans for how to achieve them.  I usually make wishes each year and this year I am making ACTION! I'm talking about scrappy gals, family goals, etc., etc. I'm hoping this year is our best adventure yet!


When I created this card in December for the Bella Blvd booth at CHA, I didn't necessarily have 2016 goals on my mind.  I was more travel focused, just coming off 5 weeks of travel across Europe and America.

The new Let's Go collection will definitely give you a case of wanderlust but as I look back at this card, it's perfect for a variety of topics - graduation, birthday, wedding, GOALS, you name it.  To create this card, I used the traffic control paper for the background, anchoring the top and bottom with borders. I attached the globe to the background and then popped the plane above using foam dots. I added a green heart on the map and added a bow at the top to pull it all together.

Supplies: Let's Go! collection: Air Traffic Control, Treasures & Text, Paper Pieces; Enamel DooDads: Guacamole; Bella Bows: Blueberry

Friday, January 22, 2016

Adorable, lovely, fabulous family!

CHA 2016 Project 4 of 10: Continuing with the Bella Blvd CHA blitz, here's a layout I created to feature the new Chip Scripts + the Sweet, Sweet Spring collection.


The Chip Scripts are one of my favorite new additions to the Bella Blvd product line-up.  I LOVE that they can be stamped, inked, doodled on, you name it.


I toyed around with altering them for today's feature but I really liked the contrast of the white on this background I created so I kept them as-is.  I have a few ideas of fun things to do with them so stay tuned for that in the very near future.  I created this background by simply doing some funky, offset cuts and layering each row over the other and then stitching the seam to give it a finishing touch. Then I determined what words to use and where to place them. I waited to print my photos until that step was complete.  Once I knew that, I knew what size photos I could use. I framed them up and added embellishment clusters to complete the page.  I will add my journaling to the bottom right under the photo.


Supplies: Sweet Sweet Spring: Bloomin' Beauties, Her Bunny Hop, Easy Breezy, Borders, 12x12 papers, Treasures & Text 12x12 Stickers, Chipboard Icons, Paper Pieces Die Cuts; Ciao Chip Scripts: Hello There, So In Love, Family
Enamel Dots: Ice, Guacamole; Bella Bows: Blueberry

Thursday, January 21, 2016

She is fierce!

CHA 2016 Project 3 of 10: Today, I'm featuring the layout in the upper left hand frame in the photo below.


As a scrapper who's style is to create fun backgrounds, usually with large shapes, I super love the Tiny Text alphas from Bella Blvd.  They were perfect for documenting my littlest daughter, who at age one was already showing her fierce and sassy side - mostly around fashion with strong opinions on clothes, shoes, accessories.  We knew we were in trouble from the start but we LOVE it!


They make it easy to use a quote for a title, as I did here, wrapping around the outside of my design. These are becoming a fast favorite, go to necessity for my scrapping.  The possibilities are endless! 

To create this layout, cut 2x2 squares out of paper and then cut them on a diagonal to create triangles.  You can also cut the squares or triangles on your die cut machine.  Next, arrange the triangles in the shape of a heart and stitch over them to secure them to the background.  Stitch around the perimeter of the heart as well.  Add your title, photo, journaling and embellishments.  

Supplies: Tiny Text alphabets: Fruit Punch, Pretty Boy; Sweet Baby Girl collection: Stole My Heart, Mrs Teddy, Pretty as a Posie, Daily Details 12x12 Papers, Treasures & Text Stickers; Cute Clips: Baby Girl - Mini Bows; Bella Bows: Bell Pepper; Enamel Dots: Cotton Candy, Ice, Guacamole, Bell Pepper; DooDads: Guacamole

Wednesday, January 20, 2016

Love, love, love you!

CHA 2016 Project 2 of 10

Have I told you how much I "love" the new Bella Blvd Chip Script words?  I love, love, love, love, love them!  I used them to create this layout for the Bella Blvd booth at CHA 2016.


As I was looking through the various packages of words, I noticed a common words that was on so many of them.  I popped those babies out and turned them in to one looooong title for this layout.  I used a paper from the new baby boy collection as my background but since I was doing a layout about my baby girl, I sprinkled in some other collections.  I love how you can mix and match these collections so well.


To create the title, I pulled out as many words as I could using the Chip Scripts to create the phrase.  Then I added a little punch to it by adding in the blue chipboard alphas.  I ended up removing one of the white "love" words and replacing it with a blue one to help tie the title all together. The title takes up a little more than half the page so I added my photo and kept the embellishments to a minimum.


For the enamel stars, I didn't randomly sprinkle those on the page.  There are some green stars printed on the paper so since I wasn't using green in my layout, I covered those up with the blue stars.  Oh and I added a pink enamel dot to the moon to pull in the pink that I have sprinkled around the page. Now it has rosy cheeks instead of blue.

Supplies: Bella Blvd Cute Baby Boy collection: Barely a Wink, Daily Details, Treasures & Text Stickers; Sweet Baby Girl collection: Treasures & Text Stickers; Sweet, Sweet Spring collection: Borders; Cute Clips: Baby Girl - Mini Bows; Enamel DooDads: Ice; Enamel Dots: Cotton Candy; Bella Bows: Cotton Candy

Tuesday, January 19, 2016

I'd Travel the World with You

I'm back from CHA and had an absolute blast.  More on that to come later.  Today, I wanted to kick off a week (or more) of the projects I did for CHA.  I was primarily in the Bella Blvd booth with 10 projects, split among layouts and cards.  I also had a layout in the American Crafts booth but that's also a "more to come on that" situation.

CHA 2016 Project 1 of 10

Here's a snapshot of a few of my booth projects.  I was honored to have 3 out of 4 framed front and center in the booth.
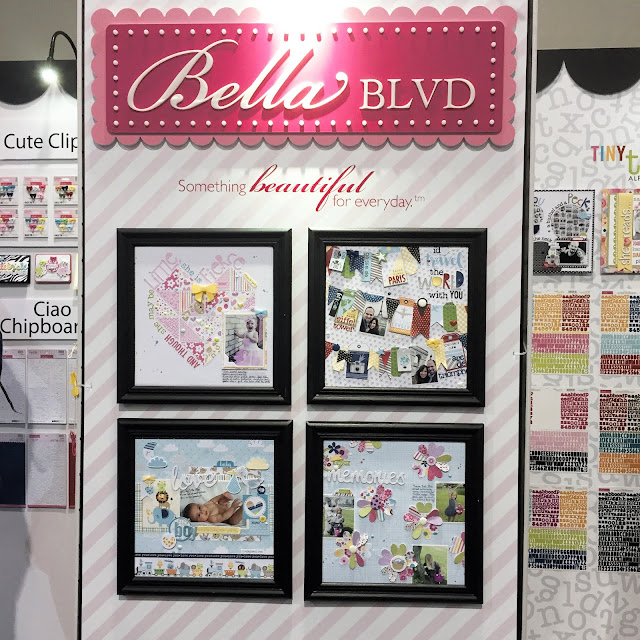
Look at that adorable baby boy layout on the bottom left. I'm not sure who designed that but I love it.  The two on the top and the one on the bottom right are my projects. And there's another one peeking out in the upper right corner.

So let's kick this off with a travel layout.  My signature style is all about playing with patterns and creating fun backgrounds and this one is no exception.  Take a look...


I was inspired to create this page by the Baggage Claim pattern paper with all the tags. I cut some out, combined them with the tickets from the Paper Pieces and started laying them out on the page.


Before I knew it I had hand cut flags, banners, tickets and more and arranged them back and forth across the page. I simply layered them over each other, added my photos as part of the banner and stitched them to the page.


One of my favorite parts of this layout is that I was able to document the location and sights we saw using the new tiny alphas, and I was able to fit them on the tags. I plan to add journaling on the red tag there in the middle. The dots will make perfect lines for guides.

Supplies: Let's Go: Air Traffic Control, Baggage Claim, Borders Papers, Treasures & Text, Paper Pieces; Cute Clips: Pumpkin Spice; Enamel Dots: Blueberry, Milk White; Enamel DooDads: McIntosh; Tiny Text Alpha Stickers: Black

Monday, December 21, 2015

Strawberry Fields Forever

What the WHAT??? I did a 2 page layout.  I seriously cannot remember the last time I did one of these.  There's something about them that makes me all cray-cray so I just stay away from them.  That is until I am asked to do one.

My go-to technique for 2 pagers is to use a grid so can you guess what I defaulted to?


One thing I do love about 2 pagers is that you can include tons and tons of photos.  I think the most I squeezed in one time was 12, maybe 14. I can't quite recall but it was a lot.  I selected 5 photos for today's project.

I also like to use two different but somewhat similar backgrounds for each side of the page.  I'm all for things looking uniform but not exact so this suits my needs.


I love to use song titles or lyrics on my layouts and this favorite from The Beatles hit the spot. The song was the first track recorded during the sessions for the Beatles' Sgt. Pepper's Lonely Hearts Club Band (1967), and was intended for inclusion on the album. Instead, with the group under record-company pressure to release a single, it was issued in February 1967 as a double A-side with "Penny Lane". The combination reached number two in the United Kingdom, breaking the band's four-year run of chart-topping singles there, while "Strawberry Fields Forever" peaked at number eight on the Billboard Hot 100 in America. Source


Thursday, December 17, 2015

DIY Star Garland

I love adding a personal touch to my holiday decor so when I started working on my mantle for the holidays, I decided to create some garland, on the cheap.


My trusty little assistant was more than happy to help me out with it too. BONUS: we even enjoyed a little walk together to collect a few sticks for the project.


How to: collect a few twigs  with enough to create at least 5 sets of stars.  Look for enough branches that have enough same size bits so that you can keep your stars in proportion.  Create your stars by laying them out on the table. Once you like their shape, you are ready to adhere them together.  I suggest you glue them together with hot glue.  If you don't have hot glue you can use double sided tape, which is what I did.  Cut strips of paper and adhere double sided tape to the back of them. Wrap each corner of the star nice and tight.  Once they are complete string them on some twine or jute. Add Bella Bows and other fun items to the garland to finish it off.


String the garland over a door, a wreath, a picture frame, your mantle or whatever looks nice!

Supplies: Bella Blvd Make It Merry collection and Bella Bows.