Showing posts with label Fancy Pants. Show all posts

Friday, July 8, 2016

Me, Myself & I

I am thrilled to be returning to the JustNick Studio design team.  I absolutely LOVE working with Nicole's cut files.


I love using quilt-inspired designs on my projects so my first instinct when I saw the new July files was to use the Quilted Background.  I used the Gossamer Blue July Main Kit, which is available NOW with tons of amazing add-ons.


This layout you see here was not my original plan.  Let me walk you through the thought process of how one thing led to another...


I decided that I wanted to use the file to piece together a background, instead of cutting it out of one piece and using it as an overlay so I cut 4"x4" squares and placed them next to each other across and down the CAMEO mat.  I cut each piece out and as I was pulling it all off the mat, I was really digging the leftover 4"x4" pieces so, onto the paper they went. I kept the other pieces and I am sure you'll be seeing them on another layout VERY soon.


Next, I laid the squares down, overlapping each other and angled just a bit.  The rest was easy - I added some layers behind and above my photo, added embellishments and mist splatters and then added my title.

Thursday, June 9, 2016

Dare to Dream

Hello everyone.  Oh how I am loving the Gossamer Blue June kit and add-ons.  It's jammed packed with fun summery collections.  I was drawn to the feathers in the Fancy Pants goodies included in the kit and so I thought, why not create a fun dreamcater?!?!  Then, Nicole from JustNick challenged a few of us to use 4 or more cut files for our project.  She makes that easy peasy with her amazing designs. This is where Gossamer Blue and Just Nick Studios come together to make one!


Cut Files used: Dreamcatcher 1PolaroidsShattered AlphaScript FontSweater Weather

How to: Use the Dreamcatcher 1 file as a guide to create a stitching path. Stitch the Dreamcatcher with embroidery floss.  Add stitched lines for the hanging feathers. Add splatters of color to the inside of the dream catcher as well as below with the feathers. Cut feathers and adhere to the page. Create the title using a combination of the Script Font and Shattered Alpha font. I welded the script font together. After I cur the word "DREAM" from the shattered alpha cut file, I ungrouped and deleted the shattered parts. Then I used the internal offset option to cut the perfect fit for the shattered alpha letters and adhered them to the back. Cut a polaroid frame. Add layers and your photo and done.  I'll be adding journaling under the photo.


Friday, January 15, 2016

Happy New Year

It's still considered appropriate to wish you all a Happy New Year right??? And it's perfectly normal to scrap last year's New Year's photo, right???


So here we are for the first design team blog hop of the year and I'm wishing you a Happy, happy new year with this layout of my youngest enjoying some New Year's Eve festivities.


A little stitching here, big title there and a super cute little girl ringing in the New Year!


So that's it for me today.  Make sure to check out the Gossamer Blue designer and member gallery for more inspiration.  And...join our blog hop to see some amazing projects from the GB design team.

Head over to the super talented Jill Keller's blog now.

Thursday, July 11, 2013

Tiny Dancer

My youngest daughter was recently in a dance recital. I took so many photos but this one stood out to me. I snapped this photo of her backstage after she put on her costume. She was sitting there looking so sweet and excited to perform. She wasn't nervous at all.


I used the Scrapbook Circle  July "Let's Chat" kit, which is full of Crate Paper, Fancy Pants, Jillibean Soup and Scrapbook Circle EXCLUSIVES, like stickers, tags and more! I got the add-on too  'cause I just had to have the 6x6 paper pad, flair and mask. Check out  preview of the kit below and go scoop one up before they are gone!
Isn't she just so cute? Yes, I know I am biased! I pulled the title from a song again and layered paper, tags, stickers and more. I did add some black glitter paper that my friend gave me so it's not in the kit but I just had to use it!
I cut strips to journal on and faux stitched around one of the layers. Lots of foam dots and stickers and borders here.

Thanks for stopping by today. Don't forget to head over to Scrapbook Circle to get more info on this kit and check out the Idea Gallery to see what the design team has created with it. It is soo fun to create with!

Friday, December 23, 2011

2011 December Daily & LYB News

I am so excited to say that I made the Little Yellow Bicycle "Paradise" Cycling Team.  I cannot wait to create with their new Winter CHA "Paradise" collection in January.  See the announcement and who else made the team on the Little Yellow Bicycle blog.

I'd also like to show you some of my December Daily mini album.  This is the first year I participated and it won't be the last.  I created it with my Birds of a Feather December kit, which included the album and lots of Fancy Pants & Lily Bee papers and embellies.

Note: the pages do not have dates, photos or all of the embellies on them.  I have taken lots of photos each day so I decided my post-Christmas task will be to go through them all and add them to the album after Christmas, adding additional pages as necessary.

Cover - I painted it red and misted over it with Perfect Pearls Heirloom Gold mist. Once dry, I heat embossed with CTMH Olive Green embossing powder. I put it on heavy because I wanted it looking distressed (aka lumpy). I outlined the numbers with a black sharpie.

The Insides - I kept the photos small since there's so many. Click to enlarge.
There's always a to-do list for the holiday season...

 I'm planning to put a photo where the banner is missing in the photo below.
 
 I misted over a transparency in the photos above and below

 Used my Imaginisce i-top 2.0 and small brad daddies to create this Christmas tree on the tag
 A pocket and mini pages...
 I was going for presents under the tree here
 A little envelope...
 Mini pages and a giant tag


 The stockings were hung...
 The tag above is made from filter flowers that I ripped apart and adhered to glue on the back of a rolodex card.
 Finally, Christmas Day - presents and trees...

Thursday, October 20, 2011

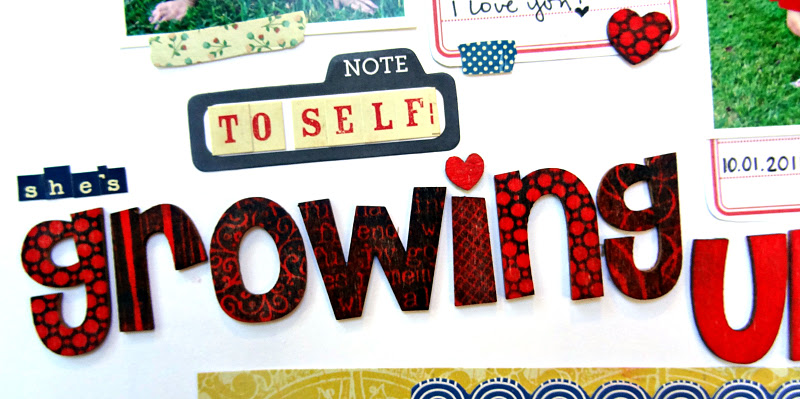
She's Growing Up Too Fast!

My oldest daughter turned 8 on October 1 and all I think about when I think of her age is how fast it's gone by.  Seriously, too fast. 

We took the family out for a birthday celebration and let her choose the restaurant.  If you know my daughter, you would understand how WONDERFUL it was that she wanted to get so dressed up, from the headband to the fancy shoes.  Then, she was willing to pose for these photos...AMAZING, trust me!

Supplies from Scrapbook Circle Fresh Picked October 2011 kit: Pebbles Fresh Goods Windows Display paper, Pebbles Fresh Goods Embossed Masking Tape Stickers, Crate Paper Textile 12X12 Random Collection Paper, Fancy Pants School Days No.2 Pencils paper, Studio Calico Scrap Pad, Pink Paislee Sawdust Wood Alphabet, Girls' Paperie Tiny Alphas Tinsel, .05 black pen, Glue Arts Glue Glider Pro, Close to My Heart Red Ink


I created this layout with the Scrapbook Circle Fresh Picked October 2011 kit and this week's Sketchy Thursdays sketch.  This layout was a total breeze to pull together. I mean, I had to put some thought into the photos and sizes and do some fussy cutting and place everything "just so" so it still took me a while but not as long as usual.

The alphas are actually wooden alphas that I inked red and then stamped over in blue, using different stamp designs.  I love how they turned out.

What I don't love is how messy they made my layout, AFTER I ADHERED EVERYTHING TO THE PAGE! You see, after I glued everything down I wrote all my journaling.  When I was done, I looked at my layout and this is what I saw:
[insert GASP! here]  I looked around my page and as suspected, there were red and blue random smudges here and there.  I looked at my arm and yep, my palm and arm were covered in ink. I washed it off again and again and again. 

I debated on adding "artistic" smudges to the rest of the layout but it wasn't going to work and wasn't the look I wanted so I resigned myself to start over. FUN...NOT! Most of it came off the page easily, except the border at the top that ripped and the alphas and hearts that I glued with super ultra bond glue.  Can you hear my sarcasm as you read this?


Yay for me (again, sarcasm)! This is what I get for scrapping under the influence (of seasonal allergies) and being impatient waiting for the ink to dry. Luckily, I was able to salvage it but like I said, I did have to re-work the whole thing. Oh and I looked at my arm again 4 hours later, and I found a distinct backwards "ro" that I missed in my initial scrub-down. And there's still traces of ink on my hand and fingertips too.  [ sigh ]
Thanks for looking today. Tell me I'm not the only one who has had to re-make a layout for one reason or another.

Now head over to Sketch Thursdays and play along with us! You could something great from Let's Capture Our Memories

Saturday, September 10, 2011

Meet the Teachers

I am so in love with the Scrapbook Circle "The Good Life" kit this month!  It's full of Amy Tangerine, Fancy Pants, Crate Paper...yummy!

Today, I'm sharing a layout of my daughter's Meet the Teacher day for 2nd grade. By now, you probably know that my style usually includes lots of layers but I went a little "clean and simple" (actually not so simple) with this one because I knew I would need a lot of room to journal about her two teachers plus how we were all feeling that day. I soon realized it would be best to hide the journaling. Take a look...


I actually journalled in three spots here on the page. The first is the little sticker tab that says No. 1. That sticker was chosen because that is my daughter's main homeroom teacher and it's affixed to cardstock that has the teacher name and bio on it. The 2nd hidden journalling is under the "Hello my story is" sticker which is is also affixed to cardstock and has teacher #2 on it. They just slide right out from behind the photos.

The last bit of hidden journaling is on the library index card peeking out on the upper left hand side and that includes our personal thoughts on 2nd grade.

I'm really pleased that I was able to fit paragraphs about each teacher so that we can look back YEARS later and know a little bit more about the teachers we had and how excited Rheagan was to start 2nd grade.

Here's the sketch I made.  I will be posting them to the Sketches page, which can also be found by clicking on the "Sketches" tab at the top of my blog.

Thanks for stopping by today!

Monday, September 5, 2011

Two Reveals. One Day. Jet Plane. 2nd Day of 2nd Grade.

I have two reveals for you on the same day and I decided to combine them into one.  I am sooo excited for both of these.

REVEAL #1 - Have you seen the new Scrapbook Circle "The Good Life" kit for September? It is TDF cute with all sorts of Amy Tangerine and Crate Paper goodies in it.  I can already tell I am going to use every last little bit of it.  Here's the 1st layout I did with it - I was also challenged to lift one of Scrapbook Circle's subscribers layout, which also happened to be based on a Sketchy Thursdays sketch that we revealed a couple of weeks ago. Too funny.  I just love it when I am IN LOVE with a layout and I really do want to marry this one; think my hubby will mind?
Supplies from Scrapbook Circle "The Good Life" September 2011 kit: American Crafts Amy Tangering "Work in Progress", "The Good Life", "Wanderlust", remarks, bits die-cut shapes (kit add on); Crate Paper Random Collection - phrase stickers; Fancy Pants Off to School ABC's; Maya Road canvas button. Not in kit: twine; Studio Calico Bonny Blue Mister Hueys Mist.

Here's the lift my layout was based on. Isn't it gorgeous? Thanks for the inspiration, Andrea!

Want a chance to be lifted and featured on the Scrapbook Circle blog? Link us to your layouts on the Scrapbook Circle Facebook page and we might just spot you!

And here's a sneak at the Scrapbook Circle "The Good Life" September 2011 kit.  The Amy Tangerine "bits" I included in my layout above are a kit add-on and trust me, you will want them!

REVEAL #2 - The September challenge over on the Imaginisce blog is a sketch challenge.  I decided to do a layout using their new Geek is Chic collection that's all about my daughter's 2nd Day of 2nd Grade!  I posted HERE a week or two ago for the Geek is Chic reveal party that I was going to do a sign every year on the day of the year she is going into so this is the 2nd day of 2nd grade, which is also the day she jumped off the bus BEAMING and holding something special in her hand - a treasure box holding the tooth she lost while at school! 

Here's the sketch.  Make sure to play along with us and post your entry (using at least 75% Imaginisce product) to the blog by September 25th for a chance to win a great prize package!

Tuesday, April 12, 2011

Little Bundle of Joy Card

What better way to celebrate the birth of a new collection than to throw a party??? Imaginisce has released it's new line this week and it's called Little Cutie.  There's a boy version and a girl version of papers, stamps, die-cuts, stickers, chipboard elements and more.  It's seriously adorable.  Today, we are focusing on the little boy line. 

With a lot of fussy cutting and LOVE, I made this little card.
Supplies: Little Cutie Collection - Little Man paper, chipboard stickers; misc. baker's twine.

I had so much fun creating this card.  The sentiment is actually affixed to the inside of the card and shows throught the front through a window I cut out. I mentioned before that it includes lot of fussing cutting...all the little items hanging from the twine "clothesline", the scallops and the window were all cut by hand.  It's just what I do.  I had the white/chocolate twine and it just wasn't popping against the white background of the card so I misted it with some blue (Spring Rain) mist.

I lifted the items hanging from the clothesline with pop dots and hung a sock and bear over the sentiment window.  Then I curled up the scallops for dimension.

I can't wait to give this card away to someone special I am thinking of.

Of course, there's so much more you could do with this line other than baby so head over to the Imaginisce blog to see what the rest of the DT did PLUS, you have two chances to get your hands on your very own collection.

Thursday, February 10, 2011

ME & My Shadow

Can I just tell you how cute my little baby girl is??? She and I were waiting for her sister and daddy to ride Goofy's Barnstormer ride at Disney World last December and there was this cute little house/play area. She was walking all around and checking things out and I was just snapping pics of her being cute. I honestly can't remember registering in my mind that she was doing what she was doing.  It wasn't until earlier this week when I was looking at some other pics of her at Disney  at this same locale that I realized she was making hand puppets and playing with her shadow.  These pictures became instantly priceless and were perfect for this week's Sketchy Thursdays sketch. I used the January kit from Scrapbook Circle, which has the perfect paper combos for what I had planned. Check out how darling she is.

Supplies: Scrapbook Circle January kit - Fancy Pants Love Birds Collection: Strips, Circle of Love, Sending My Love, LB Element; Glitz Love Nest Demask; misc. embellishments. Non-Kit Items: Bazzill Basics Caribbean Breeze; Girls' Paperie on holiday labels; Cosmo Cricket Tiny Type Alphas; American Craft Thickers - Sprinkles & Vera Vinyl Letter Stickers

I had a hard time with the title because I wanted it to say Me and My Shadow. Then I wanted it to say Minnie and her shadow but it doesn't quite have the same ring as Me & My Shadow so I combined the two by using a large M and E and squeezing "inni" between the two. Then came the delimna of using "my" or "her". I ultimately went with "my" since the primary focus of the squeezed up "MinniE" reads like "ME" from a distance. I like my decision...what would you have done?


Make sure to check out what the other design team girls did with this week's Sketchy Thursdays sketch and play along for your chance to win a yummy package from Pink Ninja Addicts or for your chance to become the Sketchy Thursdays FAVE!