Showing posts with label Amy Tangerine. Show all posts

Wednesday, September 28, 2016

Happy Together + Cut File Tutorial

Hello everyone.  Heather Leopard is here today with a layout using the new Graphic Chevron Background 2.  I love a great background cut file and this one did not disappoint.


I modified this file just slightly by removing 5 of the graphic chevrons - 2 were completely removed and 3 were replaced with a cut out for the photos.


 To get the perfect fit, I printed my photos so that the parts I wanted would show through.  Then I placed them under the cardstock and moved them around until I liked where they were.  Then I placed the piece that was cut out over the photo.  Then...


I pulled the photo with the cut out piece and cut around it, leaving ~1/4" border to add my liquid adhesive. That allowed me to get the perfect placement.


I added pattern paper to the back side of the cardstock in a very random order, filling some diamond chevron shapes completely while leaving so many others blank. I added my photos as well before adhering it all to a 2nd white cardstock background. I added my title and just a few embellishments to complete the layout.


Get this cut file here - Graphic Chevron Background 2


Thursday, April 28, 2016

Dandelion Wishes

Happy Friday eve everyone. We recently experienced severe flooding in our area and thankfully even though our street flooded, we only had water coming up our driveway just a bit.  It was a little odd to see kayakers floating in front of my house (see photo at the bottom of this post.

We're still getting a lot of rain here and they say April showers bring May flowers so I though I'd put a little SPRING in your step (care of my Gossamer Blue April kit and add-ons)...

Once I selected the photos I wanted, I designed the rest of the layout around the title. Usually my title is one of the last things I think about but for this, it was the first.

I created the word "dandelion" in Silhouette Studio using a free font I downloaded from the Internet called Modesty. For the larger WISHES word, I used the Shattered Alpha cut file from Just Nick Studio and then backed it with coordinating papers.

With such a large, bold title, I decided to keep the rest of the layout a little more siple than I usually do, adding a few frames, rub-ons, chipboard and a little splatter mist.

Thanks for stopping by today. How do you feel about bold title?

Here's the photo I mentioned above. The flooding was much worse just down the street and sadly, many neighbors' houses were flooded. It came up REALLY fast. We were actually trapped in our neighborhood for a couple of days.  You can't see the sidewalk on this side of the street anymore but this kayaker didn't seem to mind one bit.

Tuesday, April 26, 2016

Smile

Hello friends.  For this month's Pattern Play on the Gossamer Blue blog I'm showing you how much fun it is to mix and match pattern papers from different collections to create a cool background.


How-to:

  • Cut paper in varying widths x 12" strips.  I used about 11 different patterns.  
  • Place the first strip at a diagonal as far down to the middle of the page as possible, making sure the paper touches the top right and left bottom of the page, flush to the edge.  
  • Place the next paper strip over that 1st layer, leaving some of the first layer exposed.  
  • Repeat until you get to the top corner.  
  • Add a corner piece to the top or just continue with the layers.
  • Repeat at the bottom of your page in the opposite corner.
  • Place pieces of ephemera, stickers, tags, etc in some of the layers.
  • Stitch each layer to the page. Use a variety of stitches for added interest.
  • Add your photo, title and journaling, along with any additional stickers, mist, etc.


Thanks for stopping by today.  Leave me a comment and let me know if this is something you would try.

Thursday, March 24, 2016

Diamond Girl

I'll be doing a Spring Break / snow skiing trip post soon but for the time being, this layout is a bit of a spoiler but Y'ALL we did something we didn't think we'd get to do as a family for a long time and not only did we do it but we excelled at it.  Stay tuned for more on that but until then here's a spoiler alert...


My girl did BLACK DIAMOND ski runs.  She had an Adaptive Sports Coach, Ty Bonnell, who was Ah-mazing and now considered a part of our family. I'll get to the details on that separately.  But on day 6, he led her down a Black with all of us there watching and skiing with her.  We snapped this photo of them pointing to "Caliente" right before we went down.


How to:  Cut diamonds from a piece of cardstock.  I used the Diamonds Forever cut file from the Just Nick store. Save one of the diamonds you cut out to use as a template for cutting the pattern papers.  Adhere some papers directly to the back and adhere others using foam squares. I used a lined pattern in one of the squares for journaling. Once complete, hand stitch around a select few of the diamonds. Then add layers under and over your photo.  I chose a frame and a speech bubble to highlight specific things in my photo.  Lastly, add a fun title and scatter embellishments.   I chose clear crystals and gold enamel dots to look like falling snow.


Tuesday, August 18, 2015

Summer Mini Album and Free Download

Summertime is so fun here in the Leopard house. It's filled with swimming, camps, trips, reading and a ton of fun so I thought it'd be great to make a mini album to document the highlights and tell our stories. I'm offering a free download to recreate one for your summer adventures.


How to:

Step 1: I created this 4" x 6" mini album with the help of my Silhouette software and CAMEO. You can DOWNLOAD the cut file HERE. Cut your cover out of pattern paper and set aside.


Step 2: Cut 3 - 4 pieces of pattern paper for the inside pages of the book.  This is included in the cut file so it's all pre-measured. Stack them on top of each other, making sure the patterns are in the right directions. Upside down hearts are cute and all but I prefer mine right side up.


Step 3: Stitch the cover to the inside pages. Again, make sure the cover and pages are all in the same direction.  Add a strip of paper to the cover if you prefer.


Step 4: Embellish the inside with sentiments, frames, accordion pull-outs so you can include many photos on one small page, etc.

Supplies: Rise & Shine collection: (370000) – Rachel Paper, (370002) – Kylie Paper, (370008) – Stella Paper, (370011) – Lucy Paper, (370017) – Samantha Paper, (370038) – Bits Die Cut Cardstock Shapes, (370032) – Remarks Accent & Phrase Stickers, (370034) – Remarks Epoxy Stickers, (370035) – Remarks Alpha Stickers, (370045) – Ticket Memo Pad, (370054) – Chipboard Frames

Thursday, April 16, 2015

You Make Me Happy Card

It's pastel week on the American Crafts blog and I was asked to create a card.  I thought it only fitting to use the new embossing folders to create my card background and add a bit of watercolor to attain that dreamy effect.  


How to: 
  • Cut a card base so that it measures 4"w x 6"h when folded in half.  
  • Unfold it and insert the front of the card into the embossing folder.  
  • Run it through your embossing / manual die cut machine. 
  • Next, take out 3 different colors of mists and add a little bit of water to them to help achieve a more muted and pastel water color look.  
  • Choose random sections of the embossed background and start painting them in.  
  • Once you like the pattern, apply a sentiment to the top and any extra embellishments you desire. 
Supplies: Textured Cardstock (AM710-81) 12"X12" White, Rise & Shine collection: (370053) – Ava Embossing Folder, (370038) – Bits Die Cut Cardstock Shapes, (370034) – Remarks Epoxy Stickers, Heidi Swapp Color Shine: (HS01082) - Blush, (HS01080) - Seafoam, (HS00799) - Mine Green, Mister Hueys Color Mists (331047) - Taxi

Saturday, March 28, 2015

Happy Goofballs

Thickers may just be my favorite American Crafts products ever but super-sized giant Thickers blow my mind! I created this layout with Thickers taking a predominant place on the page.

 How to:
  • Cut the transparent doilies from the transparent sheet and arrange on your background paper, without adhering.
  • Using your Silhouette, measure the placement of your doilies and cut circles out of a white piece of cardstock.
  • Layer the cardstock with cut out circles over a white sheet of cardstock and adhere the doilies within the circles. 
  • Stitch around the outside of the circles.
  • Add a fun border to the top and bottom of the page.
  • Add your photo and a super-sized title using the large Thickers. 
  • Machine stitch additional elements to your heart’s desire.

I used Gesso and some glitter to give the Thickers even more dimension. 


 Supplies: Rootbeer Float Thickers (370554) – chipboard letter stickers, Rise & Shine collection: (370001) – Chloe Paper, (370015) – Lana Paper, (370018) – Sophia Transparent Paper, (370032) – Remarks Accent & Phrase Stickers, (370035) – Remarks Alpha Stickers, (370038) – Bits Die Cut Cardstock Shapes, (370045) – Ticket Memo Pad, (370054) – Chipboard Frames, (370038) – Bits Die Cut Cardstock Shapes, white cardstock, (370050) – Kara Rotary Phrase stamp

Friday, January 23, 2015

Lucky in Love

I love to repeat patterns so when I saw the dies in the new Amy Tangerine STITCHED collection, I was soo excited.  I usually repeat shapes but the word "Lucky" resonated, especially after a recent trip to Paris with my love.

How to:  Cut 12 "lucky" words out of various pattern papers, using your metal die and manual die cut machine.  Next, add water color to the background paper where you will be placing the words to make the words pop.  I chose to use a lighter shade of the color of the cut out word.  Once dry, adhere the words over the colored areas. Stich over, around, under and over the words. Add a complimentary pattern paper to the bottom 1/4 of the page for your photo, title and journaling.  I used the metal die frame for my title's background. I also cut a heart and the word "LOVE" using the metal dies and used them as embellishments in the upper portion of the page.  Add additional embellishments to bring the page together.


Supplies: Amy Tangerine STITCHED - (368948) - Thrifted paper, Serendipity collection: (369182) – Hello Honey Paper Paper, (369183) – Lucky Stars Paper, (369184) – XOXO Paper, (369185) – Hello Beautiful Paper, (369186) – Summer Breeze Paper, (369187) – One Fine Day Paper, (369188) – Sugar Sugar Paper, (369189) – Lucky Love Paper, (369200) – Bright Blueberry Paper, (369201) – Love Letters Paper, (369207) – Printed Chipboard Letter Stickers Thickers, (369209) – Printed Foil Letter Stickers Thickers, (369215) – Enamel Dots, (369218) – Die Cut Cardstock Shapes

Monday, December 29, 2014

Day Dreamer

This little girl loves nature.  She especially loves picking flowers. I snapped a photo of her while we were taking a break from biking one day and it's one of my faves of her because she's just sitting and taking it all in.  I used the Gossamer Blue December Main kit to document this moment.


I loved this background paper by Any Tangerine for American Crafts and just knew it had to be used but I also knew I had to keep it simple so I just added a few circles behind, around and above the photo.


It came together super quick and it was soo easy that I feel like I cheated but I LOVE it!
Thanks for stopping by today.


Thursday, August 21, 2014

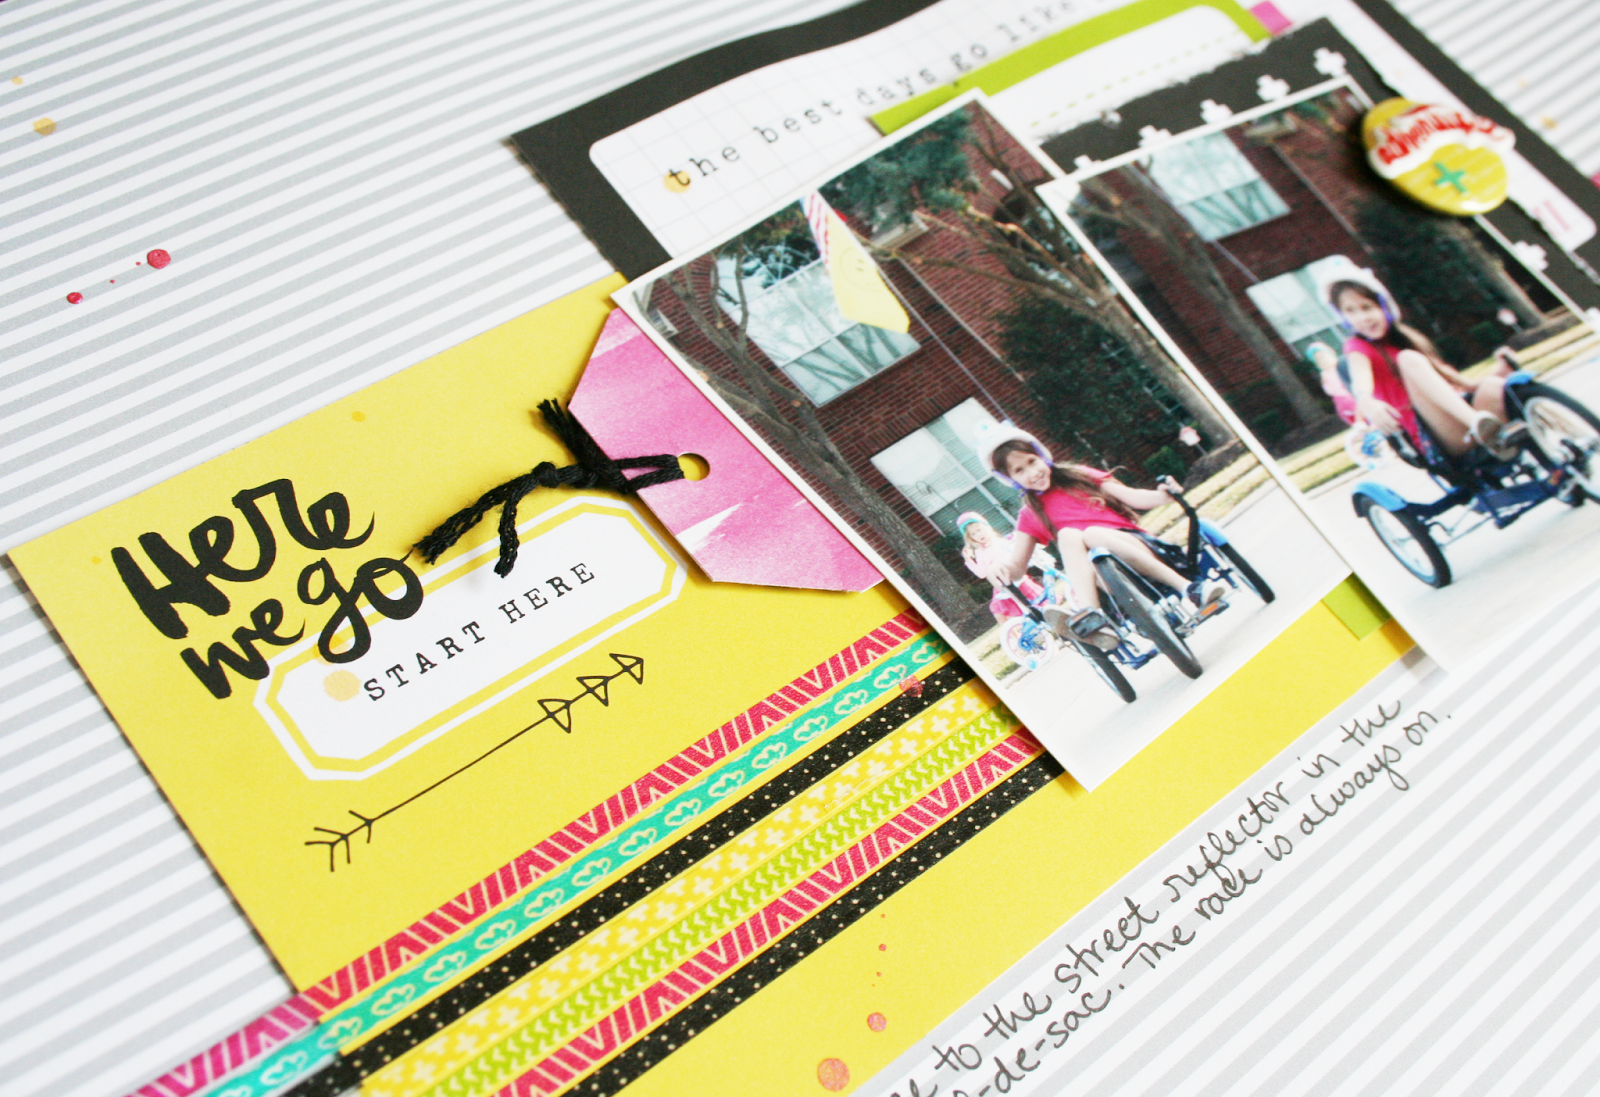
Here We Go

Happy #ThrowbackThursday

I'm back today with another sports-themed layout I created back in March. Biking is definitely a sport, just ask my dad, who entered his first race this past fall. He trains by biking 100's of miles each week. I think his PR is 58 miles. He rides a recumbent bike and that has worn off on my girls. He bought two for my daughter, who struggles on a regular bike but whips us all on her trike. And just recently, he won a $$$ recumbent in a Facebook contest so now she's really riding in style. Anyway, here she is riding her old trike around the cul-de-sac.

Supplies: Combo 12x12 paper (366804) – Amy Tangerine Plus One, Sidekick 12x12 paper (366813) – Amy Tangerine Plus One, Duet 12x12 paper (366817) – Amy Tangerine Plus One, Pair 12x12 paper (366821) – Amy Tangerine Plus One, Companion 12x12 paper (366824) – Amy Tangerine Plus One, Thickers Twins Foam Stickers (366837) – Amy Tangerine Plus One, Remarks Accent & Phrase Stickers (366840) – Amy Tangerine Plus One, Remarks Us Tiny Matte Puffy Accents (366842) – Amy Tangerine Plus One, Adhesive badges flair (366906) – Amy Tangerine Plus One, Teammate Icon Embroidery Stencil Kit (366848) – Amy Tangerine Plus One, Thread Kit / Spools (366864) – Amy Tangerine Plus One, Mixtape Washi Tape (366839) – Amy Tangerine Plus One, Studio Calico Mr Hueys Mist – Lemonade, Heidi Swapp Color Shine – Primrose

My girls like to race to the middle of the cul-de-sac, where there is a single little street reflector. That's the spot that they race to. You want to ride over it first. We have a ball doing this from the starting line, which is the division line between sections of concrete.


I used the tiny washi tape from the Amy Tangerine Plus One collection to create racing stripes across the page.

Still loving the brush script words and phrases. They make the perfect bold title for this page.

This is definitely one of my more simple page and sometimes it just makes sense to be that way.

Thursday, August 14, 2014

ACE | Sports Layout

The weeks are just blazing by these days. Between a MAJOR product launch I am leading at work, back to school coming up and enjoying the last bits of summer with the kids, I just don't like how fast it's moving. Then we have the girls' birthdays and then the holidays begin. What the what???

Anyway, it’s #ThrowbackThursday so as I mentioned last week, I’m here to share some layouts I created earlier this year that haven’t been featured on my blog yet. I should be all caught up in a couple of months. LOL

I created this sports themed layout for an American Crafts feature in April. When I think of the Day Dreamer and Plus One collections, “sporty” isn’t what first comes to mind but after looking at each of these collections a little closer, they actually worked perfectly for the sports photos I wanted to scrap.  

ACE


My daughter played volleyball with the Texas Tornados for about a year. We are soo proud of her for trying a team sport. She usually likes solo activities so this was a great thing for her.  They played in tournaments and even won 1st place. I got a few shots of this particular tourney and loved this photo of her. 


The girls do a lot of chants during the game so I thought it would be fun to feature one of their favorites as part of the title.


I simply cut the letters out on my Silhouette CAMEO and then stitched a huge ACE on the photo, using the Amy Tangerine stitch letter template.

I'll be back next week with another sports themed layout....

Love Notes 12x12 Paper (366764) – Dear Lizzy Day Dreamer, Companion 12x12 paper (366824) – Amy Tangerine Plus One, Counterpart 12x12 paper (366807) – Amy Tangerine Plus One, Date 12x12 paper (366811) – Amy Tangerine Plus One, Duet 12x12 paper (366817) – Amy Tangerine Plus One, Twosome 12x12 paper (366820) – Amy Tangerine Plus One

Tuesday, July 29, 2014

Love Birds "Relationship" Altered Project

I was asked to create a project for the American Crafts blog with a theme of "relationships". I thought it would be fun to create a shadow box with 2 love birds perched on a 3D tree. I created this to hang in my daughter's room, which has a playful woodland creatures theme but it would be a great gift for anyone in love.


This was fun to create so I thought I'd provide step x step instructions/how to:

Step 1: Using an electronic cutting machine, cut the bits to form your shadow box.

Step 2: Cut a tree limb and individual leaves and birds. Adhere them to the tree limbs, folding up the leaves so you get a 3D look. Determine where you will adhere the birds and then make holes to stitch a heart directly above them.
Step 3: Stitch your heart and then adhere your tree limb with birds to the background paper.

Step 4: Assemble the shadow box and add additional embellishments as you wish.

Supplies:
TEXTURED CARDSTOCK 12"X12" WHITE (AM710-81), SMOOTH CARDSTOCK 12"X12"KRAFT (AM71-464), Buddy 12x12 paper (366812) – Amy Tangerine Plus One, Skipping Along 12x12 Paper (366761) – Dear Lizzy Day Dreamer, Embroidery Stencil kit (366848) - Amy Tangerine, Thread Kit (366864) - Amy Tangerine

Monday, June 2, 2014

Color Splash & Dash

We did our first family color run in May, as part of a fundraiser for our local middle school that my daughters will eventually attend, if we don't move before then. Anywho, my mom joined us and we had a blast.  We started out in our white t-shirts (and the person we asked to take our photo cut off hubby's head in all the before photos. Sigh). Since it was a family kid dash, they only planned a 1 mile run but they let us go around until the colors ran out so Rheagan, daddy and I ended up getting 3 miles in. My mom stayed back with Reese because little bit was D.O.N.E. done.
Pictured: Rheagan, my awesome mom, me, Reese, my incredible hubby

And then we were off. I had a waterproof digital camera and took some really fun shots. I plan to create a coordinating Pocket Page so I can get more photos documented but for now, here's some favorites. I created this for a guest feature on Shimelle.com. Go check it out HERE.

I created this fun page by writing super-sized words in my CAMEO software and then adding paint splatters around the page. Like I said, I had more photos that I wanted to use but the page needed more balance of color so I added patterns behind some of the letters and then photos in the individual letters and one large photo for the word "DASH". At the end of the run, they gave us a ziploc of color for us to throw into the air. You can see my family in the left to middle of the "D".
I mixed phrases into one of the paint splatters and ampersand and then used water colorish patterns for the other paint splatters. And I used a die cut within a CAMEO cut for a sub title "This Messy Saturday".

I used the tiny mixed washi tape, which I love soo much to create journaling lines.

Now check out our After photo and a few other shots....


If you haven't done a color run yet, I highly suggest it. I really didn't know I was exercising and it was great family fun! We are already looking for another one we can do.

Wednesday, April 30, 2014

Darling Sisters with a Serious Bond

My girls can definitely bicker with each other, like I hear most siblings do but they also very much adore each other, as evident with this adorable photo of them holding hands.

I used the Amy Tangerine Plus One collection to document this moment.
I hand stitched sporadic arrows going down from the top and up from the bottom and along the pre-printed divide in the paper. I used two titles that could flow well together or be read separately and still make sense.
I added a little touch of fussy cut flowers here and there and left the embellishments to a minimum. The word "serious" used to say seriously so I just snipped the "ly" off to create my second title.

Thanks for stopping by today.  Make sure to check back on May 3rd, for National Scrapbook Day. The American Crafts Design Team has a fun day full of challenges planned for you!