Showing posts with label American Crafts. Show all posts

Tuesday, November 29, 2016

Cutest pumpkin and Free Silhouette pumpkin cut file

Hello my friends...While Halloween is all about dressing up and going out trick or treating, it's also about decorating pumpkins, whether carving or painting so I thought I'd do a layout about my daughter's Halloween party at school.  Sorry, no costumes allowed and by the way, where's the fun in that?

Anyway, today's tutorial is all about super sized die cuts. I'm sharing a few TRICKS as well as a TREAT with you today.  Keep reading for more details...


I was inspired by this cute photo of my daughter painting a pumpkin at her school last year. I decided I wanted to do a super sized pumpkin cut with fringe on the inside.  At first, I had planned to use varying colors of orange for the fringe but orange is a bit hard to find in this collection so I went back to the drawing board.  I put my thinking cap on and went ahead and cut the pumpkin out.

You can download my free Silhouette cut file HERE.

I kept both pieces and you should too if you plan to recreate this project.  Set them both aside.


As I was pondering, I realized I should mimic the colors my daughter was painting her pumpkin - blues, red, yellows, green, etc. so I set out to look for fun patterns in those colors.


Next I cut little slits about 1/4" to 1/2" apart on each strip and adhered one on top of the other use the cut out piece that I would typically throw away as the base.


Once all the layers have been added, trim around the pumpkin and lay the overlay on top.  Stitch it to the top for a pretty effect.


Pull up gently on the little strips to lift them up. You can simply lift them or roll them up over a thin pencil or like object to curl the edges.


Add a title around the top of the pumpkin.  This title is included in the free Silhouette cut file, which you can download HERE (https://app.box.com/s/hv6z56dau55dwn6omrkrl58ulqvjcj08) or you can create your own.


Add layers of pattern paper, die cuts and stickers over and under your photo. Adhere to the page using foam adhesive to lift it up.  You don't want to crush those lovely lifted strips.


To complete the layout, I added journaling below the photo and around the bottom of the pumpkin along with a smaller alpha to complete the title, even though the large title at the top works great if used alone.

Thanks for stopping by today.  Please share any projects you make using this free cut file in the comments below.

Wednesday, September 28, 2016

Happy Together + Cut File Tutorial

Hello everyone.  Heather Leopard is here today with a layout using the new Graphic Chevron Background 2.  I love a great background cut file and this one did not disappoint.


I modified this file just slightly by removing 5 of the graphic chevrons - 2 were completely removed and 3 were replaced with a cut out for the photos.


 To get the perfect fit, I printed my photos so that the parts I wanted would show through.  Then I placed them under the cardstock and moved them around until I liked where they were.  Then I placed the piece that was cut out over the photo.  Then...


I pulled the photo with the cut out piece and cut around it, leaving ~1/4" border to add my liquid adhesive. That allowed me to get the perfect placement.


I added pattern paper to the back side of the cardstock in a very random order, filling some diamond chevron shapes completely while leaving so many others blank. I added my photos as well before adhering it all to a 2nd white cardstock background. I added my title and just a few embellishments to complete the layout.


Get this cut file here - Graphic Chevron Background 2


Friday, September 2, 2016

2nd Day of 2nd Grade + Free Cut File

I take a first day of school as well as a ____ day of ___ grade photo each year.  Just a little something I do that's totally unnecessary but I think it will be fun to look back on when they are older.


I wanted to create something that totally and completely makes you think of school and apples for the teacher is one of those things.  I decided to create an apple background.  At first I was thinking of cutting hearts to make the apples but I wanted a more quilt-like look so I drew circles in my Silhouette software and then cut them in half. Now the circles  come together to make 4 apples as a background.

You can download the cut file HERE.

Cut all the shapes out and adhere with light adhesive, then stitch away. Although it may look like I stitched each individual piece down, I stitched straight across all patterns. This helped speed things WAY up!


Once stitching was complete, I added my photo, embellishments and journaling around the apples.

Thanks for stopping by today.  Don't forget, you can download the Silhouette cut file HERE.

Wednesday, August 3, 2016

Beautiful Smile Scrapbooking Layout and Silhouette Cut File


Recently, the Shimelle Contributing Designers participated in an Inspiration weekend. Each designer scoured through 100's of scrapbooking layouts posted on the Scrapbook Like a Super Hero page, any post in the shimelle.com archives and anything on the ‪#‎shimelle‬ or ‪#‎acstarshine‬ hashtags anywhere out there.

It was a hard decision but I was really drawn to quite a few of Laureen Wagener's layouts.  She's a woman after my own heart - mixing and matching paper patterns in fun and unique ways.  I was particularly drawn to this layout of hers because of the quilt-like look and the geometric intricacies of the page.  I also love that she created it all on a diagonal.  As much as I would have loved to copy this layout exactly as it is because it's perfection, I had to make it unique to me.


I started by designing a similar look in my Silhouette software.  I kept with the diagonal feel but to make it my own, I chose to make smaller boxes to give it a zoomed out look and instead of piecing together triangles to form the squares, I kept the squares as whole pieces.

I chose to use 5 different colors with at least 5 - 7 different patterns within the color scheme.  To cut these, I grouped the boxes together and cut multiples of each pattern in each color scheme. You can DOWNLOAD MY CUT FILE HERE. Repeat for each color scheme until you have lots of little piles of patterns for each color.


Next I used the internal offset feature, set to .79 to create smaller boxes. You can see two remaining external diamonds that still needed to be removed before I cut these.  I kept them in the photo to demonstrate the internal offset.  You can also DOWNLOAD THE CUT FILE I created with the internal offset images. Afterall, there's no need for us both to do all the work.


Once I removed the outside larger boxes, I used my sketch pen to draw a template on my cardstock.  This made it easy peasy to know exactly where to place each square.  I certainly didn't want my lines to get off and not match up halfway through the project. I went to town, adhering the squares on the cardstock with just a slight dab of liquid adhesive. I didn't want to add too much since I was going to sew over it.


Next, I really liked how Laureen stitched 3 rows over each full square so I chose to do the same.  It was quite the task for all these little boxes but I LOVE the end result!  I added layers behind my single photo, a sparkly title at an angle and a little cluster of embellishments in the corner to call this layout done.  Actually, I still need to add the journaling, which I plan to do in the open diagonal space right below my photo.


 I hope I inspired you today, the same way Laureen inspired me. If you download and use the cut files I created, please share them in the comments below, on the Scrapbook like a Superhero Facebook page AND on Instagram and tag me (@heatherleopard).  I'd love to see what you create!


Monday, August 1, 2016

Play Scrapbook Layout and Free Silhouette Cut File

There's something about stitching that pulls me in every. single. time.  I absolutely HAVE to include it on all my pages.  It certainly made it easy peasy to come up with fun layout challenge on Shimelle.com - Sewing on a layout.


While I love the look of a hand stitched layout, I don't do it on the regular because it's quite time consuming. I save those for binge watching tv or road trips (when I'm a passenger).  My go to stitching technique is to use a sewing machine.

What I love about machine stitching is that you can go as minimal or detailed as you wish in a fraction of the time so while it does add a little more time to your creative process, the results are worth it, in my opinion.  It just adds that extra finished detail that bonds the entire page together.


For this layout, I wanted to mimic the circular inner tube float in my photo so using my Silhouette software, I created a cut file and cut circles in half but with a rounded cut in the semi part of the circle. You can DOWNLOAD MY FREE CUT FILE HERE. Then I pieced them together like a quilt and stitched over them on both the inside and outside of the perimeter.  Circles are not my favorite to machine stitch but never fear, it's really hard to see if you don't make the perfect circle and you can cover little mistakes with an embellishment or two.

Monday, July 11, 2016

Amazing Summer Adventure | Silhouette CAMEO stitching holes tutorial

As a Contributing Designer for Shimelle.com, I was super excited when Shimelle asked me to create a summer layout. So excited that I created Silhouette CAMEO stitching holes tutorial.

When I think of summer, the things that come to mind are bright cheerful colors and sandy beaches so naturally, I made that the focus of my layout.  I didn't just want to include a nod to summer, I wanted to scream SUMMER!  I knew I had to go with a big, bold title so I went to my trusty die cutting tool and pulled out 6 bold colors that coordinated with Shimelle's Starshine collection and went to work.


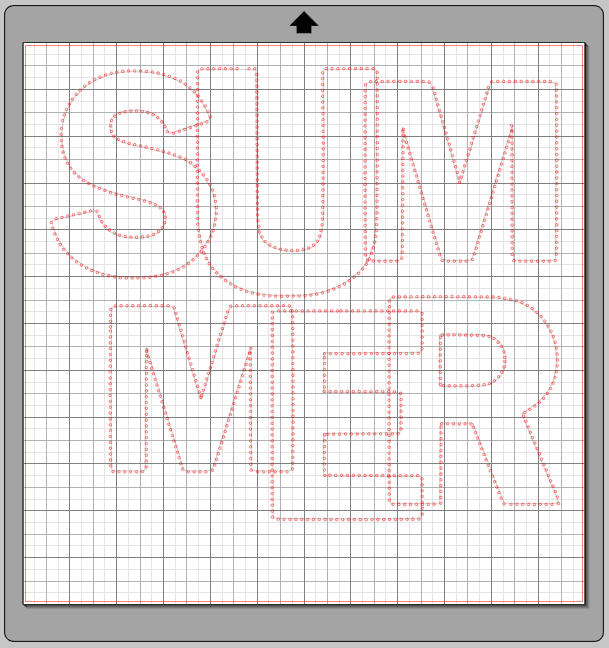
To get started, I created the entire design for my layout in the CAMEO software, including my photo and layering around my photo.  I created the letters using Franklin Gothic font in varying sizes between 460 - 525.  I simply enlarged the letters, overlapped them and scaled them up and down until I liked the look.


For this next step you have many options for practically perfect holes for stitching but I'm going to talk about two of my favorites. The first one is to draw the design onto your paper using your CAMEO and sketch pens, then poke the holes yourself.  The second option is a little more complicated but well worth it if you ask me. Take a look at how I added dots onto my letters in the image below. Here's how to create stitching holes using your Silhouette CAMEO...


I first saw a tutorial on this where someone used "o"'s instead of period (.) but there were several more steps involved, including using offset, ungrouping and deleting. Using periods is much, much easier.  My friend Majken gave me the tip and I can't remember who she said used a "." instead of an "o" but it's great and helps eliminate several steps.  So, let's go....

TUTORIAL: CREATE STITCHING HOLES USING YOUR SILHOUETTE CAMEO 
Usually when I want to stitch a cut file, I skip steps 1 - 3 but you have to do steps 1 - 3 this time because you can't add text to text.

1. 1st step is to create a png or jpeg of each of your letters.  Separate your letters and use your favorite snipping to to do a screen capture.

2. Import the png or jpeg back into your Silhouette designer. This turns it into a "shape" instead of editable text.

3. Trace each letter and release the compound path / ungroup them.


4. This is where you'd normally start if you were using a cut file. Using a text box and Times New Roman or some similar font, type in dot after dot after dot until you've filled up an entire row or two of dots. I prefer using a period for my dots but others use an "o". The actual number doesn't matter because you can add more dots to an image in step 6

5. Change the font size to 24 or 36.


6. Click the "Select" Arrow in Silhouette and then double click the text box.


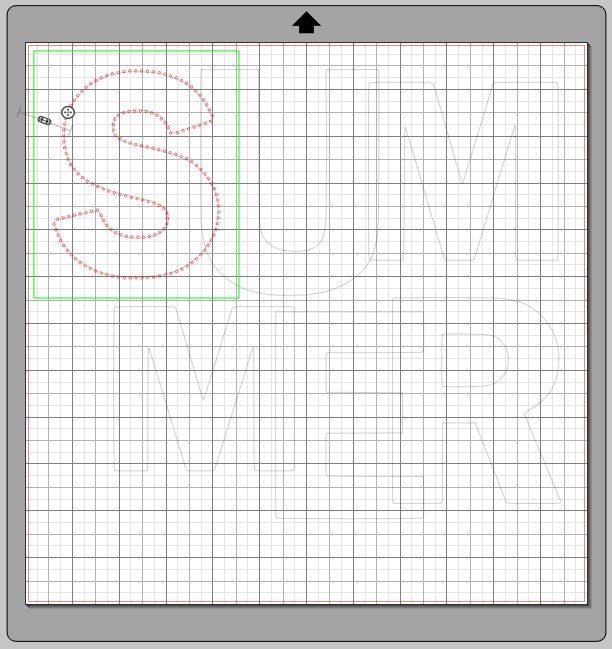
7. The text box turns to a green outline and you will see circle with a plus sign inside.  Click the circle and hold it down while dragging it to the cut file. In my case, that's the "S".


8. Your image will look similar to this.  If there aren't enough dots to cover the entire image, just click in the text box and add more. It's as easy as that.


9. Repeat until everything you want to stitch has dots for holes.

10. Cut your files as you normally would.  A few of my holes were just barely hanging on so I'll be using the double cut option next time and recommend you do that as well.


11. Put a good movie on and stitch away!


Monday, May 2, 2016

Donkey Rides, What?!?! | Santorini, Greece

Bryan and I recently went to Santorini, Greece as part of our anniversary trip. Although we went at the end of the season, it was magical and ranks as one of my favorite places in the world.

One of the most memorable things we did was ride donkeys down the caldera cliff to the dock and back up again. The cable cars were not operating out so we figured we'd be adventurous.  Because it is a very treacherous cliff it meanders back and forth across the mountain.

I thought it would be fun to tell my story not just with the pictures and words but also through the entire design of this page.


I started the entire layout of the page with a funky arrow in mind. I designed it so that it leads you back and forth up to the top, similar to how we rode the donkey up.  You can see the path up the mountain in the photo on the right.  I used a map / city grid type pattern and then hand stitched around the arrow. I added my journaling around the arrow.

I created this page as a Contributing Designer for Shimelle.com and for this week's challenge to use arrows on the page.

My design idea was to use a series of arrow to draw your eyes around the page. The super sized arrow leads to the title and then I included another "Is this for real" arrow to lead to the photos, then another arrow pointing to the top of the cliff.  I rounded it out by including a small film strip of other memorable photos from the ride.

Head on over to Shimelle.com to play along. You can also see how this week's guest designer, Mandi tackled the arrows challenge.

Thursday, April 28, 2016

Dandelion Wishes

Happy Friday eve everyone. We recently experienced severe flooding in our area and thankfully even though our street flooded, we only had water coming up our driveway just a bit.  It was a little odd to see kayakers floating in front of my house (see photo at the bottom of this post.

We're still getting a lot of rain here and they say April showers bring May flowers so I though I'd put a little SPRING in your step (care of my Gossamer Blue April kit and add-ons)...

Once I selected the photos I wanted, I designed the rest of the layout around the title. Usually my title is one of the last things I think about but for this, it was the first.

I created the word "dandelion" in Silhouette Studio using a free font I downloaded from the Internet called Modesty. For the larger WISHES word, I used the Shattered Alpha cut file from Just Nick Studio and then backed it with coordinating papers.

With such a large, bold title, I decided to keep the rest of the layout a little more siple than I usually do, adding a few frames, rub-ons, chipboard and a little splatter mist.

Thanks for stopping by today. How do you feel about bold title?

Here's the photo I mentioned above. The flooding was much worse just down the street and sadly, many neighbors' houses were flooded. It came up REALLY fast. We were actually trapped in our neighborhood for a couple of days.  You can't see the sidewalk on this side of the street anymore but this kayaker didn't seem to mind one bit.

Tuesday, April 26, 2016

Smile

Hello friends.  For this month's Pattern Play on the Gossamer Blue blog I'm showing you how much fun it is to mix and match pattern papers from different collections to create a cool background.


How-to:

  • Cut paper in varying widths x 12" strips.  I used about 11 different patterns.  
  • Place the first strip at a diagonal as far down to the middle of the page as possible, making sure the paper touches the top right and left bottom of the page, flush to the edge.  
  • Place the next paper strip over that 1st layer, leaving some of the first layer exposed.  
  • Repeat until you get to the top corner.  
  • Add a corner piece to the top or just continue with the layers.
  • Repeat at the bottom of your page in the opposite corner.
  • Place pieces of ephemera, stickers, tags, etc in some of the layers.
  • Stitch each layer to the page. Use a variety of stitches for added interest.
  • Add your photo, title and journaling, along with any additional stickers, mist, etc.


Thanks for stopping by today.  Leave me a comment and let me know if this is something you would try.

Monday, April 11, 2016

10 wishes for you + Digital Cut File Tutorial

It's numbers week over on Shimelle's blog.  It's a big deal when it comes to turning double digits so I decided to go big with this layout.

I have a couple of goals with this layout: 1. document how my little girl still makes wishes even though she was turning 10 and 2. include a space to include either 10 things she's into or a space for me to write my thoughts, wishes and feelings for this little girl.  


How to:
  • Using my Silhouette software, I mocked up the size and placement of the numbers and words to make sure that I could get the numbers as large as possible.  

  • I used a font that has the middle of the "0" cut out but you could also cut your photo and place it on top.  
  • Measure the part of the cut that your photo will be used in and then print your to that size. 

  • Place the cut paper over the photo and line it up how you want. 

  • Place the negative cut in it's spot. 


  •  Remove the positive cut, careful not to move the photo or the negative cut.


  •  Trim around the edge of the negative cut, leaving enough room around the edge to adhere it to the positive cut. I cut mine with ! 1/4" border.


  • Add adhesive to the edge and place the positive cut pack over the top. Perfect placement every time!
  • I then cut little strips of paper and added them to the outside edge, overlapping here and there. 
  • Once that was all complete, I stitched them to the paper.  
  • The next step was to cut the title and add confetti, using pattern paper circles and mist.  
  • Last but not least, I added journaling strips to the section of the "0" that is opposite the photo.  

Once everything else was done, I added the rest of the title to the page using foam adhesive.

Now I just have to decide if I write my wished for her or if I quiz her about her wishes and dreams for her future.