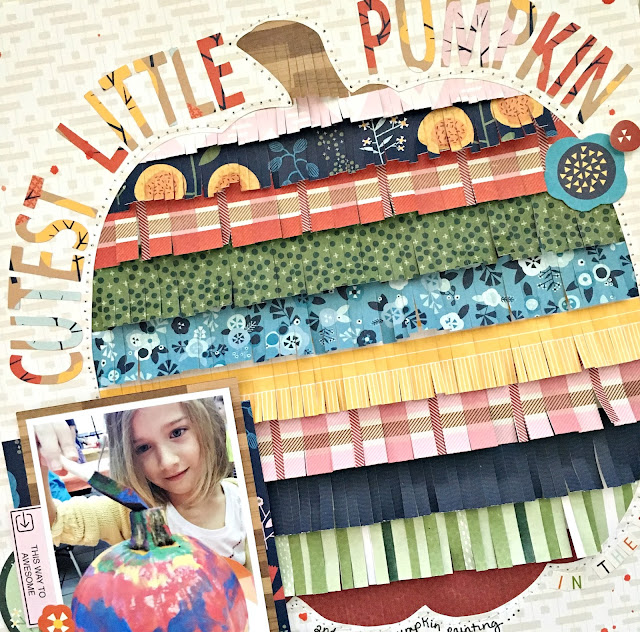
Anyway, today's tutorial is all about super sized die cuts. I'm sharing a few TRICKS as well as a TREAT with you today. Keep reading for more details...
I was inspired by this cute photo of my daughter painting a pumpkin at her school last year. I decided I wanted to do a super sized pumpkin cut with fringe on the inside. At first, I had planned to use varying colors of orange for the fringe but orange is a bit hard to find in this collection so I went back to the drawing board. I put my thinking cap on and went ahead and cut the pumpkin out.
You can download my free Silhouette cut file HERE.
I kept both pieces and you should too if you plan to recreate this project. Set them both aside.
As I was pondering, I realized I should mimic the colors my daughter was painting her pumpkin - blues, red, yellows, green, etc. so I set out to look for fun patterns in those colors.
Next I cut little slits about 1/4" to 1/2" apart on each strip and adhered one on top of the other use the cut out piece that I would typically throw away as the base.
Once all the layers have been added, trim around the pumpkin and lay the overlay on top. Stitch it to the top for a pretty effect.
Pull up gently on the little strips to lift them up. You can simply lift them or roll them up over a thin pencil or like object to curl the edges.
Add a title around the top of the pumpkin. This title is included in the free Silhouette cut file, which you can download HERE (https://app.box.com/s/hv6z56dau55dwn6omrkrl58ulqvjcj08) or you can create your own.
Add layers of pattern paper, die cuts and stickers over and under your photo. Adhere to the page using foam adhesive to lift it up. You don't want to crush those lovely lifted strips.
To complete the layout, I added journaling below the photo and around the bottom of the pumpkin along with a smaller alpha to complete the title, even though the large title at the top works great if used alone.
Thanks for stopping by today. Please share any projects you make using this free cut file in the comments below.


1 comment:
Halloween parties are fun and children love to participate with great enthusiasm. This post gives new ideas about making painting and shaping the pumpkin in various styles. I am enjoying this post…
Post a Comment