Showing posts with label Dear Lizzy. Show all posts

Thursday, September 17, 2015

Stop and Smell the Roses

This is a personal blog. All editorial content and projects are intellectual property of http://americancrafts.typepad.com/.  I do receive financial compensation and material product from American Crafts to develop my craft posts, but all ideas and opinions are my own.

Instagram is my favorite go-to app for staying connected with friends, family and people from around the world with the same interests. I enjoy sharing my DIY, craft and scrapbook projects with you all there while also documenting my family’s everyday moments so when Paige asked me to create a layout featuring Instagram photos, I knew finding the perfect photo would not be hard. And the new Dear Lizzy Documentary collection is perfection for the photo I chose.


Download and cut out your favorite background cut file and choose one where the outer perimeter somewhat resembles a circle. I chose the rosette background cut file from my friend, Just Nick.

Choose various pattern papers to back the different cuts and adhere to the page. Hand or machine stitch a large circle around the outside of your new background.


Add 2 – 3 layers of coordinating pattern paper behind your photo, layering in tags, labels, tickets, etc. and adhere to the bottom left of the page. Next, add your title and journaling and finish off the page with the remaining embellishments.

Supplies: Dear Lizzy Documentary collection: (340294) – Me & You Paper, (340296) – Confetti Paper, (340302) – Blossom Paper, (340303) – Fresh Start Paper, (340305) – Fancy Free Paper, (340307) – Snail Mail Paper, (340316) – Dreamer Paper, (340205) - Cork Bows, (340204) - Die-cut cardstock shapes, (340203) - Rub-on transfer sheets, (340207) - Wood buttons, (340200) – Accent & Phrase Stickers, (340199) – Snapshots Thickers; Cut file from JustNick

Friday, August 14, 2015

My Sweet Forever

I sure do love my patterns and I especially love repeating them over, and over and over again. So when I received a box from American Crafts full of their latest collections, I was in Heaven, so to speak!

My first assignment was to work with the Documentary collection.  I'm loving the new color palette but I especially like all the geometric elements of it. I decided to embrace them and created this sweet layout.


How to:

  1. Cut six of your favorite circle patterns from the Confetti paper and set them aside.
  2. Print 3 photos and cut them into a circle in 3 different sizes - 3", 2.5" and 2".
  3. Select 3 tags from the Minc tags included in this collection.  If you have a Minc, use different colors of foil for them all.
  4. Arrange your pattern circles, photos, tags and rosettes on the page, making sure many of them overlap each other.
  5. Next, hand stitch around the pattern circles.
  6. Add a title using a combination of Thickers and die-cuts and even leftover bits from the foil resist.
  7. Once everything is in place, add mist and embellishments, like puffy stickers, die cuts, rub-ons.


Supplies: Documentary collection: (340296) - Confetti paper, (340305) - Fancy Free paper, (340206) - Rosettes, (340204) - Dir-cut cardstock shapes, (340201) - Puffy stickers, (340203) - Rub-on transfer sheets, (340207) - Wood buttons, (340205) - Cork Bows, (340202) - Desktop puffy letter stickers, (340217) - Min Tags, Minc foils: (369980) - Teal, (369973) - Gold, (369982) - Hot Pink

Wednesday, May 6, 2015

Hand Cut Letters DIY Room Decor Tutorial

We are currently redecorating our youngest daughter's room and she chose a Paris theme. There's a corner of her room that is bare so when Paige asked me to do a Hand Cut Letters tutorial for the American Crafts blog, I went in search of a good quote about Paris.  I immediately stumbled across this one from one of my favorite actresses and humanitarian, Audrey Hepburn. It was the perfect addition to her wall and I was able to wrap it so that the words spans the corner.


Step 1: Choose a handful of papers to use for your letters. I originally selected 7 but increased it to 11 for even more variety. 
Paris Quote Supplies
 
Step 2: Start cutting your letters. I chose to just dive right in with my scissors and skipped a lot of measuring. And I certainly didn't care if my lines were straight. So most of the letters that I cut were just free hand. That said, I did use a ruler to get my angles right for the A's and the W. Then I sketched out the S before I cut it. And I did cheat a little by tracing duplicate letters once I had the first one cut, like the S in this photo. The others were just free hand. Once all letters were cut out, I outlined some in black in to help them stand out on the wall.
Paris Quote Tracing
 
Step 3: Time to make some cupcake liner flowers. First, fold the cupcake liner in half. Next, fold it in half again, then in half again and then one more time so it's folded in an 8th. Next, cut it in a curve starting at the top going about halfway down. Unfold to find these flowers. Repeat 4 or 5 times so you have layers. Adhere each one on top of the other and then add a centerpiece. Crinkle them up just a little (or a lot). Make additional flowers in various sizes by simply starting your cut lower on the folded edge.


Step 4: Create additional embellishments, such as feathers, bows and this cute little cupcake liner butterfly, which I made simply by folding and adhering cupcake liners together and then cutting the shape into a butterfly. I covered a clothespin from the DIY Shop collection with patterned paper for the center. Add additional embellishments - chipboard, stickers, etc. until you like what you see.
Paris Quote Butterfly
 
Step 5: Sprinkle confetti garland above to complete the wall.

Supplies: Fine & Dandy collection: (370061) – Fabulous Fun Paper, (370066) – Paper Peonies Paper, (370067) – Celebrate Paper, (370071) – Let’s Party Paper, (370072) – Fine and Dandy Paper, (370073) – Bright Bows Paper, (370074) – Stay Awesome Paper, (370078) – Sweetest Soiree Paper, (370079) – Elated Paper, (370080) – Cheerful Chatter Paper, (370082) – Gleeful Paper, (370069) – Make a Wish Paper, (370087) – Printed Cardstock Phrases & Accents, (370091) – Accent & Phrase Stickers, (370096) – Plastic Bows, (370098) – Cupcake liners, (370099) – Die Cut Cardstock Shapes, (370100) – Toothpicks

Wednesday, April 29, 2015

2 Yummy | Ice Cream Truck

My girls freak out each time they hear the ice cream truck music blaring through the neighborhood. They stop everything they are doing to collect their money for a delicious treat. And I remember doing the same thing when I was their age! How to: 

  • Download the ice cream SVG cutting file I created HERE.  Cut it out of white cardstock.  
  • Use your cuts to cut around the papers you want to show through the page, cutting about 1/4" larger so you can adhere them to the back of the cone.  
  • Once everything is in place, add some water color around the outside of the cone to make it pop on the page.  
  • You may even consider doing this step before you add the pattern paper.  
  • Add a few embellishments on the cone and don't forget the cherry on top! 
  • Layer elements (tag, spoon, washi tape, vellum under your photo. 
  • Add your photo on top, using foam dots.  
  • Lastly add your title and other embellishments.


So...what do you think? Leave me a note to let me know.  Visit me on the American Crafts blog too. 

 Supplies: Dear Lizzy Fine & Dandy collection: (370061) – Fabulous Fun Paper, (370064) – Stripey Straws Paper, (370065) – Shenanigans Paper, (370070) – Pretty Packages Paper, (370071) – Let’s Party Paper, (370072) – Fine and Dandy Paper, (370077) – Dazzling Paper, (370081) – Happy Day Paper, (370082) – Gleeful Paper, (370096) – Plastic Bows, (370087) – Printed Cardstock Phrases & Accents, (370091) – Accent & Phrase Stickers, (370099) – Die Cut Cardstock Shapes, (370108) – Washi Tape Designs, (370100) – Toothpicks, (370115) – Wooden Spoons, (369209) – Printed Foil Letter Stickers Thickers; Elements collection: (370760) – Pink Large Tags, (373341) – Pink Jewel Brads, (373344) – Star Brads; (AM710-81) – Textured Cardstock 12"X12" White, (368185) – This to That Adhesive Foam Dots

Tuesday, March 17, 2015

Lucky Me

This layout was featured on the American Crafts blog last Friday during LUCKY week but I thought I'd save it and post it on St. Patrick's Day today.  It may just be my favorite layout that I've created in a LONG time.  I love the subject of the layout and the design was just to fun to create.

I definitely got lucky in love with my Mister and I love documenting it so my girls know how much in love their mommy & daddy are.

Supplies: Serendipity collection: (370095) – Clear shapes, (370087) – Printed Cardstock Phrases & Accents, (370091) – Accent & Phrase Stickers, (370096) – Plastic Bows, (370099) – Die Cut Cardstock Shapes; Rise & Shine collection: (370044) – Shaped Paper Clips, (370027) – Grace Foam Stickers

How to:
  • Cut 4 hearts with the tips facing each other and multiple circles using your electronic die cut machine.
  • Use the tiny cut out circles to create a border around the negative circles and stitch over them to create a border around the page.
  • Choose a photo to insert in one of the hearts. 
  • Add embellishments in and around the remaining hearts.
  • Add pattern paper under the border of the layout.
  • Add your title to the top right hand of the page.


Thanks for stopping by today.  I hope I've inspired you in some way.

Thursday, February 26, 2015

Big LOVE!


Sometimes you just gotta go BIG and use supersized letters and numbers to make a point and express how you feel!


How to: Cut a 5.5 x 7 (11x7) card base. Using your electronic die cut machine, place the letter L at the top and VE underneath (each letter is approx. 2" w x 3"h), leaving a space above the E empty to add a colored O later.  Cut that out of pattern paper. Add coordinating patterns behind each letter. Paint an "O" in the empty space. Once dry, add the chipboard heart and banner. Adhere to the front cover of the card.
Supplies: Dear Lizzy Fine and Dandy: (370064) - Stripey Straws, (370065) - Shenanigans, (370072) - Fine and Dandy, (370073) - Bright Bows, (370087) - Darling Details Printed Cardstock Phrases & Accents

Wednesday, February 25, 2015

The BIG 18!


It may look like I am super excited that my bonus son just turned 18 but that's quite the contrary!  I'm super duper proud of him and am fortunate to have contributed to his life for the past 14-ish years. He's really grown into a wonderful young man and incredible brother to my girls.  He'll be heading off to college in the fall and I am having a really hard time with that and I know my girls will have an even harder time not having their big bro around.  Anyway, that's a blog post for another day.  

I made this card for him for his BIG birthday, as seen on the American Crafts blog.


How to:
  • Cut a 6x6 (12x6) card base. 
  • Using your electronic die cut machine, cut a supersized "18" from a piece of pattern paper and the card base. 
  • Use the negative piece for the top of the card. 
  • Before adhering, add the clear acrylic confetti paper and stitch around the "18". Adhere to the front. 
  • Next, cut another "18" the same size from a contrasting pattern paper. 
  • Adhere the "18 to the inside back of the card so that it lines up with the 18 on the front of the card. 
  • Add a banner at the top of the card and ink the edges, if desired.
 
Supplies: Dear Lizzy Fine and Dandy: (370074) - Stay Awesome Paper, (370076) - Oh Joy Paper, (370077) - Dazzling Paper, (370091) - Accent & Phrase Stickers

Monday, February 23, 2015

Je t'aime

I love to make bold statements for my layouts by creating interesting backgrounds that help draw your eye around and keep the focus on the photo.


How to: Download the cut file from my blog HERE. Chose one pattern with a subtle design to use as your heart.  Then any range of other coordinating patterns for the outside cute.  You can choose one pattern or seven, whatever floats your boat. Cut them with your electronic die cut machine and piece it all together.  Once you have your background, add stitching, doodling, photos and embellishments. And don't forget your title.


Supplies: Dear Lizzy Fine and Dandy (370062) - Love Fest Paper, (370075) - Stay Wild Paper, (360067) - Celebrate Paper, (370087) - Darling Details Printed Cardstock Phrases & Accents, (370091) - Accent & Phrase Stickers

Thursday, January 29, 2015

I Love You.... | Scrapbook Expo Designer Spotlight

Did you see the announcement a few weeks ago from Scrapbook Expo that they are amping up their Weekly Scrapper blog with all sorts of fun daily themes?  Paige Evans is heading up the Designer Spotlight weekly feature and asked if I'd contribute.  

I answered a few questions for the Q&A, which you can read HERE and created a layout featuring my Signature style as seen below.

I'm not really sure how to group my style into a particular theme. I guess that's why it's called a signature style???  I just know I LOVE colors, patterns and making bold statements, particularly with fun and unique backgrounds, all the while attempting to draw the eye around to my photo.  


I created this layout exclusively for this Designer Spotlight.  

My youngest daughter is just the sweetest little thing.  I'm lucky to be her mommy because I get to hear things like "You're the best mommy ever" and "I love you in a million billion pieces" every single day, multiple times a day.  We always try to one up each other on our love you more meter so I thought it'd be fun to create a layout with some of our favorite sayings. 

How to: To create the layout, I added all the shapes and words on the Silhouette mat on my computer. I placed everything where I wanted it, sized them up and down and moved them around until I liked the overall design. Of course, I left space for my photo. This made it super easy to make sure everything would fit once it was cut out.  Then, I just cut everything individually and recreated it on my page. some things are cut out of the white cardstock and some things were cut out and placed on top of the white cardstock.


I sent Paige 4 more of my favorite layouts that show my signature style. You may or may not have seen them before so you might want to head over to the the Scrapbook Expo Weekly Scrapper blog to check them out.  

Many thanks to Paige and Scrapbook Expo for allowing me to be part of the great things happening over there!

Tuesday, January 27, 2015

Love You More Thickers / Mini Album Tutorial

Thickers are most definitely one of my must haves when I am crafting and I love that they aren't just for scrapbooking. Thickers are a great elements for mini albums and all sorts of DIY projects.

My youngest daughter and I love to have battles over who loves the other person more.  I thought it'd be fun to make a little mini album about our sweet little debate.


I gathered my favorite Thickers from the new Serendipity collection.  These are perfect because they have some really colorful ones and some light grey ones.  I also cut 2 4x10" strips of white cardstock for my mini album base.


Next, I wrote out the words for my title, "I LOVE YOU MORE" with the colorful Thickers. I filled in around it with the light grey Thickers.


I removed the colorful Thickers so I could apply gesso over the light grey ones and the cover, which you'll see in the photo below.


Once Gesso was applied and given time to dry, I added the colorful Thickers back to the cover.


I added pattern papers to the base pages, a little watercolor, photos and embellishments.

I showed this to my daughter and after getting a huge smile from her, the Who Loves Who More debate started all over again.  She even said she's going to make a mini album with more pages than I included in mine. LOL

Oh and did anyone catch my little play on the word "MORE"?

Supplies: Serendipity collection - (369181) – Little Things Paper, (369185) – Hello Beautiful Paper, (369187) – One Fine Day Paper, (369189) – Lucky Love Paper, (369203) – I Heart You Paper, (369207) – Printed Chipboard Letter Stickers Thickers – Ooh La La, (369208) – Printed Chipboard Letter Stickers Thickers - Soar, (369218) – Die Cut Cardstock Shapes, (369211) – Accent & Phrase Stickers, (369220) - Watercolor Words; Gesso, Watercolors, Paintbrush


Friday, January 23, 2015

Lucky in Love

I love to repeat patterns so when I saw the dies in the new Amy Tangerine STITCHED collection, I was soo excited.  I usually repeat shapes but the word "Lucky" resonated, especially after a recent trip to Paris with my love.

How to:  Cut 12 "lucky" words out of various pattern papers, using your metal die and manual die cut machine.  Next, add water color to the background paper where you will be placing the words to make the words pop.  I chose to use a lighter shade of the color of the cut out word.  Once dry, adhere the words over the colored areas. Stich over, around, under and over the words. Add a complimentary pattern paper to the bottom 1/4 of the page for your photo, title and journaling.  I used the metal die frame for my title's background. I also cut a heart and the word "LOVE" using the metal dies and used them as embellishments in the upper portion of the page.  Add additional embellishments to bring the page together.


Supplies: Amy Tangerine STITCHED - (368948) - Thrifted paper, Serendipity collection: (369182) – Hello Honey Paper Paper, (369183) – Lucky Stars Paper, (369184) – XOXO Paper, (369185) – Hello Beautiful Paper, (369186) – Summer Breeze Paper, (369187) – One Fine Day Paper, (369188) – Sugar Sugar Paper, (369189) – Lucky Love Paper, (369200) – Bright Blueberry Paper, (369201) – Love Letters Paper, (369207) – Printed Chipboard Letter Stickers Thickers, (369209) – Printed Foil Letter Stickers Thickers, (369215) – Enamel Dots, (369218) – Die Cut Cardstock Shapes

Sunday, January 18, 2015

Smile Card (10+ Pattern Papers) and Silhouette troubles

Y'all...do you ever have an idea for a card and things just don't go as planned?  I was creating cards for the 10+ patterned paper week on the American Crafts blog.  I had this really fun idea and it involved the silhouette and lots of teeny tiny little flowers.  I got all 10 of my pattern papers that have a hue of pink together and adhered them to my Silhouette mat.  Lined up all the flowers so I'd get flowers from each paper and started cutting.  And then disaster struck...it just quit.  Like stopped mid cut wasn't going to cut anything else.  I disconnected and reconnected the machine to my PC. Nothing. Saved the file, closed the program, reopened the program. Nothing. Rebooted PC, disconnected and reconnected the machine to my PC. Nothing.

I decided to go about creating card #2, which is featured here.  I thought maybe I'd still be able to make the other card later but several days passed and it still wouldn't communicate.  People, I have no idea what is going on.  Anyone have this happen to them?  Putting in a call to Silhouette but if you've been there, done that, help a scrappy sistah out please.

So, here's the single card I made using not 10 but 14 pattern papers. My goal was to show a more simple way to use the multiple patterns and a more ornate way. Wahhhhhhhhhhhhhh!

I am all about mixing and matching various patterns on my layouts so why not do the same on cards to add a bit more personality to them? The key for me is to use as many patterns as I want while ensuring I don't go overboard on the number of colors used.
How to: Add a subtle background to your card base. Next create 3 sets of flowers (small, medium and large) by handcutting circles out of various patterns in different sizes so that they nest inside each other, the biggest in the back and the littlest in the front. Add little accents, like enamel dots and buttons to the top of the circles.  Next, add a pleather bow and a banner sentiment.
Serendipity collection: 369181 – Little Things Paper, 369183 – Lucky Stars Paper, 369184 – XOXO Paper, 369185 Hello Beautiful Paper, 369186 – Summer Breeze Paper, , 369187 One Fine Day Paper, 369188 – Sugar Sugar Paper, 369190 – Sweet Swirl Paper, 369193 – With Love Paper, 369195 – Razzleberry Paper, 369196 – Liz Lemon Paper, 369199 – Ooh La La Paper, 369200 – Bright Blueberry Paper, 369202 – Sprinkle Paper, 369211 – Accent & Phrase Stickers, 369215 – Enamel Dots, 369217 – Pleather Bows

Tuesday, January 6, 2015

I'd Travel the World with You

I didn't intend to immediately start scrapping our Paris trip but I just couldn't resist when I opened up the Gossamer Blue January kit.  It's filled with gorgeous golds and all sorts of colors, patterns and sentiments that are just perfect for the city of love or any love you wish to celebrate.


I was immediately drawn to this background paper from the Crate Paper Kiss Kiss collection.  It had little splatters of pink pre-printed but I wanted to highlight some key words and phrases so I mixed a few mist colors + water together until I got the right hue and then painted it onto the page.


I mixed my title up a bit also accentuating certain words and then added a few little layers over, under and around my photo.


Created using the Main kit, Add-on, add-on 2 and Life Pages kit.

Oh, this photo was actually taken to send to text to our 17 year old son as a joke to gross him out but it has become one of my most favorite and treasured photos.  Our oldest girl also thinks kissing is gross (and we want her to think that as long as possible) but our youngest is quite the opposite.  When she sees us kissing, she will drop what she's doing and come hug us.  She will also often ask us to kiss, which we happily oblige.  I love that we are instilling the importance of love and sweetness in our house, whether they think it's gross or not.  I know it's making a point either way.

I have two more Paris layouts coming this month. One from the Gossamer Blue January kit and another from American Crafts Serendipity.  You can see the other Gossamer Blue one in the gallery today along with so much inspiration from the Design Team.


Monday, December 22, 2014

Happy New Year

I realize that it's not quite Christmas yet and the New Year is a little over a week away but I just had to share this layout I created (and can be seen on the American Crafts blog today). We celebrated the new year as a family, with photo booth props, poppers, confetti, sparkling grape juice and more. Celebrating the New Year with little ones exudes a new level of excitement. We had fun with confetti this last New Years and this photo really captured the pure joy.

How to: Using white cardstock as your base, adhere the gold dot vellum paper to the top 1/2 of the page.  Adhere the Little Things paper to the bottom 1/2 of the page.  Add a 1 1/2" border using the Little Things B side of the paper above the seam. Adhere the gold scallop border over the 1 1/2" border. Stitch the papers along the seams.  Hand cut the banners from the Ooh La La paper and adhere to the top of the page.  Add a pleather bow in the upper right where the banners connect.  Scatter enamel dots like confetti over some of the gold vellum dots.Create a photo mat/frame from coordinating papers, including the gold dot vellum.  Cut a chalkboard frame from the Chalkboard paper pad.  Journal with a gold pen and embellish to your liking.  Add a fun and flirty title by mixing alphas.

Supplies: 
DIY Shop collection: 369025 - Gold Dot on Vellum Paper, 369060 - Permanent Chalk Markers - Gold, Chalkboard collection – 369079 12x12 Paper Pad, Dear Lizzy Serendipity collection: 369181 – Little Things Paper, 369199 Ooh La La Paper, 369185 Hello Beautiful Paper, 369187 One Fine Day Paper, 369207 – Printed Chipboard Letter Stickers Thickers, 369209 – Printed Foil Letter Stickers Thickers, 369210 – Phrase and Letter Stickers, 369213 – Puffy Stickers, 369215 – Enamel Dots, 369217 – Pleather Bows369218 – Die Cut Cardstock Shapes

Wednesday, August 27, 2014

Forever Bloom

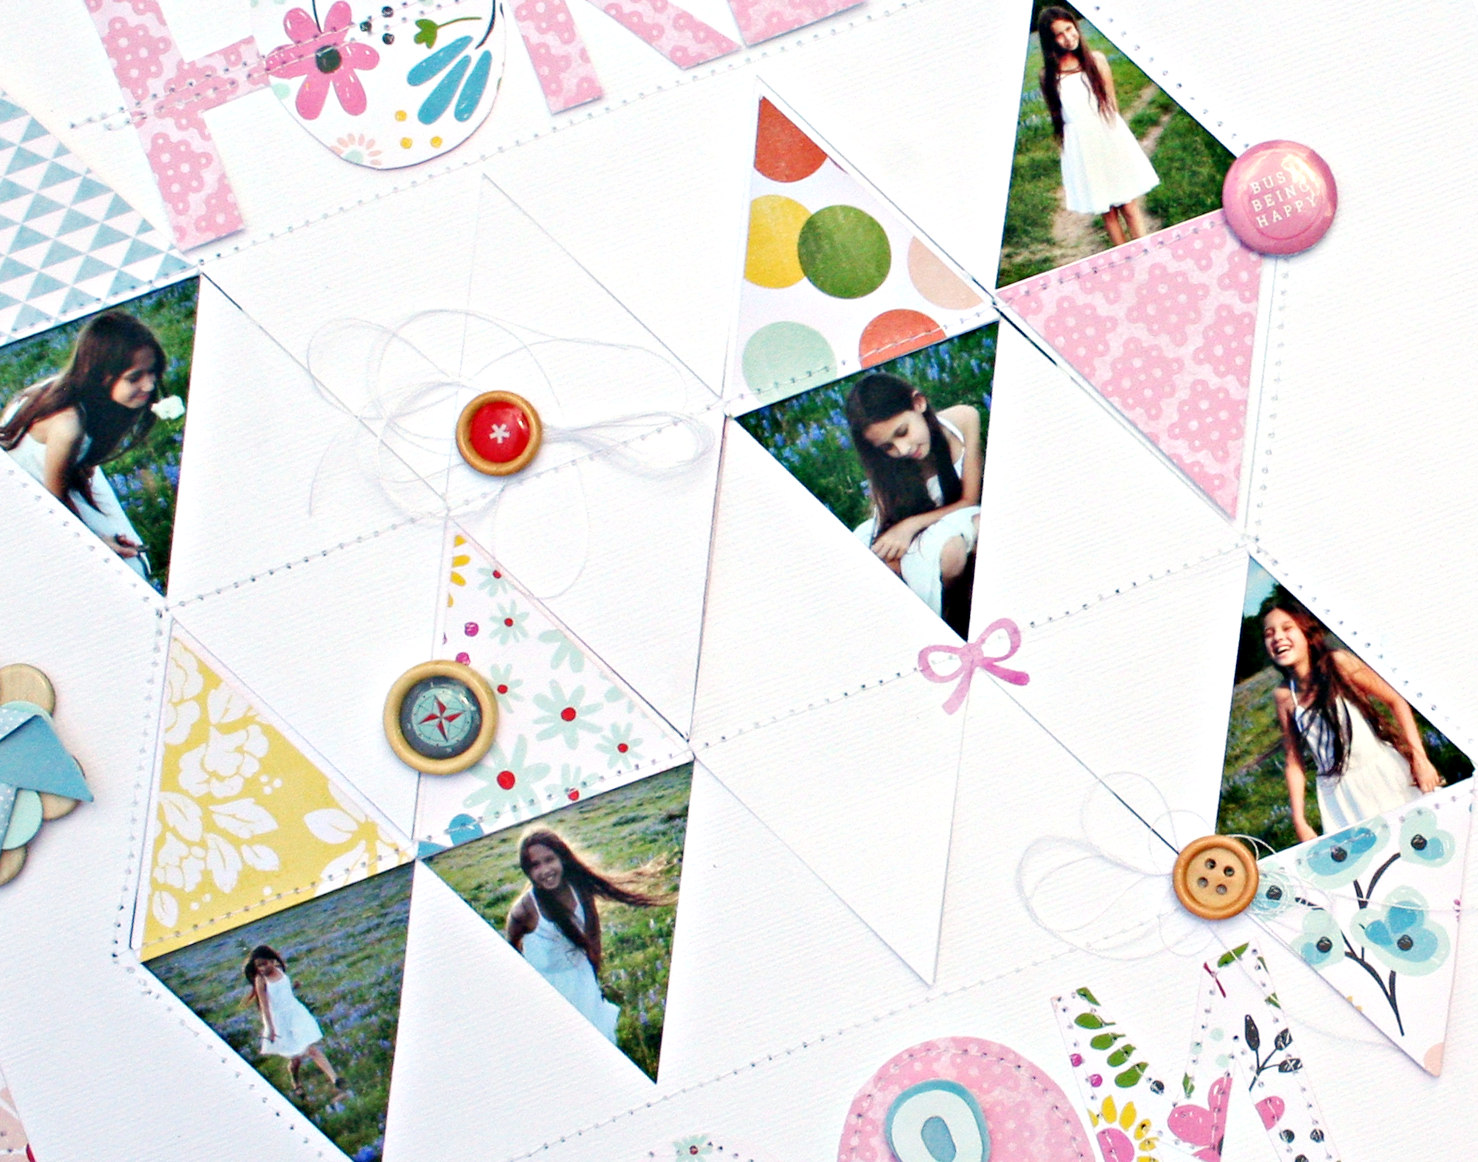
When I got the assignment from Paige to use machine stitching on my layout, I was SUPER excited.  I chose to mix it with some interesting cutting so I thought about it, designed the cutting file and went to town with my concept. Here's the finished layout.


Supplies: American Crafts Dear Lizzy Daydreamer collection, Cutting file by Heather Leopard. Download the cutting file HERE.


How to: I designed the cut file (you can download it HERE) so that the triangles can flip up and down and don't actually detach from the page. Then I flipped them up and down and added photos behind 6 of them. I machine stitched around the outer perimeter of the entire design. Then I cut smaller triangles out of pattern paper and machine stitched through the middle sections to secure the triangles up and down so that the photos can always be seen.

I also added hidden gems under some of the triangles that can only be seen if you lift them up. This is where I have the journaling and some other patterns.


I created the title by hand. How to: cut a strip of paper ever so slightly larger than the width/height you'd like your letters to be. Then cut the letters out with your scissors and trim as needed. I was not looking for anything uniform so I just went to town with my scissors. Stitch and embellish as you wish.

If you download this file to use note that the triangles at the top should not be cut with the main triangle design in the middle. If you choose to use them, these should be cut with coordinating papers and they fit within the triangles from the main design.

Thanks for stopping by today. You can see this along with my stitched card on the American Crafts blog.

Thursday, August 7, 2014

Remember You Are Loved | #ThrowbackThursday

I just realized that several layouts I did earlier this year while travelling never got posted to my blog so I thought I'd throwback the next several Thursdays and post them.  They throw back to this year so it's not like I'm going into the archives or anything.

I created this one for Silhouette Week on American Crafts. You may have seen it on their blog in February. I held back from posting it here because I had plans to create a similar layout with the same photo for the other daughter using the words that I cut out from this layout.....


Remember You Are Loved Supplies: Dear Lizzy Loved Heart Cutting File from Silhouette store, Fascinating Friends 12x12 paper (366165) - Dear Lizzy Polka Dot Party, Terrific Tunes 12x12 paper (366170) - Dear Lizzy Polka Dot Party, Delightful Display 12x12 paper (366162) - Dear Lizzy Polka Dot Party, Fabric Bows (366201) - Dear Lizzy Polka Dot Party, Accent & Phrase Stickers (366195) - Dear Lizzy Polka Dot Party, Label Stickers (366197) - Dear Lizzy Polka Dot Party, Accent & Phrase Stickers (366196) - Dear Lizzy Polka Dot Party, Epoxy Stickers (366198) - Dear Lizzy Polka Dot Party

I love using cutting files on my projects because they can add just the right touch of interesting elements to a page very quickly.
used Dear Lizzy Loved Heart Cutting File from Silhouette store American Crafts Silhouette cutting files and altered them to fit the vision that I had for my layouts. I actually super sized it to take up the majority of my page and then machine stitched a heart around it.

A bit of paper layering, a fave photo and embellishments completed the layout...

Now, I will work on the sister page using the cut outs that I saved. I want to have the complimenting pages in each girl's album.

Tune in next Thursday for a fun sports page I created.....