Hello everyone. Today is my big design team debut on the Pebbles blog. I hope you'll pop over there and say hi!
I'm super excited to show you a quick gift I made to give to my girls. We love our beach vacations and I thought it would be fun to give my girls a little care package to document all our summer activities.
The creative aspect of this care package includes the gift bag and mini album / journal. These are relatively easy to make if you have a die cut machine or template you can follow. The Fun in the Sun collection is perfect for this project.
To get started, I knew I needed to begin with the beach bags. The bags needed to be able to hold the album and other little goodies so I made it fairly large, measuring at 6" x 8". Choosing a design that allowed for a 2 tone pattern gave it added interest. Then it was time for the really fun part - decorating!
Each bag includes buttons where the straps attach to the bag, a fun sentiment and a coordinating embellishment or two. You could also hang a tag off one of the straps but I am letting my girls decide which ones they want. Of course, I designed these with my girls' style and colors in mind so we'll see how it goes.
I designed the mini albums to be 4" x 6" to easily fit into the 6" x 8" beach gift bags. To create these, simply cut a 8" x 6" cover and several inside sheets measuring 3.5" x 5.5". I used 5 sheets for the inside to make 10 pages. Center the inside sheets so that there is an 1/4" border.
Then I stitched it together in the center. Once the mini album is together, it's time to decorate again! I added a tone on tone background to cover the album and then I used the fun sentiments from the 3" x 4" cards pattern paper, framed it out and then added a dimensional sticker.
I can't wait to give these to my girls. We're taking a road trip soon so I may even print out a few photos from the summer and put a little craft kit together to keep them busy on our way to the beach.
Supplies: Pebbles Fun in the Sun Summer Days (732850)
Fun in the Sun Popsicle (732859)
Fun in the Sun 6x6 Paper Pad (732862)
Fun in the Sun Shaped Cards / Popsicles (732832)
Fun in the Sun Puffy Phrase Stickers (732833)
Fun in the Sun Layered Stickers (732836)
Bazzill Cardstock (309026)
American Crafts Cardstock Primaries
Showing posts with label Bazzill. Show all posts
Thursday, August 4, 2016
Tuesday, February 7, 2012
My Slice of {Little Yellow Bicycle} Paradise
I am soo honored to be designing as a member of the Little Yellow Bicycle Paradise Cycling team. When I saw the Paradise collection online all sorts of ideas came to mind and I was delighted to see how much more gorgeous it is in real life. Today I'm going to share a few layouts and a mini album, which I hope will inspire you. Beware, I've included lots of photos!
Sooo, the first thing I noticed when I pulled everything out were the die-cuts and I instantly realized how great they would be as a mini album. I'll get to that in just a sec. First, let me show you a few layouts I made.
For my first layout, I chose to use a photo of my daughter that is several years old. I'm not sure why I never scrapped it before but I'm glad because this is the perfect collection for it.
Pin It
Supplies: American Crafts cardstock, Little Yellow Bicycle Paradise collection: PD-106 Happy Dots/All Natural, PD-108 Blissful Dots/Teal Tapestry, PD-133 6" x 6" Decorative Edge Double-sided Textured Cardstock - with glitter accents, PD-279 Chipboard Shapes - with glitter accents, PD-222 Felt Stickers - with glass beads, PD-305 Paper Flower Kit, PD-135 Cardstock Stickers - Favorite Pieces - with glitter accents, PD-140 Cardstock Stickers - Fresh Verse™ - with thermography and embossing, PD-1100 Tear Out Ticket Book - with thermography and embossing, Imaginisce i-top 2.0 and medium brad daddies, The Twinery twine, Zig Marker in Chocolate
I love to layer whenever possible. I decided to triple layer my background but of course, I cut out the insides from the papers where they would be covered up so I could use them on another project. I distressed the edges just a bit and then machine stitched around the border.
Banners are still in-style and the "HAPPY" cardstock stickers did not dissapoint.
The paper flower kit is incredible. I love the DIY rosettes, which come in 2 different sizes. They add just the right touch to the layout.
My 2nd layout featured more banners, this time I cut them myself, using random widths and lengths and layering them over each other. I also fussy cut a few of the papers, added some punch-work and then added a top and bottom "frame" to bring the layout together.
Pin It
Supplies:
American Crafts cardstock, American Crafts knock out border punch set, Little Yellow Bicycle Paradise collection: PD-109 Pleasant Plaid/Earthy Dots, PD-108 Blissful Dots/Teal Tapestry, PD-101 Paradise/Petite Pom Poms, PD-103 Simple Pleasures/Teal Too, PD-104 Splendid Stripe/Olive Leaves, PD-309 Confetti Garland - 30" long, Zig Marker in Chocolate
I did a zig-zag machine stitch over the banners at the top as well as on the main photo below to adhere them to the page and then topped them with garland for a litle bit of added flair. It's hard to tell in these photos but the circles are folded up randomly and I added a few smaller circles on top of the larger ones to make them even more interesting than they already are.
My last layout was taken last week as I caught my youngest daughter stopping to smell the roses. She had a very large velvet pen in her hand and she kept trying to smell it. It was too adorable! This layout was made using leftover scraps after completing the other layouts and mini album. I love that it pushed me to find creative uses for those odd shaped scraps.
Pin It
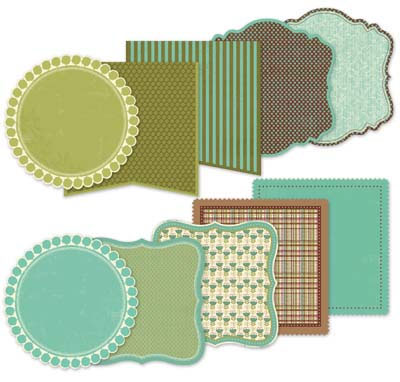
As promised, let's get back to the mini album. Like I said, I saw the dies in their packaging and it just hit me how perfect they would work as-is for a mini. Here's what they looked like in the packaging:
So the first thing I did was take them out of the packaging and cover the front and back of the actual packaging with pattern paper. Here's how I started with the cover:
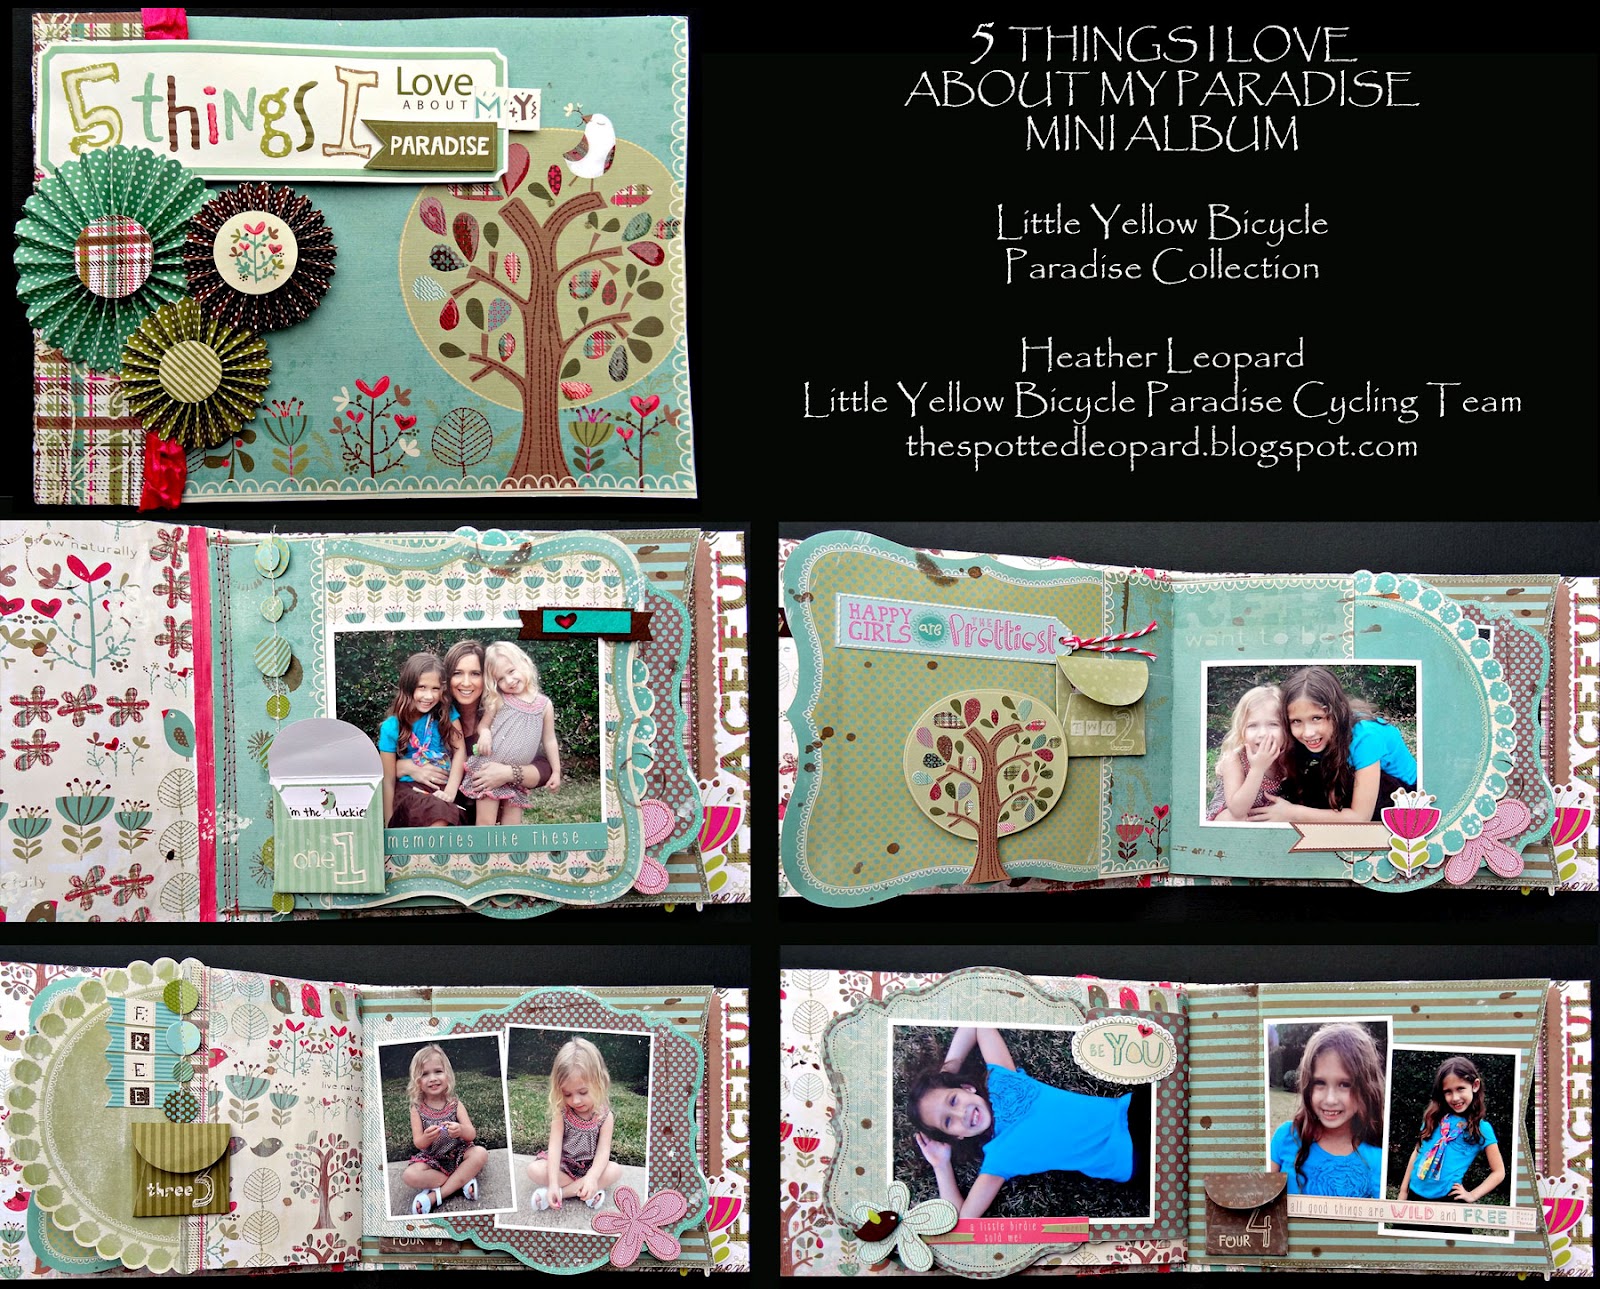
Next I added coordinating paper to the dies, making sure to use a smaller width of paper for the first page, while adding more width to the next page and the next and so on so that the lengths of each page would get longer as they are added. Once I had all the base pages made, I stitched them together with my sewing machine, added mist and gesso and then added pictures and embellishments. Here are the end result pages:
Supplies:
Little Yellow Bicycle Paradise collection: PD-133 6" x 6" Decorative Edge Double-sided Textured Cardstock - with glitter accents, PD-222 Felt Stickers - with glass beads, PD-230 Clear Cut Shapes, PD-308 5 Things Envelopes - self adhesive with embossing, PD-309 Confetti Garland, PD-140 Cardstock Stickers - Fresh Verse™ - with thermography and embossing, PD-279 Chipboard Shapes - with glitter accents
Well I guess I hogged your time long enough. I hope you enjoyed browsing through my creations as much as I enjoyed playing with this new collection. Be sure to stop by the Little Yellow Bicycle blog today and leave me some love over there too! xoxo Heather
Sooo, the first thing I noticed when I pulled everything out were the die-cuts and I instantly realized how great they would be as a mini album. I'll get to that in just a sec. First, let me show you a few layouts I made.
For my first layout, I chose to use a photo of my daughter that is several years old. I'm not sure why I never scrapped it before but I'm glad because this is the perfect collection for it.
Pin ItSupplies: American Crafts cardstock, Little Yellow Bicycle Paradise collection: PD-106 Happy Dots/All Natural, PD-108 Blissful Dots/Teal Tapestry, PD-133 6" x 6" Decorative Edge Double-sided Textured Cardstock - with glitter accents, PD-279 Chipboard Shapes - with glitter accents, PD-222 Felt Stickers - with glass beads, PD-305 Paper Flower Kit, PD-135 Cardstock Stickers - Favorite Pieces - with glitter accents, PD-140 Cardstock Stickers - Fresh Verse™ - with thermography and embossing, PD-1100 Tear Out Ticket Book - with thermography and embossing, Imaginisce i-top 2.0 and medium brad daddies, The Twinery twine, Zig Marker in Chocolate
I love to layer whenever possible. I decided to triple layer my background but of course, I cut out the insides from the papers where they would be covered up so I could use them on another project. I distressed the edges just a bit and then machine stitched around the border.
Banners are still in-style and the "HAPPY" cardstock stickers did not dissapoint.
The paper flower kit is incredible. I love the DIY rosettes, which come in 2 different sizes. They add just the right touch to the layout.
My 2nd layout featured more banners, this time I cut them myself, using random widths and lengths and layering them over each other. I also fussy cut a few of the papers, added some punch-work and then added a top and bottom "frame" to bring the layout together.
Supplies:
American Crafts cardstock, American Crafts knock out border punch set, Little Yellow Bicycle Paradise collection: PD-109 Pleasant Plaid/Earthy Dots, PD-108 Blissful Dots/Teal Tapestry, PD-101 Paradise/Petite Pom Poms, PD-103 Simple Pleasures/Teal Too, PD-104 Splendid Stripe/Olive Leaves, PD-309 Confetti Garland - 30" long, Zig Marker in Chocolate
I did a zig-zag machine stitch over the banners at the top as well as on the main photo below to adhere them to the page and then topped them with garland for a litle bit of added flair. It's hard to tell in these photos but the circles are folded up randomly and I added a few smaller circles on top of the larger ones to make them even more interesting than they already are.
As promised, let's get back to the mini album. Like I said, I saw the dies in their packaging and it just hit me how perfect they would work as-is for a mini. Here's what they looked like in the packaging:
So the first thing I did was take them out of the packaging and cover the front and back of the actual packaging with pattern paper. Here's how I started with the cover:
I then decorated the cover with cardstock stickers, DIY rosettes and Glossy Accents
Next I added coordinating paper to the dies, making sure to use a smaller width of paper for the first page, while adding more width to the next page and the next and so on so that the lengths of each page would get longer as they are added. Once I had all the base pages made, I stitched them together with my sewing machine, added mist and gesso and then added pictures and embellishments. Here are the end result pages:

Supplies:
Little Yellow Bicycle Paradise collection: PD-133 6" x 6" Decorative Edge Double-sided Textured Cardstock - with glitter accents, PD-222 Felt Stickers - with glass beads, PD-230 Clear Cut Shapes, PD-308 5 Things Envelopes - self adhesive with embossing, PD-309 Confetti Garland, PD-140 Cardstock Stickers - Fresh Verse™ - with thermography and embossing, PD-279 Chipboard Shapes - with glitter accents
Well I guess I hogged your time long enough. I hope you enjoyed browsing through my creations as much as I enjoyed playing with this new collection. Be sure to stop by the Little Yellow Bicycle blog today and leave me some love over there too! xoxo Heather
Sunday, January 15, 2012
It's Cookie Time
Yep, it's that time a year again. Time for the Girl Scouts to be out in full force knocking on doors and accosting you as you enter AND leave the store. Well there's no avoiding it so you might as well order some from my little Brownie so she can earn a sleepover at the Aquarium!!!
We spent a couple of hours last week knocking on our neighbors' doors. We only made it down the cul-de-sac and over one small street and she sold 20 something boxes. Not too bad! I was so proud of her, politely asking, figuring out the check/cash/change thing and thanking them, whether they bought or did not buy. Yes, there was someone who turned her down but she just smiled and moved on. Of course I took pics of her doing her thing.
Pin It
I am just loving these Authentique papers included in this month's Birds of a Feather kit. I think Amy might have a few left! Thanks for stopping by today!
We spent a couple of hours last week knocking on our neighbors' doors. We only made it down the cul-de-sac and over one small street and she sold 20 something boxes. Not too bad! I was so proud of her, politely asking, figuring out the check/cash/change thing and thanking them, whether they bought or did not buy. Yes, there was someone who turned her down but she just smiled and moved on. Of course I took pics of her doing her thing.
Pin It
I am just loving these Authentique papers included in this month's Birds of a Feather kit. I think Amy might have a few left! Thanks for stopping by today!
Thursday, January 12, 2012
They Better Run
Yep, all the boys that come around for our daughters had better know how to run FAST! Bryan has always said from day 1 with our girls that he'll be polishing his shot guns when those boys come around... Well the other day, Rheagan was talking about Justin Bieber coming over and so on and so forth and her daddy promptly replied with "He Better Run!" I snapped these pics of her the next day and it only made sense to title and journal it about her daddy's love, adoration and protectiveness of her.
Supplies from Scrapbook Circle You + Me kit coming within an hour.
Pin It
This is made with the Scrapbook Circle You + Me kit and the last challenge for the Sketchy Thursdays challenge blog. I am soooooo very sad to share this news. You can read all about the decision and where you might find more of Heidi and Diana's sketches on the Sketchy Thursdays blog. I just want to thank Heidi and Diana for all the work they put into make the site what it is and inviting me into the Sketchy Thursdays designer family. I feel like I have made lifelong friends with them, Julie and all the others I have designed with in my year and 2 months with them! I am a better designer because of all of them! {insert tears here}
So, let's see you playing along with the last official sketch on the blog. It's a good one! Thanks for stopping by today!
xoxo Heather
Supplies from Scrapbook Circle You + Me kit coming within an hour.
Pin It
This is made with the Scrapbook Circle You + Me kit and the last challenge for the Sketchy Thursdays challenge blog. I am soooooo very sad to share this news. You can read all about the decision and where you might find more of Heidi and Diana's sketches on the Sketchy Thursdays blog. I just want to thank Heidi and Diana for all the work they put into make the site what it is and inviting me into the Sketchy Thursdays designer family. I feel like I have made lifelong friends with them, Julie and all the others I have designed with in my year and 2 months with them! I am a better designer because of all of them! {insert tears here}
So, let's see you playing along with the last official sketch on the blog. It's a good one! Thanks for stopping by today!
xoxo Heather
Saturday, December 17, 2011
Optimistic
I originally decided that the word "Optimistic" would be my One Little Word for my oldest daughter in 2012 because we are finally getting answers to things we've been speculating about for years. The hubby and I are optimistic that we now have direction and can do things to make life easier for her and us. I'm sure I'll share more about that here on my blog eventually.
Anywho, the current challenge over at Scrapbook Circle is to create a project about your 2012 goals - be it Project Life, a resolution, your One Little Word, etc. I created this layout for my One Little Word.
Supplies from Scrapbook Circle Note to Self kit: American Crafts 12x12 Chap "Jim", Jillibean Soup Sweet&Sour Crushed Tomatoes, Jillibean Soup Sweet&Sour 12 X 12 Page of Die Cut Shapes, October Afternoon Sidewalks Word Stickers; Not in kit: Bazzill Grey and Red cardstock, red folk art paint, misc. thread, Black pen .05, Glue Arts Glue Glider Pro
The I Love My Life tab at the top is actually a hidden journaling card that pulls out to reveal my private journaling.
I used bright yellow Thickers for the alphas and used a paint dabber to match them to the mustard yellow in the paper. I added stitching, paint and kept the embellishments to a minimum on purpose.
I just love the typewriter paper so I fussy cut one out and used it as an embellishment since it tied in so well to the documenting goals. Of course, I just realized I wrote her birth year below instead of this year. Whoops, off to fix that.
Don't you just love all the goodies included in this month's kit? Some of it is sold out in stores so head over to Scrapbook Circle and get one for yourself for Christmas!
I have since decided that Optimistic won't just be my word for Rheagan; it will be my OLW in general for so many reasons. Make sure to share your projects with us on the Scrapbook Circle Facebook page by December 28, 2011 for a chance to win the limited edition the Jingle All the Way kit.
Anywho, the current challenge over at Scrapbook Circle is to create a project about your 2012 goals - be it Project Life, a resolution, your One Little Word, etc. I created this layout for my One Little Word.
Supplies from Scrapbook Circle Note to Self kit: American Crafts 12x12 Chap "Jim", Jillibean Soup Sweet&Sour Crushed Tomatoes, Jillibean Soup Sweet&Sour 12 X 12 Page of Die Cut Shapes, October Afternoon Sidewalks Word Stickers; Not in kit: Bazzill Grey and Red cardstock, red folk art paint, misc. thread, Black pen .05, Glue Arts Glue Glider Pro
The I Love My Life tab at the top is actually a hidden journaling card that pulls out to reveal my private journaling.
I used bright yellow Thickers for the alphas and used a paint dabber to match them to the mustard yellow in the paper. I added stitching, paint and kept the embellishments to a minimum on purpose.
I just love the typewriter paper so I fussy cut one out and used it as an embellishment since it tied in so well to the documenting goals. Of course, I just realized I wrote her birth year below instead of this year. Whoops, off to fix that.
Don't you just love all the goodies included in this month's kit? Some of it is sold out in stores so head over to Scrapbook Circle and get one for yourself for Christmas!
I have since decided that Optimistic won't just be my word for Rheagan; it will be my OLW in general for so many reasons. Make sure to share your projects with us on the Scrapbook Circle Facebook page by December 28, 2011 for a chance to win the limited edition the Jingle All the Way kit.
Thursday, December 8, 2011
Beautiful Mess & DIY Candy Stocking Stuffers
I have two completely different reveals for you today, which comes with two chances to win some yummy scrappy stuff.
First, my silly little girl loves to get all glammed up in her twirl dresses...yes, the amount of twirl is what she measures her clothes by. Anyway, she was dolled up in her headband-wearing-leopard outfit and I should have known something was up because she was quiet. She called me over to her to show me her "art", proud of it and all. She didn't write on her clothes, walls or carpet so I embraced it and snapped pics of course. This isn't the first time she's created masterpieces on herself and I know it won't be the last!
I used my Scrapbook Circle December kit, Note to Self, and this week's Sketchy Thursdays sketch to show of my sweet little beautiful mess that she can be.
Supplies from Scrapbook Circle December kit "Note to Self": Echo Park Happy Days collection: Retro, Bottle Caps, Journaling Cards, Alpha Stickers, Not in kit: Studio Calico Mr Huey mist (white), Imaginisce i-top 2.0, large brad, Zig .05 black pen, Glue Arts Pro Glider
Pin It
Here's a few close-ups:
Did you know? Imaginisce is celebrating Christmas this week so I made a few few stocking suffers with my Santa's Little Helper loot from Imaginisce.
Pin It
I cut the paper using my new Cricut Imagine and the Winter Frolic cartridge. The candy cane and tree measure about 6.5" inches tall and the stocking and ornament are about 5.5". To make these I simply cut two of each design, stitched them together leaving an opening to intert the candies and then completed the stitching. They are all funky lumpy because they are packed with as much candy as I could fit. I then adorned them with a bit of bling and trim. Leave a comment on the Imaginisce blog for a chance to win an i-rock sampler pack!
Thanks for stopping by today!
First, my silly little girl loves to get all glammed up in her twirl dresses...yes, the amount of twirl is what she measures her clothes by. Anyway, she was dolled up in her headband-wearing-leopard outfit and I should have known something was up because she was quiet. She called me over to her to show me her "art", proud of it and all. She didn't write on her clothes, walls or carpet so I embraced it and snapped pics of course. This isn't the first time she's created masterpieces on herself and I know it won't be the last!
I used my Scrapbook Circle December kit, Note to Self, and this week's Sketchy Thursdays sketch to show of my sweet little beautiful mess that she can be.
Supplies from Scrapbook Circle December kit "Note to Self": Echo Park Happy Days collection: Retro, Bottle Caps, Journaling Cards, Alpha Stickers, Not in kit: Studio Calico Mr Huey mist (white), Imaginisce i-top 2.0, large brad, Zig .05 black pen, Glue Arts Pro Glider
Pin It
Here's a few close-ups:
Make sure to play along with us at Sketchy Thursdays for a chance to win some fabulous scrappy goodies!
Did you know? Imaginisce is celebrating Christmas this week so I made a few few stocking suffers with my Santa's Little Helper loot from Imaginisce.
Pin It
I cut the paper using my new Cricut Imagine and the Winter Frolic cartridge. The candy cane and tree measure about 6.5" inches tall and the stocking and ornament are about 5.5". To make these I simply cut two of each design, stitched them together leaving an opening to intert the candies and then completed the stitching. They are all funky lumpy because they are packed with as much candy as I could fit. I then adorned them with a bit of bling and trim. Leave a comment on the Imaginisce blog for a chance to win an i-rock sampler pack!
Thanks for stopping by today!
Thursday, November 17, 2011
She's "fwee" Today!
My baby girl turned 3 at the end of October, which is soo hard to believe! I was inspired to scrap the photos of her blowing out the candles on her cake by this week's Sketchy Thursdays sketch and the Happy Day collection sent to me by Simple Stories for being their guest designer this month (THANKS for having me). Check out those projects in yesterday's blog post.
Supplies: Simple Stories Happy Day Collection: Let's Party, Flash Cards papers; Signature Elements 2x12 & 4x12 Title Strip Elements, 12x12 Fundamental Cardstock Stickers; American Crafts Thickers "Stroll"; Cosmo Cricket Tiny Alphas in red/cream; Kaiser Craft Tiny Alpha Stickers "Toffee Apple"; Mister Hueys Color Mist in Lemonade; homemade blue mist; Shimmerz miniZ "Bed of Roses"; Zig marker in Chocolate; misc. red/white/blue twine; Martha Stewart punch; Glue Arts Glue Glider Pro; small wooden clothespins; misc. thread.
The papers and bits from the Happy Day collection were such a perfect fit, from the colors to the celebration sentiments. I just love how so much of it is done for you and helps take a bit of the guess work out. Don't get me wrong, it took me a while to determine which particular papers to use, layering, placement, etc but all in all it came together pretty fast.
To get the paint splatters more "clumpy" than spritzy I unscrewed and removed the spray nozzle from the container. Then I flicked it with my finger. It's still an unpredictable pattern but it's usually right where I want it. To get the circle ring, I sprayed some of the mist into the cap, turned it over and pressed it on the paper.
I had the red, white and blue baker's twine but I really wanted a bit of yellow so I laid it out and then misted it a bit with the yellow. I love how it came out.
The rest was layering, punching, gathering and stitching. Here's the sketch that inspired my layout above.
Make sure to head over to Sketchy Thursdays to see the prize that's up for grabs from Lindy's Stamp Gang for playing along this week. Oh and guess what, we're "off" for Thanksgiving so you have two weeks to play along AND they'll be drawing 2 prize winners instead of 1!!!!
Thanks for stopping by today!
Thursday, November 3, 2011
Family: Then & Now
The Birds of a Feather November kit is filled with gorgeousness from Simple Stories and Bo Bunny. When I first looked at the kit the most obvious thing to do with it was to make a layout about my Family. This Then and Now layout, inspired by this week's Sketchy Thursdays sketch, features my daughters 3 years ago with their great grandma (my grandma).
Both my girls absolutely adore their Mommy Little. What I really love is seeing my grandma's face light up when she sees the girls. As a matter of fact, they had her laughing soo hard last night. What a great thing.
Supplies from Birds of a Feather November 2011 kit: Simple Stories Generations collection: Remember When, Live.Laugh.Love papers, 2x12 border & 4x12 Title Strip Elements paper, Flash cards paper, Expressions Cardstock stickers, Fundamentals Cardstock Stickers; Bazzill Basics "Brown"; American Crafts Elements Pearl Brads "Earth Tones"; Shimmerz in Sunflower; Fiskars Punch; Zig marker in Chocolate.
Thanks for stopping by today. Make sure to head over to Sketchy Thursdays to see the sketch that inspired this layout and see what the other DT gals did. Oh and play along this week for a chance to win something great from Paper Issues.
Monday, October 17, 2011
Monkeying Around
Things are a little bit sketchy over at the Imaginisce blog today. Melinda gave a few of us a really great sketch to work with. I saw the sketch and I had an idea of what I was going to do with it but as I was searching through my paper stash and my photos I came across this photo of my hubby helping my daughter swing on the monkey bars. The Animal Crackers collection was a perfect fit. Here's what I did with it.
One of my goals for the layout was to make it look like ropes a monkey would swing from so I cut the banners and pieced them together. I fussy cut a little monkey and dangled him from one of the banners. I added bit of bling in different patterns on the two banners.
My favorite part of the layout is the frame I made. I adhered my strips of paper and then I laid down some mesh and painted over it with yellow paint. I removed the mesh and this was the effect I got. Once dried, I outlined it with black and white pen.
And here's the sketch. As I mentioned, I didn't use a circle photo. A sketch is for inspiration but does not have to be followed to the "T". The key is to use it as your starting point and to go from there.
Thanks for stopping by today! -xoxo Heather
One of my goals for the layout was to make it look like ropes a monkey would swing from so I cut the banners and pieced them together. I fussy cut a little monkey and dangled him from one of the banners. I added bit of bling in different patterns on the two banners.
And here's the sketch. As I mentioned, I didn't use a circle photo. A sketch is for inspiration but does not have to be followed to the "T". The key is to use it as your starting point and to go from there.
Thanks for stopping by today! -xoxo Heather
Monday, September 12, 2011
Let the Good Times Roll
The afternoon after going to meet the teacher, hubby went back to work but I took the day off and let Rheagan choose something fun to do. She chose bowling and we had a blast. I created this layout, based on my own sketch for Create 365, a LSS I am now designing for. If you are in the Louisiana area or driving through on I-10 just outside of Lafayette in Scott, you must stop in. You'll fall in love with the store and Amy, the owner! In the meantime, check out her blog and "Like" her Facebook page.
Supplies: My Mind's Eye Lime Twist Happy Go Lucky Collection: Happy "Blooms" paper, Hello "Bubbles" paper, "Lines" paper, Cute "Buttons" paper, Perfect "Butterflies" die-cut paper; "Cute" journaling card; "Happy" Accessories sheet; "Happy" twine; Out of the Blue "Playful Alphabet; American Crafts ribbon "Sharcoal; American Crafts Thickers Fabric Letters "Aqua"
Thanks for stopping by today!
Saturday, September 10, 2011
Meet the Teachers
I am so in love with the Scrapbook Circle "The Good Life" kit this month! It's full of Amy Tangerine, Fancy Pants, Crate Paper...yummy!
I actually journalled in three spots here on the page. The first is the little sticker tab that says No. 1. That sticker was chosen because that is my daughter's main homeroom teacher and it's affixed to cardstock that has the teacher name and bio on it. The 2nd hidden journalling is under the "Hello my story is" sticker which is is also affixed to cardstock and has teacher #2 on it. They just slide right out from behind the photos.
The last bit of hidden journaling is on the library index card peeking out on the upper left hand side and that includes our personal thoughts on 2nd grade.
I'm really pleased that I was able to fit paragraphs about each teacher so that we can look back YEARS later and know a little bit more about the teachers we had and how excited Rheagan was to start 2nd grade.
Here's the sketch I made. I will be posting them to the Sketches page, which can also be found by clicking on the "Sketches" tab at the top of my blog.
Thanks for stopping by today!
Today, I'm sharing a layout of my daughter's Meet the Teacher day for 2nd grade. By now, you probably know that my style usually includes lots of layers but I went a little "clean and simple" (actually not so simple) with this one because I knew I would need a lot of room to journal about her two teachers plus how we were all feeling that day. I soon realized it would be best to hide the journaling. Take a look...
I actually journalled in three spots here on the page. The first is the little sticker tab that says No. 1. That sticker was chosen because that is my daughter's main homeroom teacher and it's affixed to cardstock that has the teacher name and bio on it. The 2nd hidden journalling is under the "Hello my story is" sticker which is is also affixed to cardstock and has teacher #2 on it. They just slide right out from behind the photos.
The last bit of hidden journaling is on the library index card peeking out on the upper left hand side and that includes our personal thoughts on 2nd grade.
I'm really pleased that I was able to fit paragraphs about each teacher so that we can look back YEARS later and know a little bit more about the teachers we had and how excited Rheagan was to start 2nd grade.
Here's the sketch I made. I will be posting them to the Sketches page, which can also be found by clicking on the "Sketches" tab at the top of my blog.
Thanks for stopping by today!
Subscribe to:
Posts (Atom)