Showing posts with label Bling. Show all posts

Thursday, February 16, 2012

DIY Chevron Card

This week at Imaginisce we are teaming up with Scrapbook Adhesive and I am so impressed with their products.  They sent us a ton of great products from photo corners to adhesive sheets to tape runners and more.  I couldn't decide what I wanted to do that would best showcase their adhesive so I pulled everything out of their packaging and just stared at them for a few moments in hopes something would hit me. 

It worked.  As I was looking at the photo corners sheets, which come 42 on a sheet, I saw a potential pattern. With chevrons being all the rage, I created this cool, dimensional card.

This really did happen by pure experiment. Like I said, I saw potential so I started stacking the photo corners on top of each other in a pattern. It took me a few tries to figure out how to position the photo corners to get the look I was going for but once I had it, it was easy peasy.  What's cool about these photo corners is that there's a very subtle line that's about an 1/8th of an inch from the top of each side of the photo corner so it made lining/stacking them evenly a breeze.
The start of my experiment. See the little indentions that helped me line them up evenly?
 I just kept stacking and my pattern was finally starting to
look like it would not just work but actually look good.
 I'm about halfway through each sheet here.......

I used an entire sheet of each color to make the card.

Check out the dimension...and it actually looks very even and cool when looking at the card because the 3 strips that look flat are raised from the top instead of the bottom like the 2 you see below. View from bottom of card.
Pin It

Side View

Here's the end result again. I hope you enjoyed my little experiment. Make sure to head over to the Imaginisce blog and leave a comment over there for a chance to win some Scrapbook Adhesive and Imaginisce goodies!
Supplies:
Cardstock card base
Imaginisce Happy Camper paper & chipboard adhesive
Scrapbook Adhesive tape runner
Scrapbook Adhesive Foam Squares in black
Scrapbook Adhesive Photo corners in white, black and kraft
Imaginisce i-rock and glam rocks
Imaginisce Lighted Tweezers
Imaginisce Pink Jewel Tray
My handy dandy sewing machine

Wednesday, December 21, 2011

Easy Last Minute Christmas Treats

I wanted to show you a few little treat bags that are super quick and easy to make and can really dress-up a little token of appreciation you may be giving. We made a few for my daughter to pass out to the people she interacts a lot with at school (nurse who helps her with her medicine, registrar who has taken her under her wing, etc). She also wanted to give them to her teachers so we added one to each of the gifts we had bought for them.

The cool thing is that Imaginisce and Clear Snaps teamed up and did a little product swap so I got to play with several of their products and the Imaginisce Santa's Little Helper line. 
This first treat bag uses the Clear Snaps Smooch Spritz in Ice Rink and Ginger Ale.  I also used their Design Adhesives, which has double sided patterns that you can apply glitter, embossing powder, etc. to.  I used the Winter Frost glitter. Why is glitter so hard to photograph?

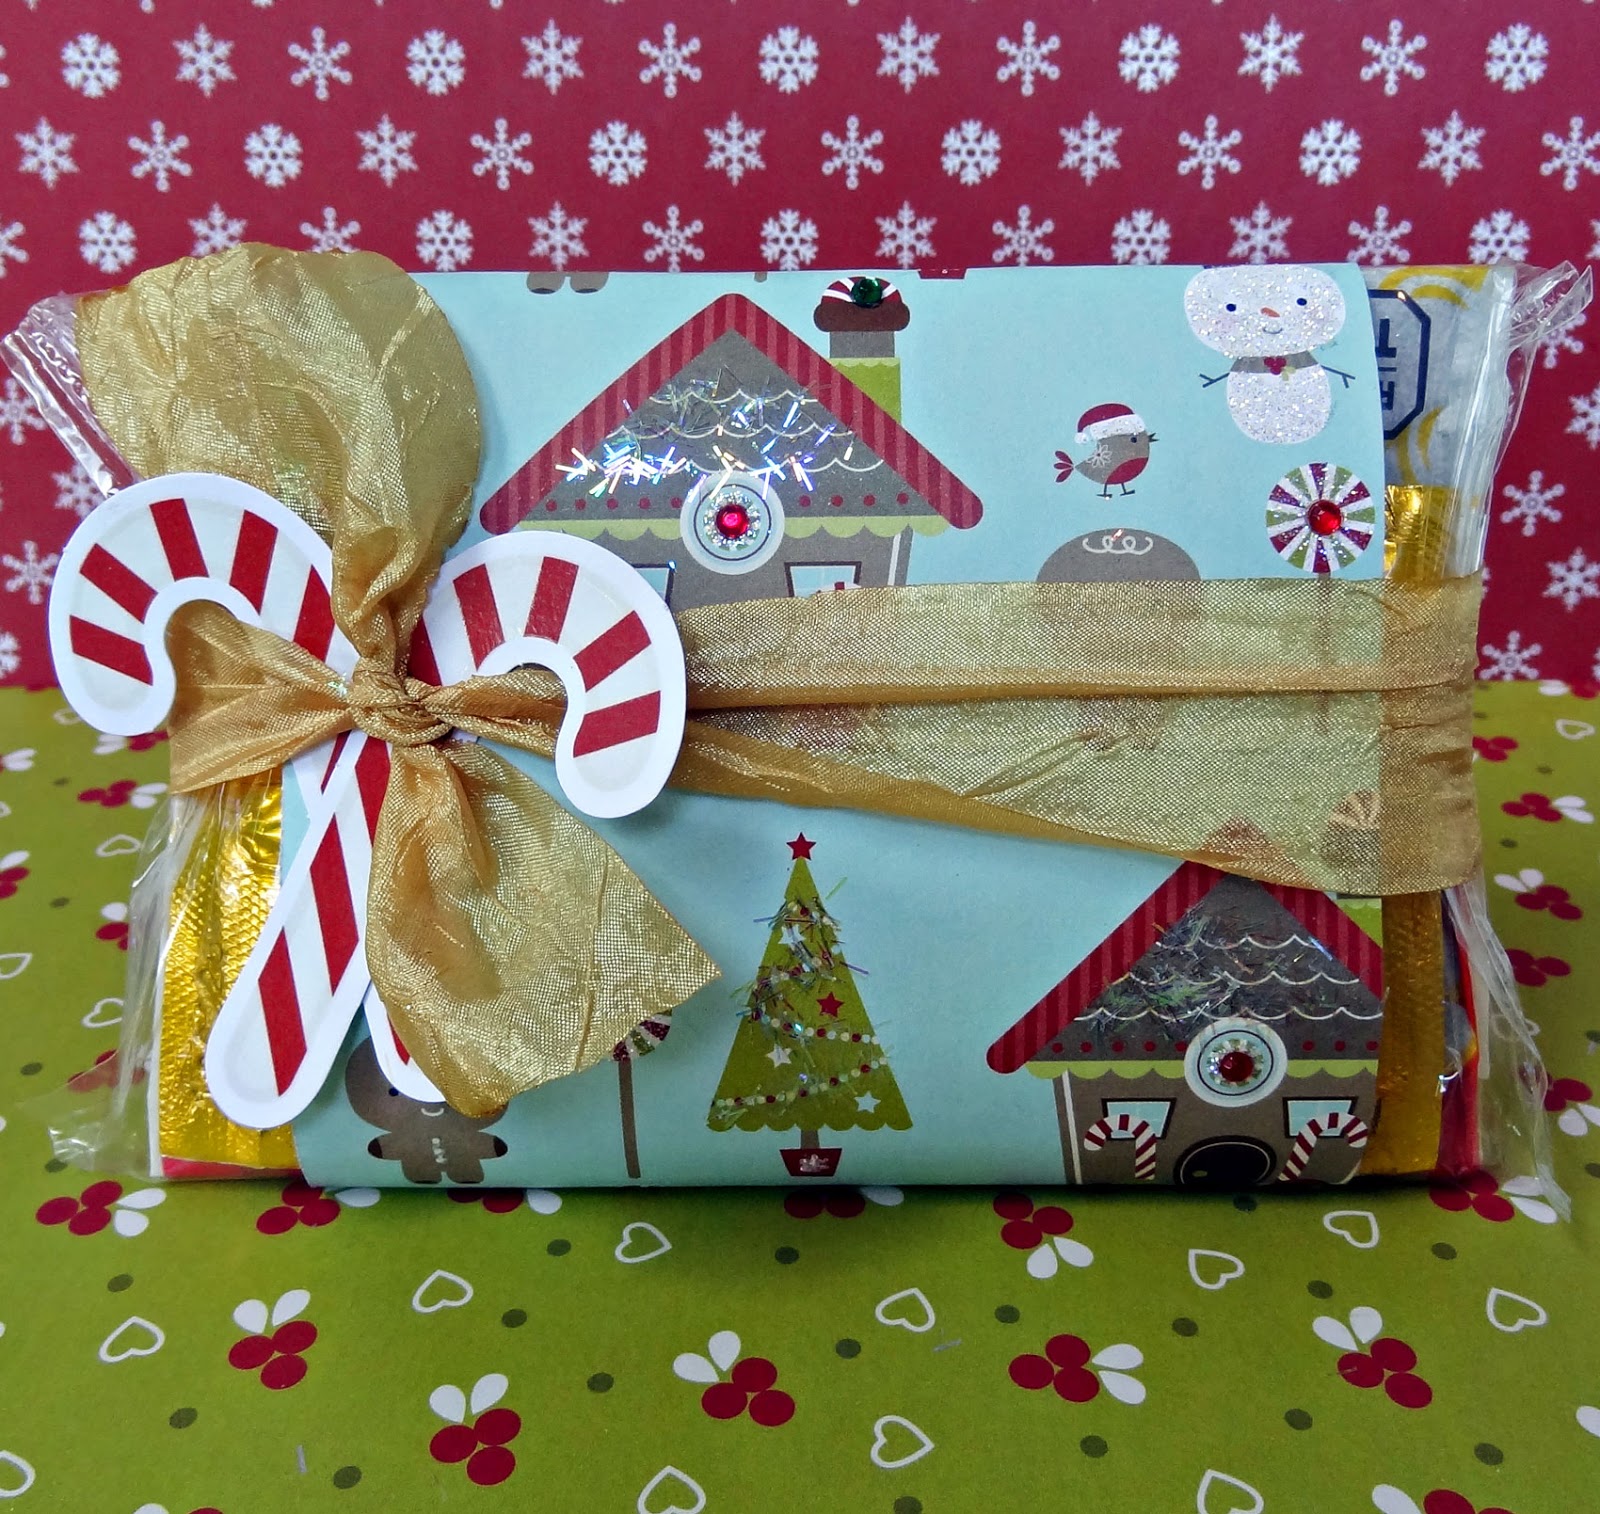
For this next project I made a little wrap to go around a Blockbuster gift card and microwaveable popcorn. We gave these to our mailman, my daughter's bus driver, our pest control guy, etc. I used Santa's Little Helper again and then added some bling to it using the Glue Gloss - adhesive on a stick - glitter and the Sparkle Fibers.

I glittered the snowman, birdie hat and peppermints. I added Sparkle Fibers to the ginger bread house in an attempt to make it look like icicles as well as the garland on the trees to go for the tinsel effect.

Thanks for stopping by today. Make sure to hop over to the Imaginisce and Clear Snaps blogs and participate in the blog hop for a chance to win some goodies for yourself.

Wednesday, December 14, 2011

Faux Snow Day

We don't see much snow down here in the houston suburbs so we have to improvise.  These photos were taken years ago when my oldest daughter was just 3 (she's 8 now).  Our neighborhood has an annual Chirstmas party and the kids just love that snow is brought in.  It's really chipped ice but no one cares.  We had a great time making tiny snowmen and throwing snowballs aka ice-balls. 

It's super cold here now so I am hoping there's a chance for a bit of snow this year.  fingers crossed!
Supplies: Pink Paislee Snow Day Collection: Cozy Sweater, Fireside, Warm Mittens, Snowball Fight, Frosty papers; Ephemera, Wood Shapes, bitty blocks alphas; Studio Calico Mr Huey white mist, Imaginisce i-top 2.0 and small brad daddy; Martha Stewart punch.

I did a lot of distressing on this layout and tucked in coordinating paper here and there in the exposed areas.  I couldn't resist adding the heart shaped "i love snow" ephemera at the top.  I also misted the wood elements with white mist and added a little paper for added touch.

 A quick shot of my journaling spot and layered elements...

Thanks for stopping by today.  I hope you are staying nice and warm on what appears to be shaping up as a cold winter.

Thursday, December 8, 2011

Beautiful Mess & DIY Candy Stocking Stuffers

I have two completely different reveals for you today, which comes with two chances to win some yummy scrappy stuff.

First, my silly little girl loves to get all glammed up in her twirl dresses...yes, the amount of twirl is what she measures her clothes by. Anyway, she was dolled up in her headband-wearing-leopard outfit and I should have known something was up because she was quiet. She called me over to her to show me her "art", proud of it and all. She didn't write on her clothes, walls or carpet so I embraced it and snapped pics of course. This isn't the first time she's created masterpieces on herself and I know it won't be the last!

I used my Scrapbook Circle December kit, Note to Self, and this week's Sketchy Thursdays sketch to show of my sweet little beautiful mess that she can be.
Supplies from Scrapbook Circle December kit "Note to Self": Echo Park Happy Days collection: Retro, Bottle Caps, Journaling Cards, Alpha Stickers, Not in kit: Studio Calico Mr Huey mist (white), Imaginisce i-top 2.0, large brad, Zig .05 black pen, Glue Arts Pro Glider
Pin It


Here's a few close-ups:

Make sure to play along with us at Sketchy Thursdays for a chance to win some fabulous scrappy goodies!

Did you know? Imaginisce is celebrating Christmas this week so I made a few few stocking suffers with my Santa's Little Helper loot from Imaginisce.
Pin It


I cut the paper using my new Cricut Imagine and the Winter Frolic cartridge. The candy cane and tree measure about 6.5" inches tall and the stocking and ornament are about 5.5". To make these I simply cut two of each design, stitched them together leaving an opening to intert the candies and then completed the stitching. They are all funky lumpy because they are packed with as much candy as I could fit. I then adorned them with a bit of bling and trim. Leave a comment on the Imaginisce blog for a chance to win an i-rock sampler pack!

Thanks for stopping by today!

Monday, December 5, 2011

Detachable Ornament Christmas Card

We are celebrating Christmas over on the Imaginisce blog this week. Today we are featuring Christmas cards.  I just love seeing all the DIY holiday wreaths for the front doors and walls, specifically the paper cone wreaths.  I decided to scale that idea down and use it on a card.   Here is the end result:
Supplies: Imaginisce Santa's Helper Pattern Paper, i-top 2.0, 28mm brad, Imaginisce i-rock, Imaginisce red foam adhesive, Martha Stewart punch, Clear Snaps Glue Gloss, Clear Snaps Sparkle Fibers, Doodlebugs Christmas Twine, Glue Arts Glue Glider Pro
Pin It


Here's a closer look at the wreath.  See that twine? I made it so that the wreath can be detached from the card and hung on a tree as an ornament!
 

Edited to add: here's how I made it detachable: I cut a large circle for the back of the ornament, adhered it to the back and slid a bobby pen behind the circle and through a little paper loop I added to the card.

Thanks for stopping by today.  Make sure to head over to the Imaginisce blog to see more card inspiration and to enter to win the i-rock sampler giveaway!

Monday, October 10, 2011

Always My Favorite & a Mini Me!

I just realized that I shared my latest big news on Facebook but haven't shared it with my blog friends.  Scrapbook Circle just announced it's new design team and Lisa has some incredible talent lined up for the next 6 months.  I will be staying on the team - YAY - but will be moving in a social media strategist role, which is sooooo up my alley.  This means I still get to be creative with the kits but I also get to interact more with you on the Scrapbook Circle Facebook page, Twitter and Pinterest!  I am beyond excited.  Make sure to follow Scrapbook Circle on all these networking sites because we will be offering promotions exclusive to each network.

With that fun announcement out of the way, let me show you 2 layouts I did with the gorgeous October kit, Fresh Picked. 

This first layout is all our our dinner tradition. Every night, we gather around the table and say our favorite and not favorite part of the day.  This came about because my daughter would come home from school and we'd ask about her day and she'd say "I don't know." This helps draw it out of her and now it's just part of our dinner routine.  We talk about our not favorite things too because it's important for so many reasons.

For this one I misted, layered and even re-purposed the packaging from the Pink Paislee alphabets (ledger paper below). I misted the alphas with yellow and once dried I doodled around them with a marker.  I painted the hearts red. The title was easy...the favorite part of my day, every day, is being with my family - they are "always my favorite"
Supplies from Scrapbook Circle Fresh Picked kit: Lilybee Memorandum Collection: timeclock, whiteboard, 9 to 5; Crate Paper Random Collection: Textile; Elle's Studio Today's Tags, Red Pennant Embellishment page; Pink Paislee Sawdust Wood Alphas and packaging insert; Shabby Chic Crafts Chevron Tag; Scrapbook Circle Printable; homemade mist; Zig .5mm chocolate marker  

My 2nd layout today was inspired by the "Lifting You" feature we do at Scrapbook Circle.  We love it when Scrapbook Circle subscriber share their projects on the Facebook page.  When you do, you just might get "Lifted".  So here's my take on Brianna's layout (also shown below):
 Supplies from Scrapbook Circle Fresh Picked kit: Pebbles Fresh Goods collection: Simple Joys, Window Display; Crate Paper Farmhouse Collection: Cross Stitch; Jillibean Homemade 6 Bean Soup "Barley Pearls; "Pink Paislee Sawdust Wood Alphas (used as a mask) and packaging insert; Scrapbook Circle Printable; homemade mist; Zig .5mm chocolate marker; not in kit: Imaginisce i-top with medium and large brad daddies; Imaginisce i-rock (various sizes, styles and colors)

And here's the original, from Brianna.  Isn't it gorgeous? Here's what I focused on: 1 photo, tone-on-tone circles, the layered papers and the circle embellie on the upper right corner.  If you look closely, there are a couple more similarities but you get the point, right?  Thanks for the inspiration, Brianna!


Thanks for looking today!

Friday, October 7, 2011

Home Grown Girl & A Birthday Blog Hop

Happy Friday, everyone!  Today we are kicking off a big birthday celebration at Birds of a Feather (BOAF).  Amy, owner of Birds of a Feather kit co. is celebrating her birthday TODAY and it's also the 1st birthday for BOAF so we are celebrating by hosting a blog hop and an online crop this weekend. 

So let's get this blog hop going.  If you just started the hop here at my blog make sure to click HERE to start at the beginning.  If you came to my site from Amy, welcome to my little piece of the scrappy world!

Amy's kits are packed is so much yummy stuff every month but I have to say that October's kit has been my absolute favorite.  I've created 4 layouts with it so far and I still have A LOT left over to play with still.  I've posted some of them on my site HERE and HERE and here is my most recent one:
Hint: This layout might just be part of one of the challenges this weekend.  ;) What do you think it could be about? 
 
Back to the hop...to celebrate this fun 1st birthday,
I am giving away a stash of Basic Grey goodies.
For a chance to win, I'd love it if you would become a follower of my blog if you aren't already AND leave me a comment on this post.  It's THAT easy to win the giveaway I'm doing! 

The grand prize for the overall BOAF blog hop is a package of Bella Blvd products valued at $50!!!
You'll need to add this word (after Amy's word) to help complete your mystery phrase:

Make sure to head over to the forum, introduce yourself and play along with all the challenges we have going on over there.
Prizes will be given away with the GRAND PRIZE being a kit of your choice!

Thanks for stopping by today! Your next stop on the hop is Krissy.

Thursday, June 2, 2011

Read Me Layout and SILVER Lining Card

I think I say this every week but I just LOVE this week's Sketchy Thursdays sketch AND the new Scrapbook Circle kit is WAY to fun to play with. This Thursday is even better than a normal Thursday because I was lucky enough to play with 2 Sketchy Thursdays sketches this week so check them out...

I had a great time creating this layout of little Miss Reese and her Big Daddy (my dad). These pictures were snapped while my mom was working on my Mother's Day gift to her, which was painting pottery with the girl's handprints. While she was painting the base colors on the pottery, Miss Reese asked her Big Daddy to "Read Me" and these are the photos I snapped. Aren't they the sweetest? She just adores him!
Supplies from the Scrapbook Circle Garden Party June kit: the girls' paperie "jubilee" Hey Day & Carousel,  Pink Paislee Hometown Summer "Summer Fun", Pink Paislee House of 3 Soiree "Music", jillibean soup corn kernels, Studio Calico Wood Veneer Butterflies, My Mind's Eye Stella & Rose "Lovely" Sticker Labels; Not in kit: Imaginisce i-rock and glam rocks; Bazzil cardstock, CTMH Twilight ink, misc. stamps.

I mentioned how fun this kit is...I love the wood veneer butterflies. I contemplated keeping them the wood color that they are naturally but they weren't popping on the colors on the paper so I stamped them and added a little decor. I also fussy cut the flowers and butterflies out of the Ho3 paper and popped them on the page. Oh and those "READ" letters were cut from the Pink Paislee Summer Fun paper and I cut them into banners to give them a little bit more kick. I hope you like this layout as much as I loved playing with the kit. 

Make sure to play along this week with this layout sketch below for your chance to win a June kit from The Sampler.

Don't go anywhere just yet...
The Sketchy Thursdays layout sketch that they did for Scrapbook Circle recently was so successful that we're doing another one.  This time, it's a card sketch. Here's my card, which is already en route to someone VERY special who deserves a little pepping up.
Supplies from the Scrapbook Circle Garden Party June kit: the girls' paperie "jubilee" Hey Day & Carousel, Pink Paislee House of 3 Soiree "Music", jillibean soup corn kernels, jillibean soup gruyere cheese; Not in kit: silver speckled felt, Imaginisce "Clouds" Snag 'em stamps (Happy Camper collection); CTMH Twilight ink; Spellbinders Nestabilities Labels Four Small; misc. ribbon.


I lined the sentiment with silver metallic ink and then I doodled on the paper cloud with the same silver metallic market. Can you see the specks of silver in the felt? I love the silver lining touch it gives to the clouds.

Here is the great sketch I based my card on. We hope you’ll join us and play along in this challenge over at Scrapbook Circle! Create a card based on the sketch, then post a photo of your creation on your blog, a gallery, or on our Facebook page.  Leave a link to your card in the comments on the Scrapbook Circle Challenge #9 Card Sketch blog post by Wednesday evening, June 15th for a chance to win a Crate Paper "Neighborhood" collection kit.
 

Tuesday, April 5, 2011

Hopscotch & A Tag

I love these One Item Wonder challenges the design team over at Scrapbook Circle is given. My item this month are these fun little chalkboard tags from the Hello, Sunshine kit. 

I used the first tag for my journaling on the hopscotch layout below. I also had fun with the playing cards from the Bella Blvd Family Dynamix papers and used the numbers and shapes to correspond with the hopscotch pattern.
Supplies from Scrapbook Circle Hello, Sunshine kit: Bella Blvd. Family Dynamix Mother's Day and Game Night papers; Cosmo Cricket Upcycle Bling Bling; Bo Bunny Ad Lib paper; Crate Paper Neighborhood Sticker Borders and Chipboard Accents; Canvas Corp Chalkboard Tag; white Uniball Signo broad pen.

I used the 2nd tag as a gift tag but I might even add it to a card or just add it to a cute little bottle or jar of goodies for someone special, I haven't decided. I misted the white and blue twine with yellow to give the blue a more green shade to match the blue-green in the caption and also to give the white a pretty yellow tint to match the bird and flower.
Supplies from Scrapbook Circle Hello, Sunshine kit: Canvas Corp Chalkboard Tag; Crate Paper Neighborhood Chipboard Accents, sticker borders and block party paper; Bo Bunny Ad Lib, Cosmo Cricket Tiny Type alphas, white Uniball Signo broad pen.

Saturday, April 2, 2011

Family = Home

I'm so excited to kick off April with my designer's choice reveal at Scrapbook Circle. This month's Hello Sunshine kit is AMAZING! It's packed full of yummy scrapilicious goodness. As I looked through the kit all these exciting ideas flooded my mind and I decided to start off with an altered project.

I bought this frame from the Target $1 section back in February with the sole intention of altering it. As I was looking through the kit, I also had this photo of my family that I had printed the wrong size for a recent layout that's posted below and well it just all came together. This will sit here on my scrap desk to inspire me!
The $1 frame:

Since the frame was plastic I sanded it down with my d-stress tool from Imaginisce. I traced the frame over my paper, leaving about 3/4 inch around the outside and inside. 


I cut the middle out with an xacto knife and it was ready to be adhered to the frame. I attempted to mod podge the front of the frame but it didn't stick very well so I whipped out my i-bond glue gun and it did it's magic without being lumpy like glue guns can do sometimes! 
 Once I had the frame covered I went to town with the embellishments.
Supplies from Scrapbook Circle Hello Sunshine kit: Crate Paper Neighborhood Collection: Block Party, Garden and Visit papers, Chipboard Accents, Border Stickers; misc. twine; Cosmo Cricket Bling


I started with the little houses and then I fringe cut some grass and rolled it with my petal roller, which worked perfectly. I fussy cut several flowers and 2 dogs to represent our pups, who are not pictured.  Did you notice the two little love birds that I perched in the tree? I added the "Home" banner, some twine, a flower to resemble the sun and that adorable little cloud, that I trimmed with white pen.

I like how it turned out. What do you think? Make sure to stop by the Scrapbook Circle blog today to see some other ideas that the design team has whipped up.

Tuesday, March 22, 2011

Life is a Garden...Dig it!

I conquered a fear this week...my fear of mini albums. I can't tell you how many mini albums I have started and not finished. Well this time was different.

For 4 days, over on the Imaginisce blog, we are doing an i-rock Intensive blog hop. It's a new hop each day with new chances to win an i-rock Bundle of Goodies each day!  Today we are doing a feature called Bling'n the Mini.  If you came from the Rhonda's blog or straight from the Imaginisce blog, welcome! If you are one of my lovely followers, then jump on over to the Imaginisce blog and check out what a couple of the other ladies did with their mini album projects, which is what is the feature for today.
I used the new Berrylicious line. It's too adorable and has such a great Spring/Summer feel to it! I also used this little flower chipboard album that I got at Michael's for $1 a couple of years ago. I stocked up on them so I'm sure you'll be seeing more minis from me now!

The cover:
If you look closely you might see that I used real dirt on the cover by applying crackle accents to the photo corners and then pressing it down in the dirt in our garden.

I used a ton of the die-cuts from this line. They are perfect for minis!

I love the little fruit people on this paper. I blinged their eyes to make them pop a bit on the page.

To make the bee trail below I used an i-rock stencil kit. I love how it turned out and it was sooooo easy!

I used some of the Imaginisce Fashion and Cupcake flowers. I misted a white one with Glimmer Mist in Brick to match it to the hearts in the paper. I love how the mesh flowers resemble a honeycomb. To make the hexagon, I cut a circle, then I folded it in half and cut the sides, then I folded it the opposite way and cut the sides. This helped keep it all evenly spaced.

I love these little die cuts in the pics above and below! In the pic below, I added some green bling to the black photo mat and gave the peach some blue blingy eyes - love the little sparkle in her eyes!

I fussy cut these citrus fruits, blinged them out and adhered them as a border for my photo mat.

This was fun - I cut a circle and then hand cut the scallops for the photo mat. Thankfully it's not perfect because that's the look I was going for!

Here's the inside back cover. If I keep this album for myself I think I might move the strawberry brad that I made with the i-top and make a brad using a photo.
Supplies: Imaginisce Berrylicious collection: Summer Stripe, Sweet Summer Garden, Cherry Limeade, Berry Patch, Sunshine Seeds, Just Peachy Papers, Die-cuts, Chipboard Stickers; Fashion Flowers, Cupcake Flowers, i-rock and lots of Hot Rocks; i-top medium brads.

So I hope you liked the little tour through my mini. I really had a ton of fun creating it and I see quite a few more of these in my future!!

Wanna win that i-rock Bundle of Goodies? Follow my blog, tell me what you think of my mini (be honest) and since I was your last stop on the hop today, head back over to the Imaginisce blog and let us know what you thought of our projects! A winner will be announced within a few days!
Good Luck!