Tuesday, March 13, 2012

Splash Zone & Playing in the Sand

Happy Tuesday, everyone!!! I have a couple of scrapbook layouts to share with you today, which are part of the Imaginisce release party for the new Making Waves collection.  Here in Texas we have been having Spring-like weather for some time now so I am really starting to get in the mood for summer. With that said, check out this scrapbooking page, which was taken at our old neighborhood pool last summer.

Supplies: Imaginisce Making Waves collection - Walking on Sunshine, Tropical Heatwave, Surf's Up, Keepin' Cool, Bloomin' Hot papers, Sun-kissed die-cuts; Mr. Huey Mists; My Little Shoebox alphas; Bella Blvd alphas

The pool has a really cool play structure in the water, with a slide and water spouts and all sorts of fun things for the kids.  We had really been missing it but luckily my friend, Audrey, still lives there and invited us over for a water playdate. Sure would be fun to go again this year. ;)

Looking back at the past 6 - 8 months of projects, I've discovered that I really like to mist. I stayed true to my mists on this layout.  I seldomly use the spray nozzle to mist and usually pull the nozzle out and flick it to get the big blotches but I did a combo on this layout.
I had fun layering the various pattern paper but I especially love the chevron papers in this new collection. I just stacked away at the papers, distressed them and stitched them in place.

I decided to go a little more clean in this next scrapbook layout, which is all about my littlest at the beach.  She was having a blast filling her bucket with sand, flipping it over and filling it up again.

I filled the page with my photos and what I refer to as color blocking but I don't think I'm right.

Supplies: Imaginisce Making Waves collection: Walking on Sunshine, Tropical Heatwave, Bloomin' Hot, Surf's Up, Hot! Hot! Hot! papers, Sunny Side Up Sticker Stacker, Hot Summer Day Chipboard stacker, Summer Fun Canvas Sticker, twine from The Twinery, Mr. Huey mists, Imaginisce i-rock, Kraft cardstock

I added chipboard, canvas, stickers and lots of fussy cut pieces. I hand stitched around some of the elements with baker's twine from The Twinery and then to top it off I blinged it out with my i-rock. Oh and I added some mist splatter.
 

Make sure to head over to the Imaginisce blog and leave a comment over there for a chance to win a collection of your own!

Friday, March 9, 2012

Field Notes Revisited

I had a great time guest designing for SEI last month! I didn't post full reveals each day over here so I thought I'd post them now.  First up is a 2-pager and a sketch I did.  Keeping to my promise to myself to do more 2-pagers, I like how it turned out.  So many times I get stuck in a two page rut of lining up a bunch of photos in a row across the page. I think this layout was a good break of that mold.
 Here's the sketch I created:
 I had fun with paint and mist with the goal to make the alphas pop using black splotches to match the ducks.

 Next up: two cards and a tutorial:


 Butterfly Mini Album
Pin It
  
Thanks for stopping by today! I can't wait to play with the other two new lines and the dye they sent me!
xoxo - Heather

Tuesday, March 6, 2012

Core'dinations Love

It's been a great start to the year with Imaginisce. They've released some cute lines and we've had several swaps with other manufacturers, which means I've been having fun creating with some amazing products.  Today I'd like to share with you a couple of cards I made using Core'dinations cardstock.

I ususally stick to my Bazzill or American Crafts but I gave this a whirl and I have to say that it's really nice and heavy and takes to embossing great! I love that you can sand away to expose another color at it's core.  

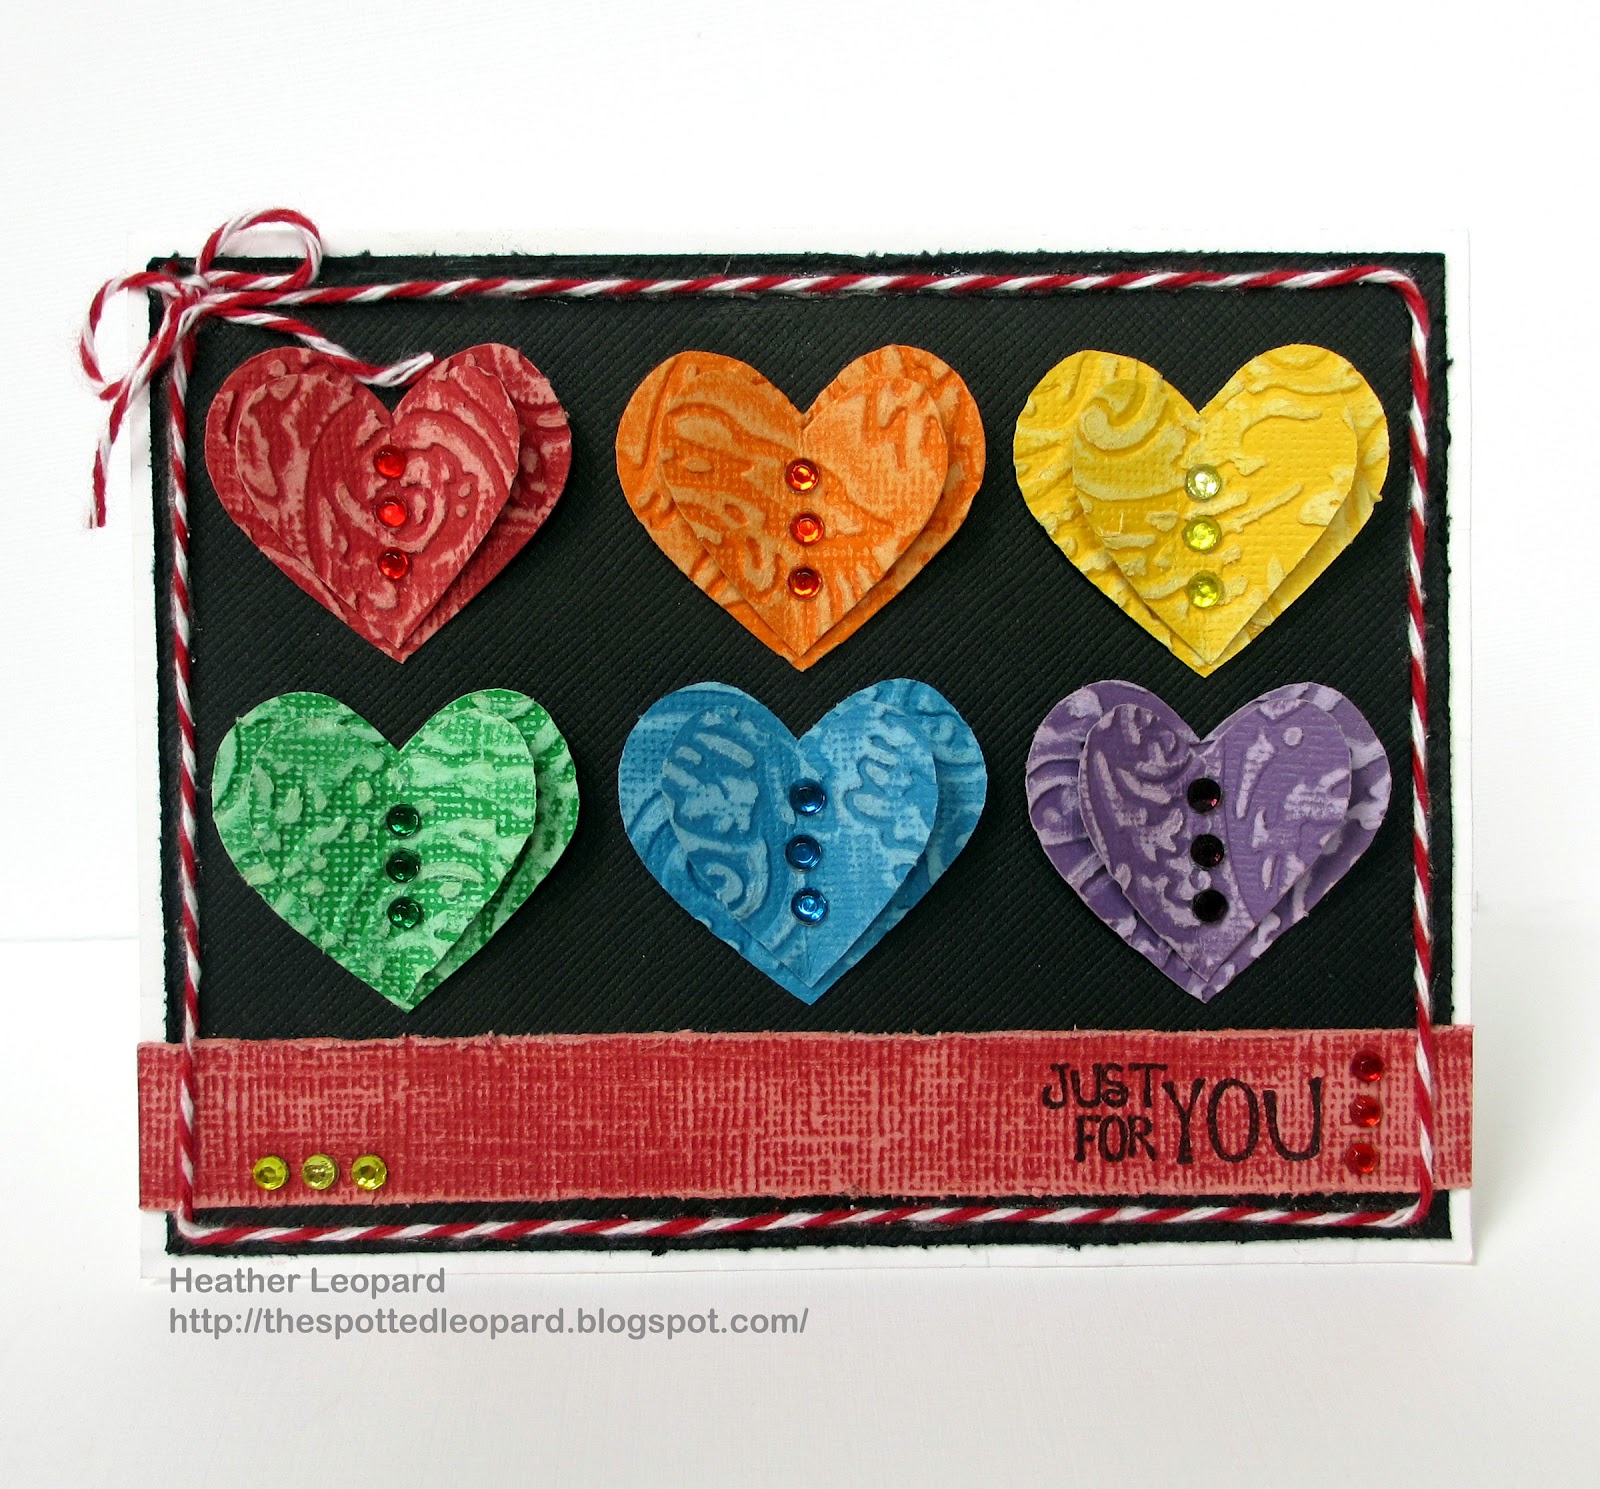
For You Card


Pin It

I made this first card but cutting out large and small hearts in the same colors and running through my Big Shot with an embossing plate.  I then sanded the embossed part and stacked the two colors together.  I added some bling to the centers, added a sentiments and some twine and voila!

Life is Sweet Card


This card was my favorite because it was experimental.  I love to challenge myself to make an idea come to fruition.  To make this card, I pulled out my Imaginisce d-stress tool and embossing tip, flipped the cardstock to the B-side and drew a heart. Then I drew another heart and another heart around it until the shape started to not resemble hearts but the bark of a tree instead.  Then I just added some more odd lines, flipped it, sanded to the core and revealed my tree trunk. I LOVE how it turned out.

Thanks for stopping by today.  Make sure to head over to the Imaginisce blog for more design team inspiration and a chance to win a collection pack of Imaginisce Hippity Hop and Core'dinations Colorcore Cardstock.

Monday, March 5, 2012

Family Movie Night

Okay, it's not every day that I get a chance to work with Becky Fleck and design a layout for Page Maps but I guess it was my lucky day.  A couple of weeks ago, I was given this sketch, from the March Page Maps.

I couldn't resist pulling out an older line of Imaginisce papers for this one.  I used the Animal Crackers collection, because of the tickets papers and embellishments.  There's also a paper that's filled entirely of connecting circles that would come in handy (after I take my scissors to them) for the line of circles under the photo.  The only problem was, I didn't have any photos.  I looked at this as an opportunity for a Family Movie Night.  It was a win-win because I got the photo I wanted and we spent quality time as a family watching a movie and snacking on popcorn.

Take a look at the rest of Becky's March Page Maps. There are so many great ones as usual and lots of designer inspiration. Thanks for stopping by today!

Wednesday, February 29, 2012

Best. Day. Ever.

Okay, so it really was one of my best days ever because I have a few days off between ending one job and starting another and I spent the day at the zoo with my littlest gal and my mom.

We had lunch in the new African Exhibit and the giraffes were eating right next to us.
So ya, that was a pretty fun day.  Wanna know how one of my Best. Days. Ever. ties into my scrappy blog??? Well let me tell you.  The Scrapbook Circle March kit, aptly named Best. Day. Ever. is now available in the store and it's packed with some of the latest swoon-worthy CHA collections.  It seriously has me oohing and ahhing over it.  Here's a couple of sneaks.

Lisa is also offering a couple of great add-ons - Scatter Sunshine add-on - loads of wonderful embellies - and a cardstock add-on.  Her kits have been selling out fast so make sure to get yours before they are gone!
A sneak of the Scatter Sunshine add-on:

Also, make sure to follow us on Facebook, Twitter and Pinterest.  You'll find fun challenges and special offers posted on these connection points and we encourage you to share your fabulous creations made from Scrapbook Circle kits (past or present)!!!

I'll be sharing a few of my projects made from this wonderful kit VERY soon!

Friday, February 24, 2012

Butterfly Mini Album - SEI Guest Blogger

I can't believe my week of hogging the SEI blog has come to an end.  I have one last project to share with you today.  Several years ago, my mom and I found a bunch of flower and butterfly chipboard mini albums at Michael's for $1. I bought several of them and gave them to friends.  When SEI sent me their new CHA collections, I remembered I the albums so I went into my stash of alterable items hoping I didn't give away all of them when I cleaned out my scrap room.  Of course, it was there because I keep everything. 

Here's a few peeks of the mini. 


To see each page, visit the SEI blog today.  And make sure to leave a comment for your chance to win the Field Notes collection.  

xoxo Heather

Thursday, February 23, 2012

LYB Girly Girl & SEI Butterfly Cards

I have one more Little Yellow Bicycle Paradise scrappiness to show you.  Liz asked me if I would create a layout based on the new sketch challenge and of course I obliged. :) Visit the Little Yellow Bicycle blog to see the sketch and play along.  Here's my take on it.

Pin It

 A few close-ups:
 I love the tear out tickets, especially this one:


I can’t believe my week at SEI is going by so fast. Did you get a chance to check out my Pinterest post yesterday? There's soo much out there in Pinterest-land that I want to do and try so be prepared to see a little bit of that here on my blog in the future. How about we start with something today?  I ran across this collage while looking for inspiration for my projects below. I love how they are spreading their wings and taking flight in all sorts of different directions.
Today, I am sharing 2 cards I made using the gorgeous Field Notes collection again because the colors are so striking and I just love the dimension I got from the butterflies. 

Spread Your Wings Card
For this first card, I used the perforated 12x12 sheet, Curated, and fussy cut the butterflies from the Butterfly sheet.  I machine stitched the background and banner and then laid the sentiment across the top.
Pin It

Tip: When I want to stitch on a card I like to stitch each piece before I adhere it to the card so that you can’t see the stitching on the inside of the card.

I used pop dots to raise the sentiment and to keep the butterflies from flattening out once I put the card in the envelope.

Pin It

 Just Be You Card
Looking back at the inspiration piece above, the center photo shows butterflies going in various directions and I wanted to do something to highlight those gorgeous butterflies. What better than a spinning card???  It really all came together because of the Vignettes 12x12 paper. When I got the collection, this paper really stood out. I immediately started cutting out the beautiful frames and I kept going back to the rectangular frame. At this point, everything just kind of came together. Here is the result…
Pin It


I double layered the butterflies and added another smaller frame up at the top right. I stamped the sentiment in orange and blue ink, using silver embossing powder to accent the word “BE” so that it would match the silvery foiling on the frames.  I can’t stop picking up the card and tilting it back and forth. It’s a bit addicting to watch the butterfly spin around.


Pin It
Interested in making your own spinning card?   How about a quick & easy 6-step photo tutorial?

Pin It

Thanks so much for visiting today. Make sure to head over to the SEI blog and leave a comment for a chance to win your own Field Notes collection.  Post a comment on each day's post for up to 5 chances to win!

Tuesday, February 21, 2012

Nature's Adventure - SEI Guest Blogger

I am soooo excited to be guest blogging for SEI all week.  It actually started with an introduction post over there yesterday.  
They sent me their 3 new collections to play with and I've been having a blast creating with them this past week.  I immediately dug into the Field Notes collection because the butterflies and the foiling on the papers are gorgeous! 


My project today is actually a sketch and layout.  And it's not just any layout...if you know my history you know I love my single page layouts. I made it a goal this year to do more double pagers so I figured this would be a good time to start. 


I started out by drawing up this sketch and choosing this color combo:
Pin It

Here's a couple of sneak peeks of my layout.  Visit the SEI blog to see my layout in it's entirety as well as read my design notes. 


There's one more reason to head over to the SEI blog every day this week. By commenting on each day's post, you are entered to win a Field Notes collection. That's up to 5 entries for this!

So that’s it for today.  I hope you enjoy the sketch. If you use it please post a link to it here so I can visit your site and admire your work, even if it's several months from now!!!
Check back in tomorrow for some Pinterest inspiration.
xoxo Heather

Thursday, February 16, 2012

DIY Chevron Card

This week at Imaginisce we are teaming up with Scrapbook Adhesive and I am so impressed with their products.  They sent us a ton of great products from photo corners to adhesive sheets to tape runners and more.  I couldn't decide what I wanted to do that would best showcase their adhesive so I pulled everything out of their packaging and just stared at them for a few moments in hopes something would hit me. 

It worked.  As I was looking at the photo corners sheets, which come 42 on a sheet, I saw a potential pattern. With chevrons being all the rage, I created this cool, dimensional card.

This really did happen by pure experiment. Like I said, I saw potential so I started stacking the photo corners on top of each other in a pattern. It took me a few tries to figure out how to position the photo corners to get the look I was going for but once I had it, it was easy peasy.  What's cool about these photo corners is that there's a very subtle line that's about an 1/8th of an inch from the top of each side of the photo corner so it made lining/stacking them evenly a breeze.
The start of my experiment. See the little indentions that helped me line them up evenly?
 I just kept stacking and my pattern was finally starting to
look like it would not just work but actually look good.
 I'm about halfway through each sheet here.......

I used an entire sheet of each color to make the card.

Check out the dimension...and it actually looks very even and cool when looking at the card because the 3 strips that look flat are raised from the top instead of the bottom like the 2 you see below. View from bottom of card.
Pin It

Side View

Here's the end result again. I hope you enjoyed my little experiment. Make sure to head over to the Imaginisce blog and leave a comment over there for a chance to win some Scrapbook Adhesive and Imaginisce goodies!
Supplies:
Cardstock card base
Imaginisce Happy Camper paper & chipboard adhesive
Scrapbook Adhesive tape runner
Scrapbook Adhesive Foam Squares in black
Scrapbook Adhesive Photo corners in white, black and kraft
Imaginisce i-rock and glam rocks
Imaginisce Lighted Tweezers
Imaginisce Pink Jewel Tray
My handy dandy sewing machine