Wednesday, March 5, 2014

#heatherhitsitalysolo2014 Part 1

I love my job, I really do.  I work for a major computer company as a Portfolio Marketing Manager and I have the flexibility to work from home. I wouldn't trade that for anything because it allows me to see my kiddos on and off the bus, I get more accomplished during the work day and it makes mornings with 2 kids (one with autism) a little less chaotic. If the hubby and I had to add getting us both ready, along with the kids, and do the morning routine, we might all go crazy. Anyway, I also love my job because I am able to travel. I don't go too often but it seems that when I have traveled lately, it's taken me to some pretty incredible places. In November I got to visit Sweden (and meet Alex) and Ireland. And I just got back from Italy and Finland a few days ago.

If you follow me on Instagram, you probably already know that I was just overseas because I shared a few photos there using the hashtags #heatherhitsitalysolo2014 and #heatherhitsfinladsolo2014.  Here's a recap of my trip. WARNING: There's a ton of photos, like tons.  I'm only sharing a few and will spare you the 100's on my computer. Most were taken with my point & shoot and haven't been edited.

#heatherhitsitalysolo2014

It was a long flight over with a stop in New York City. These beautiful snow-capped mountains were my first view of Italy and a welcome sight.

I arrived at 8:40 am, got to the hotel and checked in early. I refused to listen to my biological clock that was telling me to go to sleep. I showered up and set out to explore Milan. I took the underground metro to Duomo not realizing the beauty I would see as I came up to street level.
Duomo do Milano: Milan Cathedral is the cathedral church of Milan, Italy. Dedicated to Santa Maria Nascente, it is the seat of the Archbishop of Milan, currently Cardinal Angelo Scola. The Gothic cathedral took nearly six centuries to complete. It is the fifth largest cathedral in the world and the largest in the Italian state territory. Source: http://en.wikipedia.org/wiki/Milan_Cathedral 

I bought a ticket to the top Terrace. I could have stayed up there all day. I must have been there a while, just enjoying the view, the weather, my religion. Here's what I saw on my way up:


Someone was creating his very own masterpiece and it looked great!


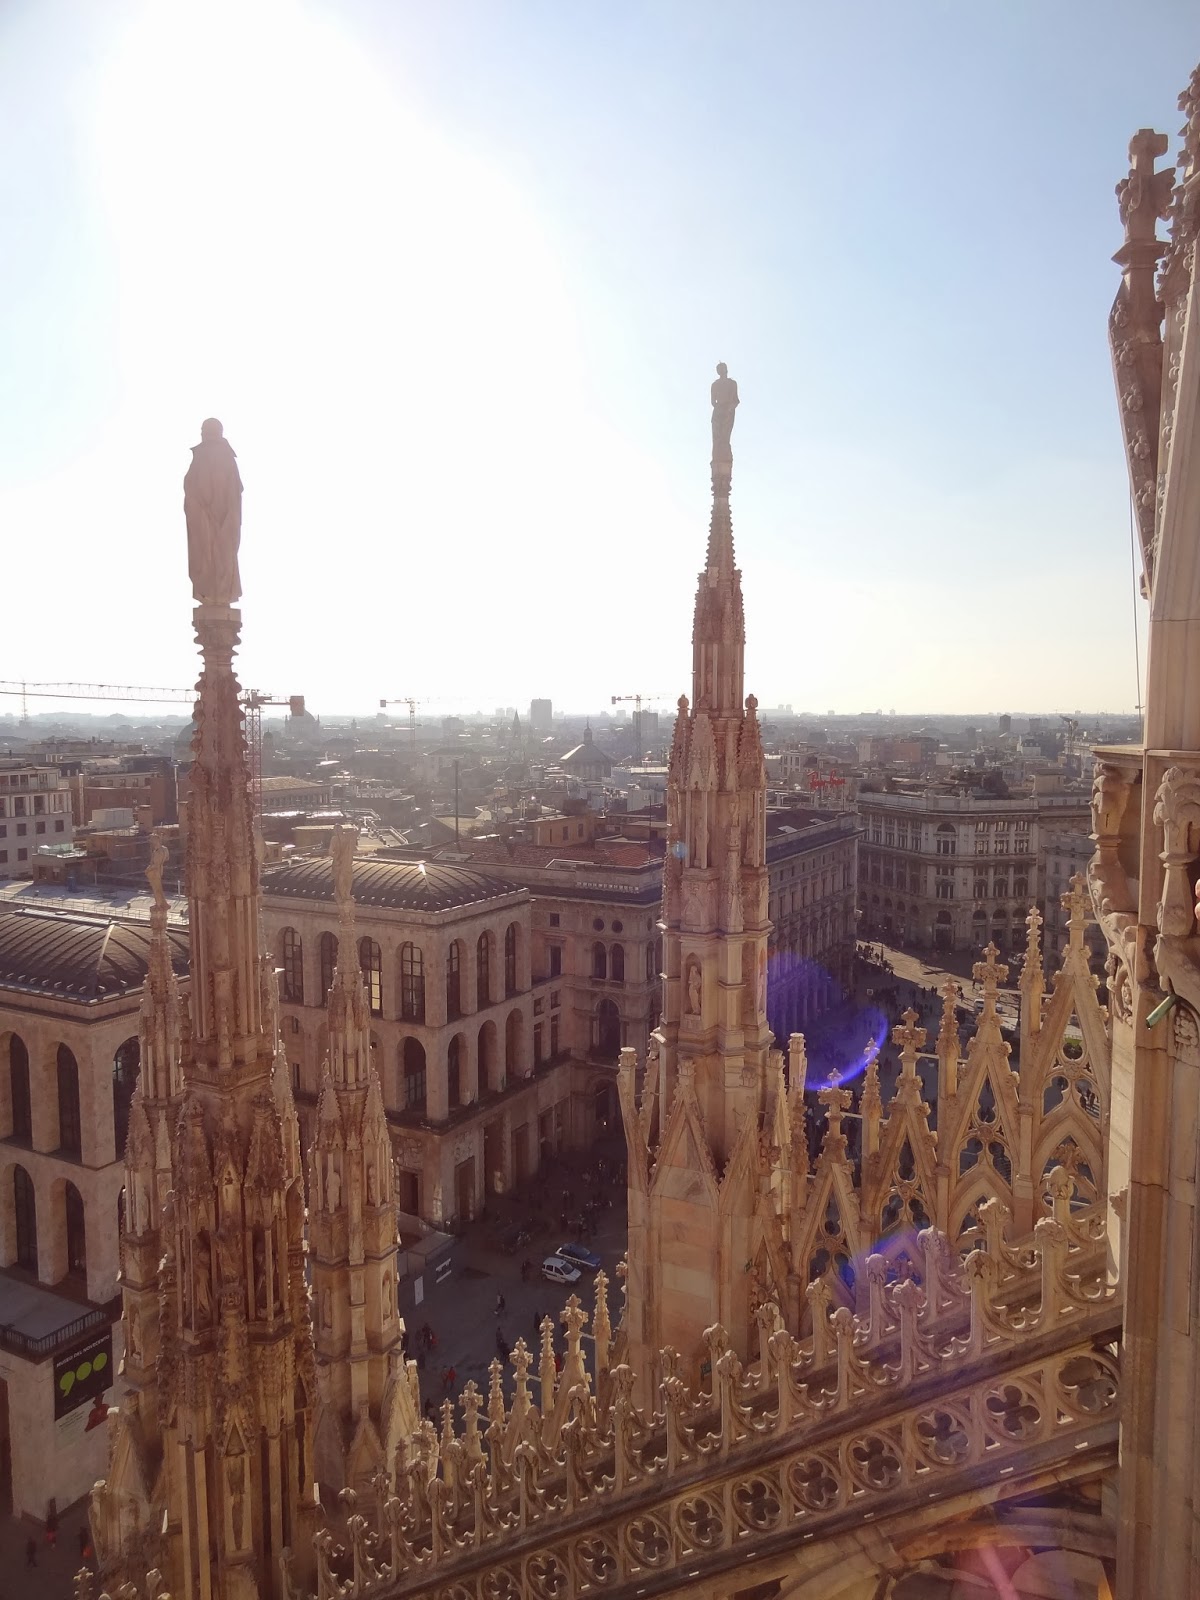
And the view from the top was just incredible:
In 1762 one of the main features of the cathedral, the Madonnina's spire, was erected at the dizzying height of 108.5 m. The spire was designed by Carlo Pellicani and sports at the top a famous polychrome Madonnina statue, designed by Giuseppe Perego that befits the original stature of the cathedral.


You can see the shine in my photo above but it doesn't do it justice. It was almost blinding and oh so beautiful.

I snapped a selfie on the terrace. Not sure why I am all squinty-eyes. Perhaps it's the sun shining back at me from the selfie.


This is where I could have stayed all day but there was too much to see and do, considering this was just my 1st stop.


I can't believe I didn't snap a photo looking down from the terrace. I definitely looked several times.  I found this one on the "Interwebs". This photo of Cathedral (Duomo) is courtesy of TripAdvisor

On to the inside. It was a Sunday so I was in for Mass. I couldn't understand anything they were singing or saying but it was simply magical.


There were two bodies encased in clear glass and preserved for all to see. The masks covered their faces but you could see parts of their bodies.
Andrea Carlo Ferrari (13 August 1850 – 2 February 1921) was a Cardinal of the Roman Catholic Church who served as Archbishop of Milan. His body is in the cathedral. Wikipedia


The Blessed Alfredo Ildefonso SchusterOSB (18 January 1880–30 August 1954), was a Benedictine monk and Cardinal Archbishop of Milan during World War II. He was beatified on 12 May 1996 by Pope John Paul II. Wikipedia

Next was Galleria Vittorio Emanuele II. It was Fashion Week so I needed to get cultured. ;)

The grand entrance to the Galleria...

First thing I saw when I walked in was a photo shoot taking place in the middle of the hustle and bustle.  I slying pulled out my iPhone and snapped a photo. The model is the one in white in front.
He must have walked back and forth a million times for them to get the perfect shot. I was fascinated a watched a bit from the sidelines along with a gazillion other people. Oh and there was another photo shoot in Duomo square and another in La Brera that day. They were all over, everywhere I turned.

I left the mall on the opposite side and ran into a few street performers, like this one.


Tickets to see The Last Supper painting by Leonardo di Vinci was sold out. I had to do the next best thing and visit his statue. Add the museum to the list of MUST SEE when I come back with my family.
I ventured across the way to Teatro alla Scala - it's an amazing place for the opera and ballet.

For now, it was just me and I loved it. I walked and walked and walked the streets of Milan, bundled up in my warm jacket, just enjoying the architecture and culture.


I got to La Brera and walked into Brera Academy of Fine Arts. This is the 3rd spot where I walked upon a photo shoot but what was most interesting was the Napoleon statue that was taken down to be renovated.
It was inside a tent. The cool thing was being able to see parts of it up close. Otherwise, I would have had to look at it like this, if it was still standing in the middle like it's supposed to:
I snapped this pic from a book I found in the museum. Is that bad?

Keep on walking on the cobbled streets...

^^^ I spy a heart shaped rock ^^^ 


Flowers carved out of vegetables? Wha-what???

Finally, gelato!
Chocolate chip & pistachio. I added chocolate to the mix the next time and ordered a medium instead of a small. 


I had lots of Pizza margherita on this trip, though they didn't look like this.

Oh the wine...so smooth.

My dogs were tired and it was time to head home. 

After all, I had walked in and out and around the inner and outer yellow line multiple times, almost all day.

But not before I made it to Castello Sforzesco (Castle of Milan). It was closed by the time I got there so I've marked it down as another MUST See when I come back with the family. It was wonderful to walk around it though.

A trip to Como was on the itinerary for the next day. I'll cover that in another blog post.

Oh and if you are wondering what took me to these places, I am managing a Global roadshow to train our sales and channel partners on the latest product and solutions we have to offer. I manage the logistics, schedule, speakers, etc. for approximately 80 events worldwide. That's in addition to my regular job. ;) I am only going to a select few of these events, thankfully. I couldn't be gone too much from my family as it's hard on us all to have one of the parents away. But sometimes duty calls and sometimes it allows us to see parts of the world that we haven't seen before as well as get a bit of much needed respite. 

Stay tuned for Part 2 coming soon.

Monday, March 3, 2014

Lovely {Beautiful} Girl

I just love when we're outside enjoying the day and I am able to spontaneously capture an image on my iPhone/Instagram, that captures the moment. This photo is a perfect example.  We were just hanging out in the cul-de-sac in princess pj's and little miss was collecting acorns that had fallen from the tree. She's a bit of a nature collector so her hands were full. That's when I snapped this photo.

I had already used some of the pink floral paper and most of the chevron paper so I put my scraps together to make a 12x12 page. I added some pretty lace trim from my Gossamer Blue March kit and add-ons and I had a great page foundation.

My title can be read many different ways: Lovely Everyday Moments, Beautiful Girl, Lovely Girl, Lovely Beautiful Girl. Pick your fave and go with it.  Perhaps the title should be Little Miss Sunshine or Handful of Gold. The point is that this little girl is all of the above.
I don't use a lot of flowers on my layouts but this paper by My Mind's Eye in the GB March kit was irresistible. I knew I had to use it and I knew that my scissors would be getting a workout.

I used the gold ink included in the kit to turn the wood veneer arrows gold. Once dried, I placed them in the chevron pattern and also right above my photo so they just kind of go with the (chevron) flow. I also journaled in the lines of the chevron.

I finished the layout by adding little details on the page that almost blend in with the background. I placed white sequins here and there on the page and then added pink enamel dots in small and medium sizes in them. I also added a couple of grey sequins in a few places on the page.

This layout was created using the Gossamer Blue March 2014 kit and add-ons. These sell out quickly because Lori puts together just the most amazing kits. I just can't wait to show you what else I created with the kits.  If you'd like to see more samples from this kit, visit the Gossamer Blue Design Team March gallery.

Saturday, March 1, 2014

Studio Calico STITCHED Class

Hi everyone! I wanted to let you in on really great, super fun opportunity for you to hone in on your machine sewing or hand stitching skills.....I've been asked to be a class contributor to Paige Evans' upcoming Studio Calico class: STITCHED!

Registration for the class is open now and the class starts on April 1, 2014.
  

Let's take a look at what you will get:
  • 4 videos from Paige
  • 24 unique ideas for stitching - we'll cover ideas tailor made for paper crafts from different stitch types to quilting paper to adding dimension with stitching
  • Technique tutorials and tips for using hand and machine stitching on layouts, cards, Project Life® and more
  • PDF lessons posted each week in April
  • 24 all new projects, including layouts, Project Life® spreads and cards


There's a class kit, which includes journaling cards, a stitching template, exclusive stamp set, a stitching template, stitchable wood veneer tag, embroidery floss and more! There's also bonus files - die cuts, printable and just a ton of yummy things.

Head over to Paige's blog to learn more, view the class sneak peek video and see sample projects. Or, you can go ahead and sign up for STITCHED right now. But before you go, check out this exclusive offer.

I hope to see you there!
xoxo Heather

Wednesday, February 19, 2014

Dream a Little Dream

Hi friends! I'm up on the Gossamer Blue blog a new version of Pattern Play that was inspired by something in the background of the photo I chose to scrap.  I had these photos that were taken in front of a bridal shop in a quaint little village called Old Town Spring, near where I live. We were hanging around the shops when these photos were taken of my girls telling secrets to each other. I have no idea what they were whispering but I'm so glad this moment was captured.


As I started thinking through this layout, I kept going back to the pretty A-line dress and that's where I felt the inspiration hit. I pulled out my triangle punches and started punching out large and small triangles and arranged them on my page to mimic the dress. I used 13 different papers on the various triangles throughout the page and a few more for my photo layering, background paper and title. I think I counted 17 different patterns by the time I finished yet it doesn't feel like it.


I chose to use my electronic die cut machine to create the title, which I placed at the top of the triangle dress and around the photo and layers. I added a clear frame over the photo to highlight the girls in the photo and finished off the layout by adding a few more embellishments here and there.
 

So tell me, what do you think of how I extended the background of my photo onto the page? Do you ever do this - hone in on a little detail or element and repeat it throughout your layout.  I'd love to hear your ideas.
 
Supplies:

Monday, February 17, 2014

2 Blog Hops | 3 Winners

Hi everyone!  Thanks so much for joining the two blog hops I was recently a part of.

It was a fun Gossamer Blue | Elle's Studio collaboration.  I hope you enjoyed all the amazing projects.  The winner of my Elle's Studio prize pack is...

LISA P (Lisa Peeples)


The winner of my American Crafts Valentine's Day Blog Hop prize pack, which includes American Crafts goodies from Dear Lizzy Lucky Charm and Amy Tan’s Sketchbook collections is...

EVA SCOTT


The winner of my Instagram prize pack from the American Crafts Blog Hop is...

FLEURSBYDESIGN


Congrats everyone! Please email me at heather AT heatherleopard DOT com by March 20th and I'll get your prize pack right out to you!

xoxo Heather

Friday, February 14, 2014

Seriously Sweet {American Crafts Valentine's Day Blog Hop}


Hi friends! I’m soo excited to be participating in the American Crafts Valentine’s Blog Hop again this year. There’s so much talent & inspiration along the way. Oh and of course, lots & lots of giveaways, like the not one but TWO I have below.

You probably came here from Ashley’s blog, so welcome.  If you are new to my blog, I hope you like what you see and will become my newest follower. Without further ado, here is the layout I created.

Supplies: American Crafts Amy Tangerine Plus One collection: Accomplice 12x12 paper (366822), Tandem 12x12 paper (366805), Ensemble 12x12 paper (366827), Soul Mate 12x12 paper (366818), Co-Pilot 12x12 paper (366810), Adhesive badges flair (366906), Screenprinted clothespins – Whittles (366907), Twins foam stickers – Thickers (366837), Remarks Tiny Matte Puffy Accents (366842), Remarks Accent & Phrase Stickers (366840)

I just love this photo of the hubby and I that Allison Schnurr snapped of us in December. We’re a great match for each other and now it’s documented in our family’s history book…and Amy Tan's new collection, Plus One is soo perfect for this layout.


To create the layout, I cut doilies in different sizes from white cardstock.  Once cut, I adhered the negative cut white cardstock over pattern paper and then placed the doilies back in their spots, only adhering them down in their centers so I could pop up the edges of the doilies. I added the title and OH MY, I just adore those word phrase Thickers!


I grounded the layout by adding a large border at the bottom and layering patterns and the photo over it.  I used one of the doilies that was going to be covered by the border and repurposed it as part of the layering around the photo. I finished the layout by adding a few mist splatters and embellishments.

TWO GIVEAWAYS!
Giveaway #1: I am giving away one set of American Crafts goodies (paper and embellishments) from Dear Lizzy Lucky Charm and Amy Tan’s Sketchbook collections. I’ll randomly draw a name from everyone who comments on this blog post.  You can gain a bonus entries if you are a follower of my blog. You have until February 16th at midnight CT to leave your comment(s). Good luck!

Giveaway #2: I am giving away another prize to those who follow me on Instagram (@heatherleopard) and leave a comment on my Love is All You Need photo going up on February 14.

Now on with the hop. Your next stop is the amazing Elizabeth Gardner. I just know you will love what she has created.  Here’s the list of designers participating in the hop.

Heather Leopard ß YOU ARE HERE

Thanks for stopping by. Have a LOVELY weekend!

Thursday, February 13, 2014

My Little Sweetheart {Gossamer Blue + PageMaps}

I love designing with sketches but I don't do it very often anymore so when the opportunity to create with the February PageMaps sketches presented itself, I jumped at the chance.  The Gossamer Blue team teamed up with PageMaps this month and when Becky sent the sketches, I couldn't wait to dig into my kit to create this:

I've had these photos pf my little sweetie for 2 year now and I couldn't decide which photo I wanted to scrap so when Becky email this sketch, I immediately knew these photos would be a perfect fit.
You can find all of the February PageMaps sketches and what the other Gossamer Blue design team created on the PageMaps blog. As you can see, I stayed very true to the original sketch. I only made slight modifications, like swapping sides, using 6 photos instead of 7 and such.


I added lots of dimension to this layout. Some photos are directly adhered to the papers, popped some of them up, along with some of the sentiments, etc. I used a heart overlay and stitched it over a photo, similar to the sketch.

I added a pre-printed title banner 'cause it was just too perfect.  You can also see the envelope I used as one of the 2x2 sections.

Thanks PageMaps and Gossamer Blue for this great sketch opportunity!  See the rest of the sketches and team designs on the PageMaps blog.

Wednesday, February 12, 2014

Love You

I was recently asked to create a layout using the American Crafts Silhouette cutting files and oh my word, it was so hard to decide which ones to get creative with. I chose two and I'm sharing one of them with you today.

I love using cutting files on my projects because they can add just the right touch of interesting elements to a page very quickly. I used the Dear Lizzy Loved Heart Cutting File from Silhouette store and altered it to fit the vision that I had for this layout. The cutting file includes hearts that are all the same size. I enlarged one for the bottom right corner (more on that later). I also enlarged a heart to make a medium sized one and then placed it here and there, modifying the small hearts to accommodate the new medium ones. It basically involved lots of moving and shifting until it looked perfect.


You can see the different sized hearts in this photo. I also cut different sized hearts out of coordinating pattern paper and nested them into empty spaces, stitched over them and then lifted the edges.

So back to the larger heart.  Once it was cut, I backed it with strips of paper in different pattern papers, added an embellishment and then journaled around it.


I added the same pattern papers under my photo, include one cut as a photo corner and then fussy cut flowers. I cut the "Love You" words out of white cardstock on my CAMEO and then stitched them onto the layout.

This layout includes lots of white space which is not what I consider "Heather" style but I feel great about it since it has such a fun tone-on-tone pattern.  I really love it and I hope you do too.

Sunday, February 9, 2014

Families Stick Together

Hi friends.  I'm excited that I can finally share one of the layouts I created for the Simple Stories booth at CHA. This one is using the new Homespun collection.

I just love the colors of this collection. It has such a wonderful combination of daintiness to mixed with masculine elements. I love, love, LOVE it!
True to myself, I layered and distressed fun patterns, adding fussy cut and pre-cut embellishments behind and around the photo.  Did I mention that this photo was taken by the uber talented, Allison Schnurr? Love her! Anywho, I love the doily paper so I cut some of them out and placed them around the photo and in a few other spots on the layout. And I must of been crazy when I decided to cut out all the red and blue flowers with those tiny stems and yellow buds.  What was I thinking?  Well, whatever it was, I'm glad I did it because I love what they add to the look of the layout.


I chose to use the FAMILY letters from the chipboard to make a bold title. I then used word stickers to add a sub-title. I would normally used this empty space to do my journaling but these words were too perfect.  I'll just add my journaling on the back because there's a few things I want to say about these sisters but I'd like to keep it hidden.

So whattaya think about my debut project for the Simple Stories team? I gotta say that I absolutely love their new collections and I can't wait to show you the projects I've been busy creating! Stay tuned for more soon.

Monday, February 3, 2014

Everlasting Love {a Gossamer Blue + Elle's Studio Blog Hop}

Did you hear the news? The February Gossamer Blue kits are filled with all sorts of Elle's Studio goodness this month!  When I got my kits, I was so excited to see such loveliness all in one place. You know what's really cool? We've teamed up with Elle and some of her design team for a super fun blog hop, lots of inspiration and plenty of giveaways.

I'm excited to show you what I created using the Elle's Studio goodies from the Main kit and Add-ons. Why, because I documented my parent's love story. Let's take a look:

Aren't they so cute? They've been a great example and I'm proud to say that they've been married 44 years!


I just loved the front and back of this love letters paper so I cut it the bottom 1/3 of the paper and flipped the bottom part over to show the side with the hearts. I think it grounds the page nicely, especially with the yellow border and the adorable Happily Ever After paper strip.  I chose to create my title using the wood veneer and a word I cut from the doily paper using my cameo. You can see one doily in the upper right hand corner above and tucked behind the photos in the picture below.

I chose simple layering behind these photos, using a striped pattern paper, a doily, a few cards and envelopes and of course lovely embellishments. I just love how the page turned out and I'm glad to know that I've documented this love affair for both myself and my children.

I'm doing a giveaway here on my blog for a collection of Elle's Studio goodies from my stash. All I ask is that you share 1 thing you love about life, what makes you happy.  And if you like what you see here today, I'd love to have you follow me here on my blog and on Instagram. I share lots of sneak peeks of Gossamer Blue kits and all my projects on Instagram. You have until Friday, February 7, 2014 at midnight to enter to win my giveaway.

Now, your next stop is to the talented Jenny Evans.  Here is the full blog hop list:


Don't forget to stop by the Elle's Studio blog and the Gossamer Blue blog! Each company is giving away some great prizes on their blog. Leave a comment on their blogs telling them what inspired you along the hop to be entered to win!