Wednesday, June 2, 2010

Wah! I'm Officially Mommy to a 1st Grader

Today is my first baby's last day of Kindergarten.  I cannot believe how fast this year has gone by.  I remember prepping her for Meet the Teacher and bawling as the bus pulled away on the first day.  In a couple of hours I will be seeing her get off that bus for the summer!  I was the Homeroom Mom for her class so I've been working hard to put together a a class gift.  I was able to raise enough money to get her teacher a $150 gift card and then I made a personal gift from Rheagan, but included other drawings from her classmates.  Rheagan's school has been celebrating "20 Years and Still Rockin'" so I based the project off the Rocker theme. 


The Card
This is a 6x6 card I made using CTMH "You Rock" Stamp Set and a little bling for the crown. The card is actually red, which you can see peeking through the middle. I distressed the edges with ink to give it a rocker feel.

The Clipboard
I used an oversized clipboard from CTMH. I applied ink to the edges in a somewhat erratic fashion because I wanted it to have a distressed look.  I used a notebook paper punch I got at Archivers since it's for a school teacher.  I then hand stamped, doodled and colored the "You Rock" portion.  I then modge podged over it all.  I love how it gave the ink an even more distressed look!  I applied the ribbon and bling to the clipboard while the modge podge was still wet to ensure it wouldn't budge. I really wanted to decorate the handle but I saw how some of her other clipboards in the classroom are and as much as I feel it needs some flair at the top I made the executive decision to keep it as-is so that the clipboard will look better in the long run.

Tuesday, June 1, 2010

Happy {Early} Birthday Lynette!!

Lynette Davis is giving some goodies away to someone else on HER birthday (how generous).  Check out this Heritage 1981 Kit and then hop on over to her blog and wish her a Happy Birthday.

Kit Contents: 9 papers (including Die-Cut, Overlay and Glitter) from Hambly, Jenni Bowlin, Webster's Pages, Chatterbox, Prima, Basic Grey and Fancy Pants. Plus, a bunch of embellishment goodies including Smooch Spritz, Prima Flowers, Trims on Old-Fashioned Clothespins, Clear Stamps, My Mind's Eye Bling, Basic Grey Rub-ons, Buzz and Bloom Acrylic, American Crafts Chipboard Frames, Tulle, Making Memories Flower Pins, Doodlebug Buttons, and more!!!

Monday, May 31, 2010

NVS, DD, CSD, CM Challenges

I went crazy this weekend and decided to do one layout for 4 different challenges. 

C.S.D. - Candy Shoppe Designs - Use Lollipop Flowers on the layout - I made 4 (2 at the top, 1 for the "o" and the 4th for my journaling). I would LOVE to win the Magpie Club Blog Candy!
CM - Challenge Masters - Stamp on a Layout - the scalloped/lined journal was stamped as were the letters in "blond".
NVS - Nerdy Victorious Scrapbookers - Envious Inspiration.  The challenge was to use this image for inspriation.  It inspired me to do a layout on my baby who has blond hair like daddy, while all us other girls are brunettes.  The lollipops in the Inspiration image were a perfect fit for the CSD challenge too! The Chloe's Closet kit is TDF!
DD - Design Dollies - TRIFECTA!!! This means I participated in all 3 challenges (because I liked all the prize packages but I also liked each individual challenge).
1. Color Challenge - use KRAFT, WHITE, FUSCHIA:

2. Use this sketch for the layout.

3. Elements Challenge - use Lace, the color PINK, Stripes, a crown, TWO 3-d elements.
It took more thought and planning than usual to pull all these challenges into one layout but it was so much fun.  Here's the layout, called Blonde Beauty. 
Click Image to Enlarge

Pure Delight

I really enjoyed working on this layout.  As usual, I added a few handmade elements.  Here's the Nuts About You sketch, my take on it and a few close-ups. 
Want to make your own pinwheel flowers?  Here's a link to the tutorial.

Saturday, May 29, 2010

Tutorial: Pinwheel Flowers

I am always trying to incorporate different types of flowers in my layouts.  I was scrapping about a day at the park and I thought pinwheels would be appropriate for beautiful summer days.  Here's how I did it and check back on Mnday to see the entire layout (I also made a lollipop flowers and a journal tree).

First I cut a 2" square and then I folded it in half and creased it in half so I could find the center easily. Notice the red ink mark. I purposely used some paper that had a flaw on it because I knew I could cover it up and I just couldn't let it go to waste.
Open the square back up and then I made marks 1/2" from the center on all 4 creases.
Cut along the creased line from the corner in to the pencil mark.
Fold one of the cut corners in to the center and adhere it with adhesive. I used a glue dot. Repeat on remaining 3 cuts. until pinwheel is formed.
And here is the pinwheel. Can you see the red ink mark?
Check back Monday to see how I used it on my layout.

Wednesday, May 26, 2010

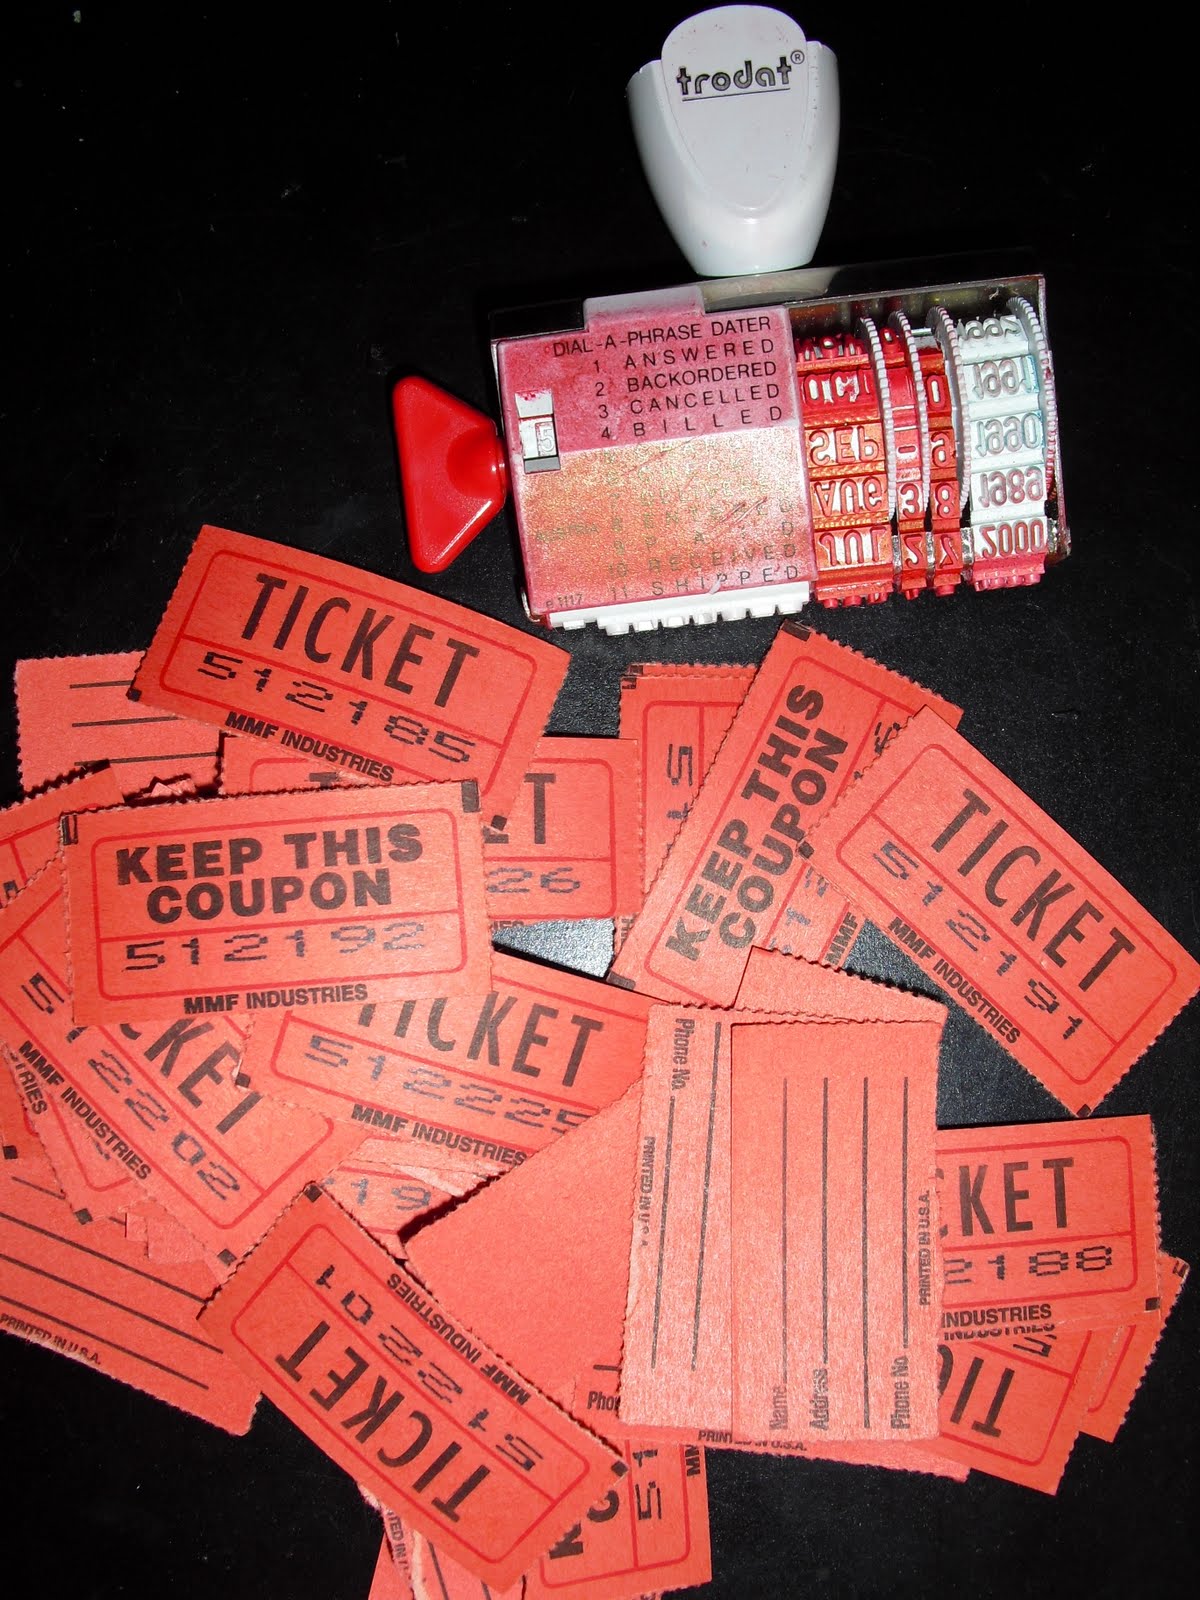
Dumpster Diving!

Look What I Dug Out Of The Trash! Okay, maybe I wasn't digging in the dumpsters but I did turn other people's trash into my treasure.  We recently moved to a new building at work and I heard a co-worker ask someone else on her team if they needed a stamp that said Received.  No one took the bait so she chunked it.  I ran over and said I'd take it so she took it out of her trash.  As I looked at it I saw that it was a "Dial-A-Phrase Dater".  The dates only go up to 2000 but I can work the year into another area of my layout or I can just use the phrases. I was so happy with that find but the day got even better when my work (HP) hosted a moving celebration. It was a low cost way to welcome us to the new building and they offered light snacks and beverages. Since HP products were highlighted in Sex & the City 2 they gave away 3 sets of tickets.  They did the giveaway using old style ticket stubs.  Sadly I didn't win ( I was 1 number away) and ironically, only men won the tickets.  Regardless, after the drawing was over I wanted the used ticket stubs. I asked our Admin and she got them out of the trash! I just couldn't let them go to waste. I figure I can use them as is, paint them, mist them, the possibilities are endless. I've been re-purposing a lot of things recently, including a tissue box my mom was about to throw away 2 weeks ago.  I can't wait to play with all these goodies.  Check them out.


Monday, May 24, 2010

You Are Sooo CUTE!

I went on a somewhat spur of the moment crop at a LSS store with my sweet friend Audrey this weekend.  It was great to catch up with her but it wasn't long enough.  I did get a couple of pages done for the Nuts About Sketches Design Team.  I'm revealing one today and the other next Monday.  I had a lot of fun with this sketch and I got to play with the Noel Mignon Playdate kit I purchased last month that I hadn't had a chance to dabble with yet. The kit is unbelievable, there's so much in it.  I will definitely be checking into more kits, including 2 Audrey told me about, soon.  So here's the Nuts About Sketches sketch.
And here's my take on it. I blocked out portions of certain photos.
From the kit I used: Dear lizzy crochet flowers, Quite Contrary "TOKEN" ticket, yellow ribbon, My Mind's Eye Jack & Jill "Cute" Paper, October Afternoon Title, Shimmerz Spritz "Bed of Roses" on the title and ticket. I added some CTMH tokens, photo corners, waxy flax and bling accents, Cloud 9 "Rain" Dots and a handmade journal raindrop and scallop frame.  Here's some close-ups. Click on any of them to enlarge.


Saturday, May 22, 2010

Sketchy Thursday June Guest Design Team Challenge

Here's my submission for the Sketchy Thursday June Guest Design Team Challenge.  I had so much fun doing this layout.  I think what makes this layout so unique and cool is that I made my own background paper by adding Photoshop effects to the photo and then printing it on white cardstock. I really liked both of these photos but I didn't just want to so this side by side since they were so similar.  I think this really helps show them both off in their own cool way.  See my tutorial on Photoshop Effects: Poster Edges & Opacity to see how I did it. I also made my own pleated flowers.  I posted a tutorial on making pleated or accordian flowers yesterday. So here's my layout. 

Here's some details. I stamped the date with brown StazOn and Sans Small Caps CTMH stamp set, cut the blue flower from some lace and added another flower on top.  The charm is from Close To My Heart.

I made this next flower out of some wired blue loopy ribbon.  I have no idea how else to explain it.  Here's what it looked like before and then after, with a CTMH crocheted flower pretty pins and  a bit of bling.

Lastly, here's the pleated flower as well as another flower I made with chiffon and some bling.


Keep your fingers crossed that I make the cut!

Friday, May 21, 2010

Paper Accordian Flowers Tutorial

Today I am going to show you how to make this really cute accordian flower.  I really like this because you can easily coordinate it with the papers in your layout plus it adds so much dimension.

Find the paper you wish to make into a flower and cut a strip. Mine was about 7 inches long and 1/2" wide. Try different lengths and widths for whatever size flower you want. Take your strip and begin folding back and forth with your fingers to make pleats. You may also choose to score the pleats.  My strip is 1/2" wide and the pleats are approx. 1/4" (I wanted a smaller flower). Don't worry if the pleats don't line up exactly; close enough is good. You won't be able to tell once you make the flower.

Click to Enlarge Paper Strip
Click to Enlarge Folded Pleating
Click to Enlarge Pleating
Next, you'll want to run a needle and thread through one side of the pleats. I wasn't smart when I first did this and I had a heck of a time threading the needle through each paper pleat.  If you have a small hole punch, punch holes in the paper first and then run the thread through.  
Glue the first pleat over the last, form the flower, tie the thread and voila! You have an accordian flower.

You may also consider using a decorative border punch to add flair to the flower.  Just punch one edge of the strip prior to pleating and proceed from there. You can also just cut strips and pleat those and use them as a decorative border or faux ribbon instead of making a flower.

I'll be posting the layout for this later today or tomorrow at the latest.  I can't wait to show this one off!

Thursday, May 20, 2010