Friday, May 31, 2013

So Lovely & a Requested Tutorial

I was blown away last week by all the kind words left on the American Crafts blog, their Facebook and the link I posted on my personal Facebook about this layout. Paige Evans challenged me to create projects using lots of photos. I accepted the challenge and then double challenged myself to push my creativity a little farther than my usual layered look.   Here's the layout I created...

I don't want to admit how long it took and I actually have no idea. I just know it took longer than expected and it doesn't have to be the case for you. I'm sharing some tips and the "how-to" for this layout:

  1. I created triangles and banners in Photoshop and added my photos to them.  Here's a tutorial for how to do that.
  2. Once I printed the photos, I adhered them to a background paper. At this point, I had 5 large photos and a lot of empty space.
  3. For these next steps, I'll tell you what I did and then share a big tip.
  4. I cut the larger triangles freehand out of pattern paper, being careful to make sure certain words or patterns that I wanted to show on the layout were included.
  5. I then filled it in with medium triangles and then added the smaller filler triangles.
  6. I wanted every. single. one. to be a triangle so that meant A LOT of thinking and A LOT of triangles that just didn't fit right after I had already cut them. There's one or two on there that I did at the end that didn't quite make it into a full triangle. 
  7. Here's the tip: When I was almost done I had an a-ha! moment. After adhering the photos and probably after cutting and adhering the larger pattern paper triangles, I totally should have hand drawn triangles with a pencil directly on the layout and then cut the smaller pattern paper triangles to that size.  Once I started doing that, which was probably 3/4 to completion, it went by much SUPER fast because I wasn't having to guess each cut as I was cutting them. It was like having a pattern to cut to. I hope that makes sense.
  8. Once I had all the triangles glued down, I realized some of them kind of faded into the background so I drew lines around them to add definition.
  9. I kept the embellishments to a minimum since the layout had so many other things going on.
I hope this answers your questions. If not, please leave me a comment below, email me or contact me on Facebook and I'll be happy to answer any questions.

Here's a few detailed shots.


Thanks so much for stopping by today! Make sure to head over to the American Crafts blog for more inspiration and while you're there feel free to tell them what you thought of my layout!

Friday, May 24, 2013

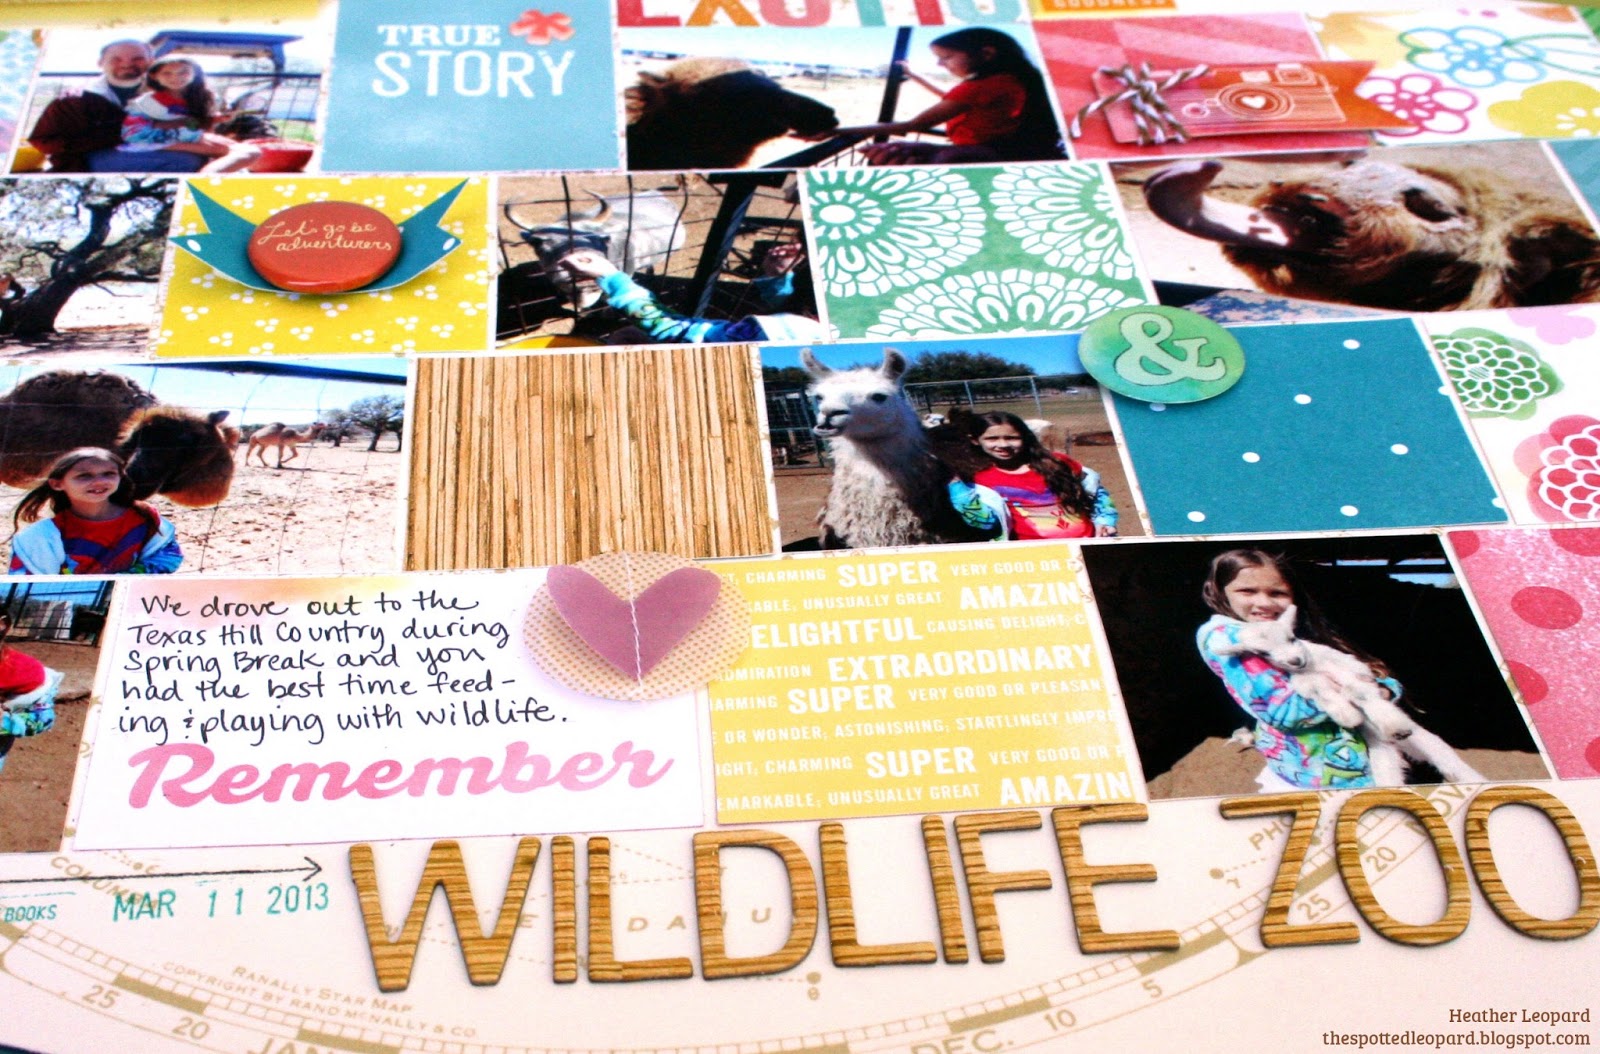
Exotic Wildlife Zoo

Good morning, everyone! It's Friday and we have a 3-day weekend so I am super excited today!  I'm not sure what we're going to do this weekend but I wanted to show you what we did the last time we had time off from school and work.

I grew up in the beautiful Texas Hill Country, about 3 1/2 hours away from where I am now.  Oh how I miss living on the lake! Anyway, we headed out to a new exotic wildlife zoo. We had such a great time, aside from the deer in the petting zoo trying to eat my littlest daughter's skirt. And let me tell you how traumatic that is for a little girl who LOVES her skirts!  That aside, we got to feed camels, deer, llamas, baby goats and all sorts of animals I never thought we'd be close enough to ever meet.  We also got to see zebra, who were being shy that day, goats, who were actually standing way up in in trees, bison hanging out and so much more. Here's how I captured the details for my oldest daughter's album.


I had so many photos so I decided to make them either 2x2 or 2x3 and put them at an angle. This allowed me to still have a design aesthetic and include all the photos I wanted. I kept all the pattern paper to 2x2 and  luckily the title card and journaling card were 2x3. I added a few embellishments to some of the pattern paper. I intentionally kept embellies to a minimum. I used American Crafts Amy Tangerine Yes, Please to make this all come together.

The journaling goes a little something like this:
Supplies: Fulfill Paper (35936) Amy Tangerine Yes, Please, Reflect Paper (35938) Amy Tangerine Yes, Please, Share Paper (35930) Amy Tangerine Yes, Please, Perfect Paper (35932) Amy Tangerine Yes, Please, Understand Paper (35939) Amy Tangerine Yes, Please, Priority Paper (35941) Amy Tangerine Yes, Please, Truth Paper (35944) Amy Tangerine Yes, Please, Hopeful Paper (35946) Amy Tangerine Yes, Please, Life Remarks Accent & Phrase Stickers (42365) Amy Tangerine Yes, Please, Goodness Printed Chipboard Letter Stickers (53458) Amy Tangerine Yes, Please, Dream Mini Marks Rub-On Transfer Sheets (42369) Amy Tangerine Yes, Please, Adhesive Badges/Flair (85624) Amy Tangerine Yes, Please, Simplify Stitched Vellum Embellishments (85628) Amy Tangerine Yes, Please, Discover Tiny Matte Puffy Accents (42366) Amy Tangerine Yes, Please, Adhesive Badges (85658)  - Dear Lizzy Lucky Charm 

Thanks for stopping by today. If you like this project, I'd love to have you leave some love for it HERE on the American Crafts blog.

Friday, May 17, 2013

Lovely Bunny Fun


Little Yellow Bicycle's new Spring collection called Poppy, is full of gorgeous vibrant colors and I'm not just saying that because they gave me some to play with. I really, really think they chose a beautiful color scheme. This collection captures the essence of Spring, from Easter to all the wonderful blooms. For this particular project, I honed in on the adorable bunny rabbits and wanted to capture the story of my littlest girl getting bunny smooches.

I just love the journaling cards. Their style in this particular collection kind of reminded me of Project Life style scrapbooking so I channeled that look.

I used a combination of the journal cards and laid them out in a grid around my photo, embellishing them here, there and everywhere to make little individual "scenes". 

See that cute little bunny playing in the flowers, peeking up over the fence? She's just too cute. I really enjoyed making all the little scenes on each card and I hope it's inspired you as well!

Wednesday, May 8, 2013

Bouquet of Flowers

We're celebrating Moms over at Little Yellow Bicycle so I made a little something for my desk with the Fern & Forest Girl and Naturals collections they sent me. My hubby and kids bring home flowers for me often and we're always so sad when they begin to wilt so I thought it would be fun to create a bouquet of flowers that never die.

I used cutting files and my CAMEO to create the flowers. Each flower had a small hole punched in the middle on them, which were the perfect size for the tiny sticks I found laying in my flower beds outside. I just inserted the sticks into the center hole in the flowers to create the stems and glued them together with liquid adhesive. I've had a couple of questions about this so here's a further explanation...To adhere the flowers to the stems, I threaded the stem through the paper flowers and flipped them over so that the flowers were facing down on my craft mat and the stem was in the air. Since the flowers are not flat the stem poked through the front quite a bit but that's okay for now. It actually helped it from falling over.  I then added a generous amount of Scotch liquid adhesive to the stem and left them there to dry. Once dried, I turned the flowers right side up and cut off the top of the stem and placed buttons in the middle of the flowers.

These adorable paper flowers sit right here next to my desk and are such a wonderful reminder of my girls.

Little Yellow Bicycle Supplies:

FNG-304 6x6 Paper Pack (24 sheets - 2 each of 12 designs)
FNG-135 Cardstock Stickers - Favorite Pieces - with glitter and embossing (31pieces)
FNG-140 Cardstock Stickers - Fresh Verse - with glitter and debossing (43 pieces)
NA-WB20 Wood Buttons - Etched
NA-SP10 Stick Pins - Wood Buttons
NA-SP30 Stick Pins - Cork Flowers

Saturday, May 4, 2013

Love You Always | Nat'l Scrapbook Day

Welcome to the American Crafts National Scrapbook Day Blog Hop! I hope you'll be inspired to whip out your American Craft supplies and start creating after you make your way through the 20 design team members'  blogs. There are a lot of fun challenges in this hop so there's no excuses not to play along!

MY CHALLENGE: Create an embellished, multi-dimension layout using a grid!

To create this layout, I cropped my photos to approximately 2x3 so that they would fit inside the frames. Prior to adhering them, I layered different types of pattern papers (from my 6x6 paper pad). I distressed some and left others with the cut edge. 

The Love You Always chipboard fit great inside the frames. I chose to add the yellow striped chipboard over the yellow striped frame but I embellished it by punching the red gingham and adhering it to the LOVE chipboard piece and popping it up over the sentiment. This was perfect for my title!

I added more clear cut shapes, rosettes, stickers and more to the layout to tie it all together.

I added my journaling, the cutest picket fence chipboard and the date using a date roller stamp.

Here is the full hop list in case you get a little lost along the way, or maybe you just ran across the hop from right here on my blog and you're just dying in anticipation to see them all right now. Either way, make sure you go through the entire hop, leave a comment on each blog, then visit the American Crafts blog to win a "super ginormous prize"! 


Next on the hop is Andrea Budjack!

Happy National Scrapbook Day!

Friday, May 3, 2013

Simply Wonderful: PageMaps + Little Yellow Bicycle

I'm super excited to get to work with PageMaps again. I do love to design my own layouts but there's just something about sketches that simply the creative process and that's good to mix in as often as possible!  Little Yellow Bicycle and PageMaps teamed up this month and I was given this 12x12 sketch to design with.  Here's what I created, something Simply Wonderful in my opinion.

I used the Fern & Forest Boy collection that Little Yellow Bicycle sent me. The colors are so bold and striking. To create this layout, I painted Heidi Swapp mists on the paper with my fingers, adding in the Bronzer color between the colors.

I then stitched a circle over the dried mists and added banner strips under the photo as a sort of mat. I added additional elements, such as journaling cards and chipboard to give it added dimension.

Lastly, I used sticker letters for the word "simply" and then wrote the word wonderful using a sketchpad app on my iPad and then traced it in Silhouette Studio. Several of my fellow LYB DT members thought I had written the word with twine and I love that it kind of looks like that but without the fuss.

Thanks for the opportunity, PageMaps and Little Yellow Bicycle! LYB is doing a fun sketch challenge giveaway over on PageMaps so make sure to check it out HERE!

Tuesday, April 30, 2013

Sunshine & Bluebonnets

Hi there, everyone! I sure have missed blogging the last 10 days but I've been making memories with the family, Spring cleaning and creating lots of goodies for upcoming assignments and publications! I wanted to show you this layout I did of my daughter a couple of weeks ago. We ventured out to the country for a huge craft/thrift festival and on the way home we stopped and snapped some photos in the bluebonnets fields. We snapped a gazillion of our own photos but there was a photographer there and she snapped a few photos of my girls while we were out there. Thanks to Crystal D Photography for the photo in this layout!

I used the new American Crafts Mayberry collection! I LOVE, love, love it! To create the border, I drew triangles in Silhouette Studio around the outer perimeter of the design software. I was able to measure how big to make them in the actual software. I just placed 6x6" sheets from the 6x6" paper pad and cut them out. The hardest part was deciding which pieces to put where!


I just love the new Thickers that came with the Mayberry collection. They look like they are covered in sugar crystals!

Rheagan saw that they had a chalkboard and wanted me to write Peace, Love, Lions (her school mascot and their slogan this year) but she also liked the idea of Peace, Love Bluebonnets so we went with that! There's also a peek at my journaling. The back just tells the rest of the story about how much fun we had in the bluebonnets fields and closes with how beautiful I think she is. I tell her a lot but I also want it documented!

Thanks for visiting me today!

Thursday, April 18, 2013

Hello Beautiful

I made a page last week using the Fern & Forest Girl collection Little Yellow Bicycle sent me. At first, even though I liked the collection, something about the purply color that I saw online was throwing me off (I don't scrap purple) but after seeing it in person, it's the perfect shade of pink and purple and I just love it. I seriously can't stop playing with this collection. I think I said that about the Just Because collection too. I thought it'd be fun to create a 2nd page to last week's layout.

I love to layer and this layout is no exception. One of the big trends in scrapbooking right now is to add strips to the top and bottom (or the sides) of layouts. It usually consists of unevenly cut paper strips with labels or embellishments anchoring the page together but today, I decided to put a twist on that trend. I used the Fresh Verse cardstock stickers and added banner sticker and wooden button.  


I carried the wooden elements throughout the layout, adding the stick pins to the layering and the "Happy" clothespin to the pull out journaling card. The mix of the various word elements (wood embellishments and stickers) just tells such a great little story and ties everything together.


The clear cut embellishments that I used on my layout have a nice iridescent glitter look and feel but without the mess of glitter, by the way. I added a little Stickles iridescent glitter to the wood elements as well. You can see it on the stick pins above and the clothespin holding my journaling above.


Oh and see that photo, I had them printed from Origrami. The prints are incredible and they come with all the details printed on the back, like when the photo was taken, how many likes it got, where it was taken. And it comes in the coolest Instagram box. Find out how you can win free prints from Origrami on the Paper Issues blog. You have until April 20 to submit for your chance to win.


Thanks for stopping by today. 

Thursday, April 11, 2013

Let Your Light Shine

I snapped several photos of my girls at the park the other day and I just love this one. My daughter was playing with a bowl of sand on a wooden play set and I snapped this through the wooden slats. Isn't she just the cutest?


When I pulled out the Fern & Forest Girl papers that Little Yellow Bicycle sent me, I was immediately drawn to the woodgrain paper and the wood ring circles. And I just love the wishful words paper. I knew I wanted the wood rings and words to dominate my design. 


A little fussy cutting, distressing, and layering topped with the chipboard shapes and my layout was complete. 


Head over to the Little Yellow Bicycle blog to see what Liz and Robbie created (and leave me a little scrappy love if you so choose).

Wednesday, April 10, 2013

Happy Silly Smiles

When my youngest sweetie isn't picking flowers or talking about picking flowers, she's picking berries from the bushes outside our house. She packs as many as she can into her tiny little palms of her hands until their overflowing. Anyway, I snapped these photos of her one day as she was picking those berries. The American Crafts My Girl collection was perfect for this moment!

American Crafts My Girl collection: Cute Chloe paper, Sunny Savannah paper, Precious Penny Paper, Marvelous Madeline Paper, Adorable Abby Paper, Tender Tessa Paper, Dress Up Bits, Swing Details, Noteworthy Stamp, Summersault Details, Amy Tangerine "Authentic Roller Stamp, Amy Tangerine Aspire Stamp, Gesso mixed with Mr. Huey's Bonny Blue mist, Tattered Angels Glimmer Glam "Lipstick Pink", Mr. Hueys Barnwood mist, Close to My Heart Grey Wool ink, 

I kept my layering a bit more simple than I usually do. I was focusing more on the photos of course but also the the My Girl Stamps. I started out with 2x3 photos a tag and a card that I cut from a 12x12 sheet of paper.
I wanted to add paint to give it a pop of color so I added pink Glimmer Glam to the stencil and then laid it down on the paper. I then mixed a batch of Gesso and blue mist to create a thicker paint. I applied it sparingly over the mask and laid it down over the paper again, alternating it over the pink. Then last but not least, I sponge painted grey mist from the center and outlined the mask.

My favorite part of the painted elements is the simple little Cloud 9 stamp. I painted the blue Gesso on the stamp and applied it to the card. It was a bit "gloppy", which is what I was hoping for. It make the perfect background for the inked image that I eventually stamped over it. I repeated these techniques for the arrow and the diamond stamped image at the top.

I'll be back tomorrow with a fun layout using the new Little Yellow Bicycle Fern & Forest Girl.