Hello and welcome to my craft room tour. My space is a combination of a DIY and scrapbooking space as well as my work space, as I work from home full time. So let's take a stroll around the room!
You can shop this room at the end of the post. Product links contained in this post may include affiliate links. You don't pay any extra, but I get a small percentage of your sale. Thank you!
Designing my craft room
When my I designed this room, I planned for the following:
- Bright white walls that I could add color to with decor and craft projects of course
- To set up my scrap space as close to the natural light as possible.
- Five distinct work areas - scrapbooking / crafting, sewing, photo staging, my work / computer space and a kids' section
- Storage - plenty of cabinets in varying sizes to stash all my craft goodies, including my printers and larger tools
Let's walk through each of these areas...
Bright white walls with pops of color and natural light
This is an early stage photo of my space to show you that I was serious about the white. I decided to create one VERY long desk that spans 2 and a half walls along the perimeter of the room. Check out the natural light I get to work with!
I usually hang my most recent projects in the space under the word "#CREATE" so my family and I can look at the story before they get put away in albums. If you ask me, "do they actually come look at them?", the answer is YES! This photo features some of my older layouts. Those are all put away in albums now.
Scrapbooking Space / Craft Desk
While my window shades are closed in this photo, they are always open. Ironically, the best lighting to show off this space was when the window was closed. Oh, and don't mind the lamp shade that's too small for the lamp.
Crafting Video / Process Video Setup
I also have a video arrangement for shooting process videos of my crafts. I currently use a tripod with an extension arm and a bracket that holds my DSLR or can be swapped out for an iPhone grip. I'm not loving the tripod since it has to stand on my desk. I tend to accidentally bump it occasionally and it takes up space. In the coming weeks, my husband will either insert a pole into my desk or clamp the pole to my desk on the other side of the lamp that I can attach the extender arm to.
Storage for craft supplies
Like most crafters, I have way too many craft supplies and I needed a solution that would hide it all away.
Sitting on top of my desk is this "imagination station". The drawers at the bottom hold white cardstock because I use it for everything, Silhouette CAMEO cutting mats, and things I've cut from cardstock that I want to re-use. For instance, perhaps I needed to cut a large background, shapes or alphabet for a project. Many times, the negative version of the cut would make a great design. Or perhaps something went wrong with the cut but it cut most of it correctly. I can use the part that was cut correctly on another project. You can see what I have in the rest of the station.
I have a Raskog cart that is currently being underutilized. Right now it holds the basket that holds all my large 6" x 12" alphabet sheet. This is a basket made out of paper and while the angle makes it look shorter than it really is, it's a great size for holding these alpha sheets. I can easily flip through them.
Each side of my craft space has a set of drawers. They hold all the things. I've included a list below that you may consider using for your craft room organization.
Craft Room Organization Labeling / Sorting Ideas
I store all the items listed above in five sets of the cabinets that also act as the bases for my supersized desk. You can see the other set holding up my work desk at the end of my post.
These hold my adhesives, glitters, inks, stamps, punches, sewing supplies, mists, paints, card bases, the list goes on and on. Everything has a place but if I have to be honest not everything always goes back in it's place. I'm making it a goal this year to pack everything back up when I finish a project. Who's with me?
To the right of my craft drawers under my sewing station is where I keep all the current collections I've received from companies design for. These need to be at my fingertips at all times. I usually keep my paper trimmer on the top but it's not currently pictured.
This organizer holds the standard plastic bins and easily holds tons of 12"x12" paper, Thickers, sticker sheets, die cuts and all the embellishments. I use one per collection so I can easily find what I need. I can even fit a large punch! Look how good it all fits in there.
The gadgets
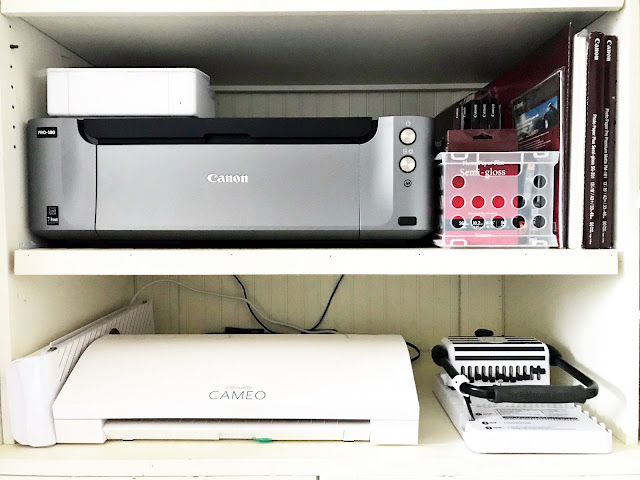
My printers and larger tools are located in an armoire next to my desk (see the full armoire in my work desk photo below). It's one of my favorite things.
The top part holds all my main craft tools - my large and small printers, printer accessories, Cameo, Cinch, Big Shot and more. My hubby built shelves that slide so I can pull things in and out as needed. I'm in the process of adding another shelf to better accommodate a few more items, like the Minc you see sitting on it's side.
The bottom has room to fit 3 super large plastic bins across and about 6 high. I store older collections I'm not ready to part with, alterable things, momentos, etc. This is an older photo used for the purpose to show you what the cabinets looks like at the bottom when you open the cabinet doors.
Stichity stitch stitch sewing area
The sewing area is just an extension of the craft space because 95% of what I sew is paper. That said, my daughters love to sew and I recently sewed a poodle skirt for my daughter's school play.
Photo staging area
Once I am done creating my projects, I move them over to the area of my room where I take staged photos. A lot of times, I am creating for a season that's a month or two away so this space comes in real handy during those times.
My staging center includes this desk I purchased at Target, which has a drawer to hold my backgrounds. I hung bead board on the wall, which I purchased at my local hardware store And then I have cabinets with dividers under the table to hold all my props, some of which are currently on the table. This enables easy access to themed goodies. I don't put them away each season as many were purposefully purchased to span multiple seasons. For instance, a red platter can work for Christmas, Valentines, Patriotic stuff, etc.
Work Space
I work full time as a Marketing Manager for a major tech company and I primarily work from home. I put my work area so that my back would face all the crafty goodies so I won't be tempted to craft instead of work! I also have a personal laptop that I can connect to my monitors in the evenings and weekends when I need to create cut files, designs and blog.
Space for the kids to craft
I purchased this armoire back before I had a dedicated scrap space. It's awesome because it has a section across the top that fits 12x12 papers and it also folds out to make a desk. There's lots of cubbies and drawers to hold goodies. My girls each have a drawer on the left for their supplies and when they are ready to create, they just fold the door down and voila, a table top just for them! Since it's black, I don't have to stress about ink that may not make it on the paper.
The gold and black locker holds my fabrics and vinyl.
Shop this room
All product links contained in this post are affiliate links. You don't pay any extra, but I get a small percentage of your sale. Thank you!

So that's a peek into my scrap space. I hope you've enjoyed my scrapbooking room | craft room tour.
xoxo,
Heather |
Instagram |
Pinterest |
Twitter
I'm participating in Craft Room Tours 2018 with an amazing group of DIYers. You can see the full list of craft spaces
HERE!


