Tuesday, October 30, 2012

We Are Family & You Make Me Happy Cards

I guess I was in the mood to create classic song cards when I created these cards for today's feature over on the Lily Bee blog...we were challenged to create a border using stamps and I chose to create these two cards.


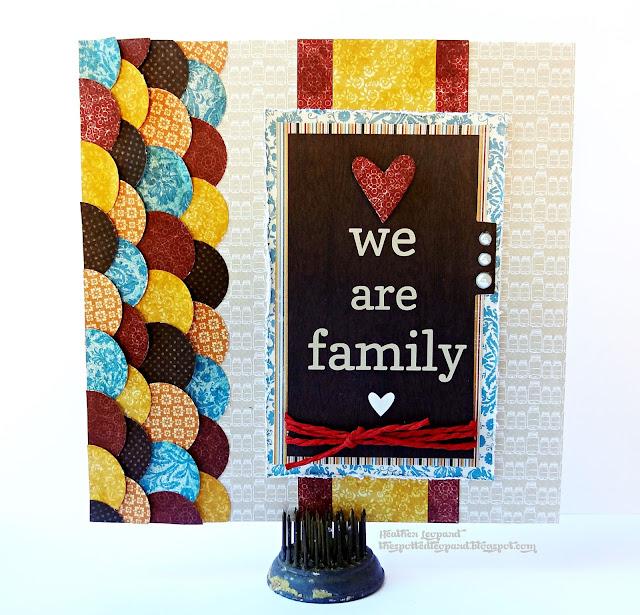
We Are Family Card
 
Supplies: Lily Bee Designs Autumn Spice 6 x 6 paper pad, Autumn Spice Index Journaling cards and Autumn Spice stamp set

Creative How-to: I used the circle stamp from the Autumn Spice stamp set. I was going for the tone on tone look so I selected papers with a single color pattern and then stamped the circles in the same color. You can cut them our by hand but I found the circles to be the same size as my 1" circle punch so I saved a lot of time cutting them out. Then I just layered them over each other to create the scallop border. 

I added some red colored string around the journaling card and then placed it over coordinating layers. I topped it off by stamping the heart on the red paper and popping it over the journal card. You may have noticed the colors look richer than the collection. That's because I added the same color ink over the stop with the stamping and then I did the same to the paper strips so the colors would blend.

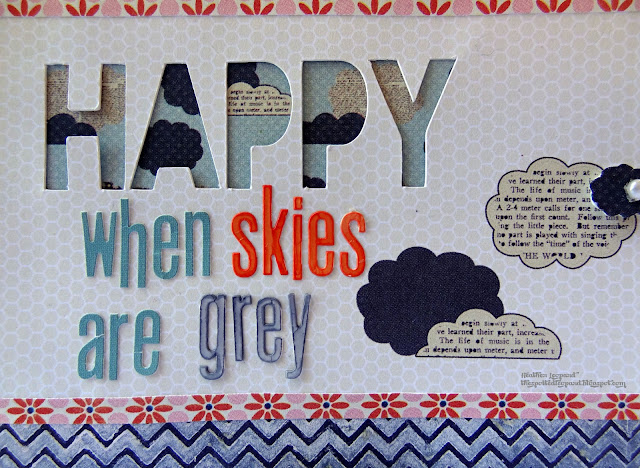
You Make Me Happy Card
 
Supplies: Lily Bee Designs Persnickety 6 x 6 paper pad, Persnickety Index Journal Card, Persnickety ABC Stickers, Persnickety Stamp Set


Creative How-to: I stamped the chevron and dot border stamp with white pigment ink over the dark blue pattern paper and set it aside to dry. I then cut the "YOU" banner out of the index journaling cards and added the "make me".  

I cut the word "HAPPY" with my CAMEO and matted the back of it with the cloud paper from the 6x6 paper pad. I completed the sentiment, coloring the white alphas with an orange and grey COPIC markers. The added some fussy cut popped up clouds to add dimension at the top and bottom of the card.


Pin these cards

Thanks for stopping by today. Make sure to pop over to the Lily Bee blog today to find out how you can play along with the challenge AND see what Ursula and Amy created.

Tuesday, October 23, 2012

The Perfect Pumpkin - LYB & Xyron Swap

Little Yellow Bicycle and Xyron teamed up to bring you some fun all week long over on their blogs. Today, we are showcasing my fun little pumpkin on the LYB blog.

Pumpkin-Front
I was pretty excited when I got the box containing my new Xyron Create a Sticker product that they sent to the Little Yellow Bicycle design team! It is so easy to make your own sticker from whatever paper design you are working with. I just so happened to use the Little Yellow Bicycle Acorn Hollow goodies for today's project, which is a paper pumpkin.
Making-Stickers
I cut the pumpkin using my CAMEO and a cutting file I downloaded from their store but you could easily do this by cutting multiple circles and then perforating the inside edges to form a triangle. I also cut a stem and set it aside. Once the circles were cut I ran them through the sticker maker.
Stickers-web
They came out on a long strip as shown below and all I had to do was peel them off. Instantly I had a great little sticker.

Next, I folded the circles at the edges and adhered them, sticky sides together, to each other, turning the perforated flaps up. I continued to adhere them to each other until they formed a "ball". I added the stem and some ribbon to top off the project.
Pumpkin-Top

I think these would look great with two more pumpkins in different sizes, perched on my table in the entryway.

Acorn Hollow Products:
AH-102 Pretty Plaid/Flowered Dot
AH-103 Brown Berries/Textured Walnut
AH-105 Toss & Tumble/Crimson Houndstooth
AH-106 Walnut Woodgrain/Fleur de Lovely
AH-108 Chevron Knit/Textured Gold
AH-109 Fancy Forest/Pumpkin Pinstripe
AH-110 Forest Floral/Textured Pond
AH-112 Button, Button/Tiny Tonal Walnut Stripe

Giveaway
Want a chance to win some Xyron and Little Yellow Bicycle goodies? If you like what you saw here, just leave me a comment and "Join" or follow my blog and then head to the Little Yellow Bicycle blog to learn how. 
6a0120a615ca8d970b017ee4580ded970d-800wi

Monday, October 22, 2012

Looks Like Fall...Pumpkin Picking

I've got a sketch challenge up on the Lily Bee blog today! We are playing with the Index Journaling Cards all week. These essential elements are so versatile...they can be used as a standalone part of your overall layout or card design, a photo mat, a great place to do your journaling and the list goes on. I created a sketch, which can be found on the Lily Bee blog, specifically with these cards in mind. I hope you'll play along and post your fabulous creations to our Flickr Group!

Here's my take on the sketch. I used the Autumn Spice collection and altered the sketch slightly, adding more base layers under the strips.

Supplies: Autumn Spice (Spice Vanilla 12x12 paper, Spice Nutmeg 12x12 paper, All Spice 12x12 paper, Brown Suger 12x12 paper, 6x6 paper pad, Index Journaling Cards, Mixed Stickers)

Creative How-to: I used three index journaling cards, slicing and dicing them to fit the layout just so. I cut the top tab off the "November" index card and then tucked the tab portion to the top right of the photo section. I used the card that says picking pumpkins as title for the layout.


Here's a little peek at the layers. I distressed the larger layers and kept the strips intact with more clean lines, added some stitching and then I scattered a few embellishments over the layout.


Journaling: I used this index card for my journaling and wrote my story so that it would end with the sentiment that is already pre-printed on the card.


Pin these images to Pinterest 

Head over to the Lily Bee blog to see the sketch and how Nicole used it for her layout. Thanks for stopping by today!

Friday, October 19, 2012

So Very Thankful Fall Home Decor


Every year at this time of year I start to get in the holiday mood. It all starts in October with my 2 daughters' birthdays, then Halloween, Thanksgiving and Christmas. It's all right in a row and it just gets me into the spirit of the holidays. I had this fun project up on the Little Yellow Bicycle blog yesterday and I wanted to show you a fun way to make this fun holiday wall decor. 
Supplies: AH-279: Little Yellow Bicycle Acorn Hollow Chipboard Shapes, AH-135: Little Yellow Bicycle Acorn Hollow Favorite Pieces Cardstock Stickers, AH-305: Little Yellow Bicycle Acorn Hollow Paper Crafting Kit, May Arts Ribbon & Burlap, 10" Embroidery Hoop from local craft store, Muslin from local craft store

Creative How-to: This was so easy to make and I've received so many compliments on it already. I've included a supply list above but you will need embroidery hoop, muslin, mists, ribbon and Little Yellow Bicycle Acorn Hollow goodies. The first thing I did was measure and cut the muslin, leaving plenty around the edges so I could pull it taut. I then used spray mist to give it a little extra pizzazz. I added the burlap and ribbon and hooked the hoop together. This is where the real fun started.  


I used the area inside the hoop to create little scenes. I layered chipboard and sticker trees and the little fox at the bottom. Then I added the "SO VERY thankful" sentiment over the ribbon.


Next I added the chipboard "FALL" letters and the tree limb, placing the owl sticker over the limb. I topped it off with a little flowers/leaves medley from the paper crafting kit. Ideally you would use this inside the house since I used a lot of paper product but I am sure you could seal it to use it on your front door. Luckily, my front door is under a large covered patio so that's where you'll find mine.


I plan to switch out the insides for the different holidays. Thanks for stopping by today! Now make your way to the NEW ONLINE STORE from Little Yellow Bicycle. You can now order these great goodies from them. 


Wednesday, October 17, 2012

Hello There, Love Story

I shared these projects on the American Crafts blog last week and between family fun fests and the sickies, I'm just now getting around to posting them here. I played with the Amy Tangerine Ready Set Go collection. It's just soo easy to create with...so many great papers and the embellies are too much fun.

Hello There Tag Card
I created this card using a Lori Whitlock cutting file and my CAMEO. Once the card was assembled, I just layered it with different embellishments, added the speech bubble and topped it off with they groovy ribbon. Anyone remember the old Houston Astros baseball team colors? The ribbon is a perfect match! I wonder if I can dig up any old photos from games I went to as a child to scrap. Hmmm.
 
Supplies: Afternoon Delight Paper (35766) - Ready Set Go, Green Light Paper (35765) - Ready Set Go, True Story Paper (35775) - Ready Set Go, To-Do List Paper (35782) - Ready Set Go, Ready Set Go Printed Cardstock Shapes (85589) - Bits, Mixed Dimensional Embellishments (85591) - Delights/Details, Stitched Vellum (85593) - Details, Ready Set Go Value Ribbon Pack (89428) - Premium Ribbon

Love Story
This photo might look familiar because I scrapped it before but I really wanted to do two layouts of it so that I could put one in each of our girls' albums. Of course their albums are hugely about them but I think it's important for them to know how much their daddy & I love each other.
 
  Supplies: Green Light Paper (35765) - Ready Set Go, Coffee Break Paper (35768) - Ready Set Go, Running Errands Paper (35770) - Ready Set Go, Lunch Break Paper (35771) - Ready Set Go, Globetrotter Paper (35772) - Ready Set Go, Dinner Date Paper (35773) - Ready Set Go, Get Cozy Paper (35774) - Ready Set Go, True Story Paper (35775) - Ready Set Go, Charmed Paper (35780) - Ready Set Go, Surrounded Paper (35781) - Ready Set Go, To-Do List Paper (35782) - Ready Set Go, Rise N Shine Paper (35783) - Ready Set Go, Why Thank You Paper (35785) - Ready Set Go, Ready Set Go Printed Cardstock Shapes (85589) - Bits, Sure Thing (42255) - Remarks, Baxter Brown/Blue Letter Stickers (42254) - Remarks, Oh Yes (42256) - Fabric Remarks, Mixed Dimensional Embellishments (85591) - Delights/Details, Stitched Vellum (85593) - Details

Journaling: You know what? I haven't written it yet but when I do in the very near future it will be hidden on the journaling card that is tucked behind the photo where it reads "PULL HERE".

I "love" this love paper and just new I needed to use it as part of my title. I pulled out my handy dandy Clicut xacto type tool and cutting mat and just cut out the inside of one of the love words. Then backed them with fun paper and used the brown letter stickers, which are somewhat see through, and layered them over the bottom portion to tie the title together.

Here's a close up of my chevron do-hickey. As you can see I added paper to the base page as well as immediately under the cut out and then popped it up with foam dots. When you see it in person you can really see the dimension. Oh and you can't see the waves when you look at the page "full frontal" or in an album.

Thanks for stopping by my blog today! Before you go, if you are a Silhouette owner and you love American Crafts like we all do, did you know you can download cutting files from American Crafts in Silhouette Studio? How cool is that???

If you want to get your hands on this collection, head over to the Paper Issues store. They have Amy Tangerine Ready Set Go and so many other manufacturers AND you can get 20% off if you use the code HEATHER at checkout.

Friday, October 12, 2012

Daughters are flowers that are forever in bloom.

Happy Friday! Today is extra special for me because it's my first post as a member of the Lily Bee design team. And we wanted to make it a fun Friday for you by doing a blog hop to introduce the new team.

This week, the design team has been mixing and matching different collections - "Persnickety", "Autumn Spice" and  "Christmas Cheer". In the spirit of carrying on with that theme, I created this layout of my youngest daughter. She definitely has 3 year old sass but she got the sweetest heart and I see her growing and blooming every day!
 
Supplies: Lily Bee Design - Persnickety Collection: ritzy 12x12 paper, huffy 12x12 paper, Index Journaling cards, Mixed Stickers, ABC Stickers; Christmas Cheer collection - Mrs. Claus 12x12 paper, ABC Stickers; Autumn Spice collection - Spice vanilla 12x12 paper, Spice clove 12x12 paper, Spice nutmeg 12x12 paper, 6x6 Tiny Tablet, Mixed Stickers, Clear Stamps; My Mind's Eye Stella & Rose Hatty "Happy" Decorative Brads, Glue Arts Glue Glider Pro Adhesive. Photos by Allison Avenue Photography.

I used my CAMEO to cut the sunflowers that are sprinkled throughout the layout in the visual triangle. I also used a journaling card in place of a photo, added the "i simply enjoy you" sticker, stamped 2012 and "DOCUMENTED" from the Lily Bee stamp set and then stitched over the entire card.


Journaling: I opted to use a quote instead of journaling on the front. I added a journaled note on the back to let her know what I think about the little lady she is becoming.


Heather Leopard <---YOU ARE HERE and halfway through the hop!


Nicole Nowosad, Danielle Flanders and Anna-Maria Wolniak are also a part of this amazing team but are not participating in the hop today.

Giveaway!!!
Since this week's theme was all about mixing and matching the 3 new collections, Lily Bee will be giving away a variety pack of 12x12" papers from all three lines for one lucky winner who comments on each designer's blog AND on the Lily Bee blog post. To be eligible for the prize on the Lily Bee blog, you are asked to comment on everyone's blog posts. If you enjoy what you see on my blog, I'd love to welcome you as my newest follower!

Thanks for stopping by today. Continue the blog hop by visiting Deanna Misner now!

Wednesday, October 3, 2012

Happy Harvest

Fall in Texas can be a bit unpredictable, but all in all it's usually in the 70's/80's and we spend a lot more time outdoors. Each year we make the trek from city life to country life and enjoy a day at a local farm, where you can interact with farm animals of all kinds, take a hayride, pick you own pumpkins and soo much more. It really is a day's worth of fun fill activities.  One thing we always love to do is climb up on the tractors and pretend to be tending to the crops.  Little Yellow Bicycle sent me the Acorn Hollow collection to work with and it's great for all your fall photos. It's so very versatile with the rich colors so you could use it for so many other non-fall projects. Nature lovers rejoice!

Supplies: Acorn Hollow ProductsAH-101 Tallest Trees/Striped Piping, AH-112 Button, Button/Tiny Tonal Walnut Stripe, AH-108 Chevron Knit/Textured Gold, AH-110 Forest Floral/Textured Pond, AH-111 Lichen Check/Lichen Text, AH-105 Toss & Tumble/Pumpkin Pinstripe, AH-304 6"x6" Paper Pad, AH-135 Stickers - Favorite Pieces, AH-140 Stickers - Fresh Verse, AH-134 Journaling Cards, AH-305 Paper Crafting Kit, AH-279 Chipboard Shapes, AH-227 Stick Pins

I used the paper crafting kit and a Fresh Verse sticker to create my title "Happy Harvest".

Journaling: The journaling cards in this collection are soo cool...some have foil on them and others have fun decorative edging. I used mine to feature some hidden journaling, which I wrote on after this photo was taken.

Thanks for stopping by today. Head over to the Little Yellow Bicycle blog to see what Jen and Corrie did with this collection.

Monday, October 1, 2012

Love Adventures Together

My oldest baby girl is 9 at exactly 9:40 am today, when this post goes live! I am both excited and sad at the same time to see her growing up. I can definitely see that she is maturing a lot this year. She's more aware and she is actually really into clothes and shopping, something she's never expressed an interest in. That's just one example and I'm citing it today because it is related to this layout I recently created.

I took a several days off work before school started so I could spend some mommy daughter time with my girls. We went to tea rooms, ice cream factory tour, manis/pedis and other fun stuff.

I spent one of the days with just my oldest so we could do back to school shopping. We snapped this quick photo as we took off for our shopping spree.

Supplies: American Crafts Amy Tangerine Sketchbook.

Creative How To: I got these Amy Tangerine sketchbook goodies from American Crafts and quickly went to work. I started this layout knowing I wanted to use the chevron paper and the hearts but plaving the photo on the chevron was not gonna work since it just got lost so I added the grid and just layered away with paper from a 6x6 pad and scrap, die cuts, stickers, bits, journaling cards and more. Before I adhered it all down I took a step back and realized there was something missing from the chevron pattern - a bit of color. I pulled out my Mr Hueys mists and ran my finger across the inside of the nozzle and then dabbed it on the paper quickly spreading it across as it was quickly drying. Just a few dabs here and there and I was happy. Lastly, I doodled a bit and added journaling.

A little mist, two techniques...

 The journaling reads: We played hookie from summer camp and work to have a mommy/daughter day. We spent the afternoon shopping for clothes, shoes and back to school supplies. I had a great time & you said it was the best day ever!

Layers... 

Happy birthday to my oldest baby girl! 

The birthday fairy paid her a visit while she was sleeping. She was SOOOOO excited to wake and find this surprise.

Actually the door was open when she woke so she could see the sign and crepe paper. Her younger sister's room is adjacent to hers. Little sister woke up first and was soo worried that her sister was trapped, until we explained it to her.

The birthday girl busted through like a champ.
xoxo, Mommy!