I created 3 layouts, a card and an altered canvas with a vacation theme in mind. Without further ado, please take a look...
Soak Up the Sun – I created this layout focusing on a day at the beach on a recent trip to the Gulf coast.
Supplies: Ventura Paper (35731) – Shoreline, Belmont Shore Paper (35736) – Shoreline, Carpinteria paper (35721) – Shoreline, Vero paper (35719) – Shoreline, Myrtle paper (35725) – Shoreline, Cambria paper (35726) – Shoreline, Manhattan Beach paper (35740) – Shoreline, Pacific Beach paper (35737) – Shoreline, Malibu (35722) – Shoreline, Venice Paper (35734) – Shoreline, Bits - Sand Dollar – Shoreline.
Create Adventure – vacation adventures don’t have to include zip lining, airplanes or water for that matter. This particular day, we had a staycation so we stayed and played with chalk.
We created all sorts of themes with our chalk but this one was a favorite. I sketched out a crown, wand and frog and my daughter colored it in. We created this silly princess scene and had soo much fun creating our own little adventure story.
Supplies: Veridian Wignette (35676) – Amy Tangerine Sketchbook, Ivory Impression (35677) – Sketchbook, Padma’s Pattern (35673) – Sketchbook, BITS DIE-CUT EMBELLISHMENTS 24/PKG SHAPES(77290) – Sketchbook, FLAT-TOP FABRIC BRADS 12/PKG (85578) – Sketchbook, REMARKS FABRIC STICKERS PAINT (42242) – Sketchbook, REMARKS STICKERS BOOK 8 PAGES ACCENTS & PHRASES (42240) – Sketchbook, BITS DIE-CUT EMBELLISHMENTS 4/PKG LAYERED TAGS (77289) – Sketchbook, Scene Glitter Foam Stickers (53340) – Amy Tangerine Thickers, Boardwalk “Pool” Printed Cardboard Letter Stickers (53361) – American Crafts Thickers
Always My Baby – We were away on Fall vacation when these candid pics were snapped of my daughter and I. She was snuggling up to me and my friend captured these moments. I just adore having such a snuggle bug.
Supplies: Padma’s Pattern (35673) – Sketchbook, Ivory Impression (35677) – Sketchbook, Harper’s Hue (35687) – Sketchbook, Paige’s Portraits (35691) – Sketchbook, REMARKS FABRIC STICKERS PAINT (42242) – Sketchbook, REMARKS STICKERS BOOK 8 PAGES ACCENTS & PHRASES (42240) – Sketchbook, BITS DIE-CUT EMBELLISHMENTS 4/PKG LAYERED TAGS (77289) – Sketchbook, (77290) – Sketchbook, REMARKS DIMENSIONAL STICKERS DOODLE (42243) – Sketchbook, “Muse” Printed Chipboard Letter Stickers (53343) – Amy Tangerine Thickers, Roxie Acrylic Stamp – American Crafts Stamp
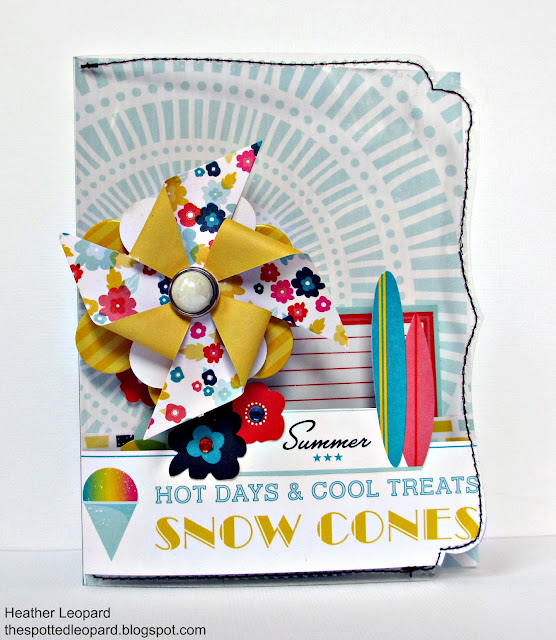
Snow Cones Clear Card – Who doesn’t love a refreshing snow cone treat on a hot day in the sun? This was created using a clear card. I knew I wanted to create two scenes – one on the inside to write a message and the other on the front of the card. They would need to work together to be visually appealing when the card is closed.
I covered the inside with the blue paper and positioned the center of the circle behind the pinwheel on the front cover.
I added a journaling spot and flat embellies to the inside. Then I layered paper, fussy cut elements and the pinwheel over the front.
Supplies: Manhattan Beach paper (35740) – Shoreline, Carpinteria paper (35721) – Shoreline, Vero paper (35719) – Shoreline, Delights Seaside Pinwheels (85586) – Shoreline, Clost to My Heart Clear Card
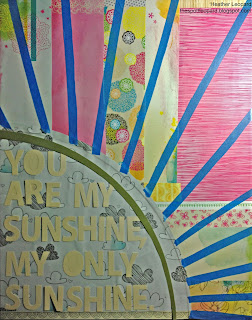
You Are My Sunshine Canvas – I’ve been wanting to do this canvas for my daughter’s room and when I think of an ideal vacation, I think of the sun. This will be hanging in my daughter’s room so she can daydream of the beach and sunshiny days when she’s playing inside or if the skies are grey.
Can you see the grey skies (Indigo Inspiration paper) behind the main portion of the sun?
Supplies: Sienna Spirit Paper (35672) – Sketchbook, Crimson Charm (35674) – Sketchbook, Kristi’s Craft (35682) – Sketchbook, Charlotte’s Shade (35684) – Shoreline, Indigo Inspiration (35686) – Sketchbook, Harper’s Hue (35687) – Sketchbook, Large 16x20 Canvas from LSS, Folk Art Paint – mix of yellow and mustard, Silhouette Cameo
I had fully intended to create a photo tutorial but I only took one prep photo. I just really got into making this and was having so much fun that I forgot to take more photos. The good thing is that the photo I have is probably the most important! Anyway, I thought I'd at least offer up a written step x step:
- Gather a canvas, multiple pieces of paper, adhesive - mod podge and glue dots, painter's tape, alphas (either store bought or cut from a digital file) and paint.
- Cut your papers into strips and mod podge them to the canvas in whatever pattern you desire.
- Make a large circle, you can you a plate - I used a drafting tool my hubby had. Line it up to the corner, making sure it's large enough to get all you letters in or make your letters smaller. Mod podge it to the canvas.
- Make a 1/2" mask for the edge of the sun, using the same tool you used to cut the circular part of the plate.
- Using painter's tape, begin to tape down the rays for the sun. Keep in mind that the parts that aren't covered is where the paint will be and the taped parts are where the papers will be exposed. You want the space between the taped areas to be wide enough to look like rays. Be sure to make the widths different sizes.
- I struggled with the best way to do this next part. I'll tell you what I did but it was a little risky. I applied glue dots to the back of my letters and before I laid them on the grey skies paper I took most of the tacky off of them, simply by pressing my fingers repeatedly on the side of the glue dot that would be touching the paper. The last thing I wanted to do was to have it rip my paper when I peeled the letters off.
- Once everything was laid out, I painted over the canvas. I went with a thin coat because I wanted to be able to see a faint pattern of the paper. You may choose to go heavier depending on your goals.
- I set it aside to dry for a short while, peeled the tape off and carefully removed each letter.


I hope you enjoyed my creations and I hope I made the American Crafts team proud! Thanks for having me, Paige! If you started here, please head over to the American Crafts blog and leave me some love! Make sure to check out all the CHA Summer sneaks going on over there right now!


16 comments:
it's so difficult to work with bold prints yet you do it so well.
WOW! This is spectacular. Thanks for the tutorial, too! I might have to try it!
eeeek! oh girl, these are truly awesome, awesome projects. I love every single one of them. Congrats on Guesting...I know you're super stoked about that ;) HAPPY 4th!
Heather, truly LOVE all these projects - they are amazing!
Wooooo hooooooooooo!! CONGRATS!! That is AWESOME and you soooooo deserve it!! WOW!! I am IN LOVE with all your projects you made! GORGEOUS!!!!
Seriously you did a phenomenal job! I'm so super impressed by your creativity!
YEAH Heather!! congrats to you--BEAUTIFUL work!
OH my gosh, these are all so wonderful! Bright, fun, and so creative. Love your work!!
Beautiful, bold and bright fun colors. Wonderful layouts!
Congrats on being a Guest Designer for AC, Heather!! You did an amazing job on all of your layouts and projects!!
Wow I love that sunshine print and the way you layered it is just extra stunning!
LOVE all your projects! They rock!
These are beautiful! Megan
I love this! Definitely want to try =) Thanks for sharing!
Visiting from Tip Junkie
LOVE! I did some wall art with the same words ;) I'd love for you to post this project on my new link party- Impatiently Crafted sundays! http://impatientlycrafty.com/2012/10/13/craft-link-up-impatiently-crafted-sundays/
soma 350 mg can i buy soma online - soma yoga 02840
Post a Comment