As a Contributing Designer for
Shimelle.com, I was super excited when Shimelle asked me to create a summer layout. So excited that I created Silhouette CAMEO stitching holes tutorial.
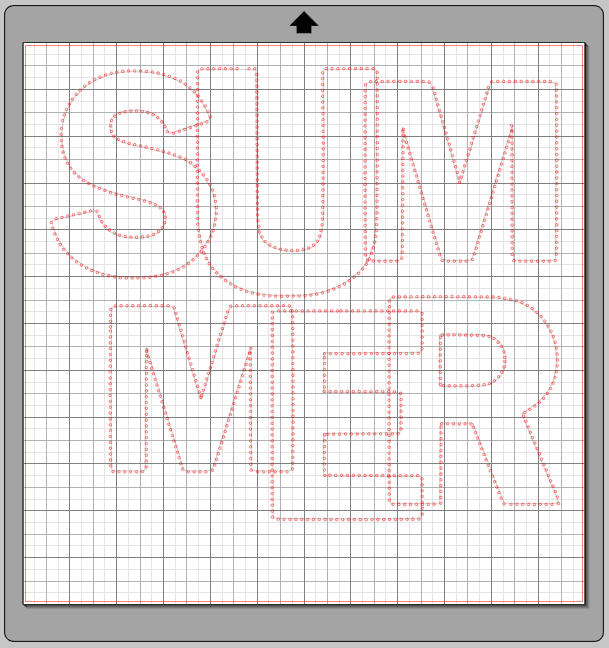
When I think of summer, the things that come to mind are bright cheerful colors and sandy beaches so naturally, I made that the focus of my layout. I didn't just want to include a nod to summer, I wanted to scream SUMMER! I knew I had to go with a big, bold title so I went to my trusty die cutting tool and pulled out 6 bold colors that coordinated with Shimelle's Starshine collection and went to work.
To get started, I created the entire design for my layout in the CAMEO software, including my photo and layering around my photo. I created the letters using Franklin Gothic font in varying sizes between 460 - 525. I simply enlarged the letters, overlapped them and scaled them up and down until I liked the look.
For this next step you have many options for practically perfect holes for stitching but I'm going to talk about two of my favorites. The first one is to draw the design onto your paper using your CAMEO and sketch pens, then poke the holes yourself. The second option is a little more complicated but well worth it if you ask me. Take a look at how I added dots onto my letters in the image below. Here's how to create stitching holes using your Silhouette CAMEO...
I first saw a tutorial on this where someone used "o"'s instead of period (.) but there were several more steps involved, including using offset, ungrouping and deleting. Using periods is much, much easier. My friend Majken gave me the tip and I can't remember who she said used a "." instead of an "o" but it's great and helps eliminate several steps. So, let's go....
TUTORIAL: CREATE STITCHING HOLES USING YOUR SILHOUETTE CAMEO
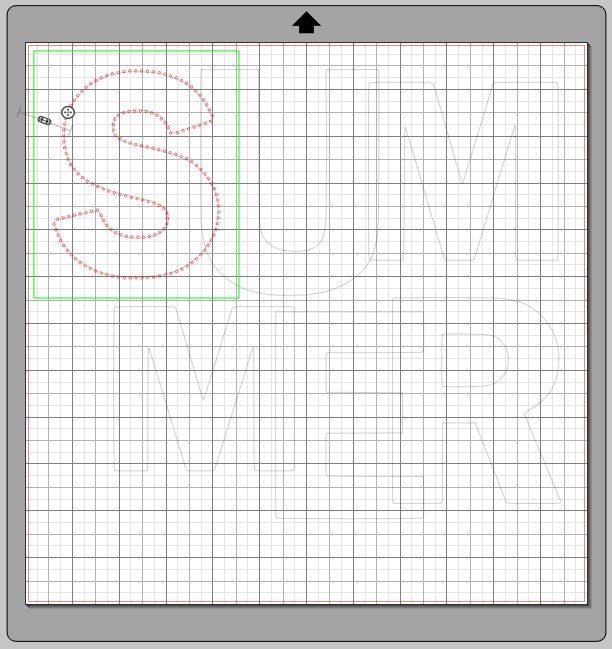
Usually when I want to stitch a cut file, I skip steps 1 - 3 but you have to do steps 1 - 3 this time because you can't add text to text.
1. 1st step is to create a png or jpeg of each of your letters. Separate your letters and use your favorite snipping to to do a screen capture.
2. Import the png or jpeg back into your Silhouette designer. This turns it into a "shape" instead of editable text.
3. Trace each letter and release the compound path / ungroup them.
4. This is where you'd normally start if you were using a cut file. Using a text box and Times New Roman or some similar font, type in dot after dot after dot until you've filled up an entire row or two of dots. I prefer using a period for my dots but others use an "o". The actual number doesn't matter because you can add more dots to an image in step 6
5. Change the font size to 24 or 36.
6. Click the "Select" Arrow in Silhouette and then double click the text box.
7. The text box turns to a green outline and you will see circle with a plus sign inside. Click the circle and hold it down while dragging it to the cut file. In my case, that's the "S".
8. Your image will look similar to this. If there aren't enough dots to cover the entire image, just click in the text box and add more. It's as easy as that.
9. Repeat until everything you want to stitch has dots for holes.
10. Cut your files as you normally would. A few of my holes were just barely hanging on so I'll be using the double cut option next time and recommend you do that as well.
11. Put a good movie on and stitch away!