Friday, November 30, 2012

Ribbon Christmas Tree Card & Gift Box

Hi friends! Today I'm playing with some yummy May Arts ribbon. Thanks, May Arts!!! A few of us on the Little Yellow Bicycle design team are doing a blog hop to show you all sorts of fun ideas and uses for ribbon.  Details on the hop are below but first, let me show you these two projects I made..

Christmas Tree Card

Pin this to Pinterst using the Pinit button here or at the end of this blog post.

Supplies: Little Yellow Bicycle Once Upon a Christmas collection: OC-304 6c6 Paper Pad, OC-190 Clear Stickers - Card Making, OC-279 Chipboard Shapes, May Arts ribbon

Creative How-to: Cut pattern paper the same size as the wrong of card. Measure 5 rows for the ribbon so that the largest is at the bottom and the smallest is at the top. Leave room at the top and bottom for the star and sentiment. Punch holes at the end of the measure lines and string the ribbon through the holes. Secure the ribbon edges to the back of the card with tape. Adhere the paper with the ribbon tree to the front of the card. Complete the card by adding the sentiment and a star.

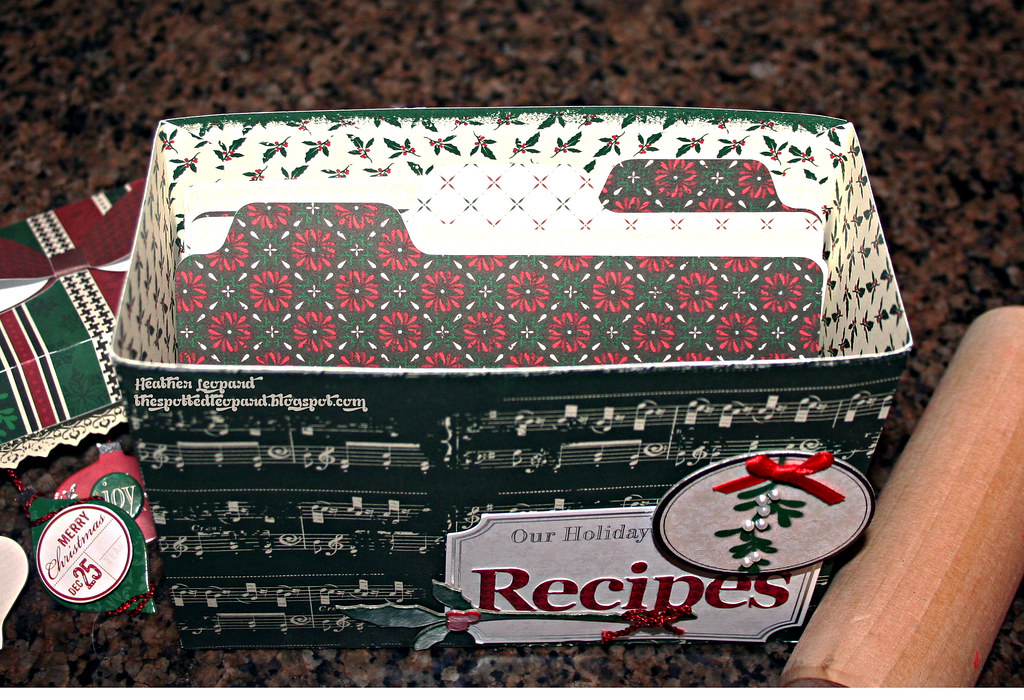
Fancy Schmancy Gift Box
I guess I had a bad camera angle - I promise my box and the decor are nice and square; just doesn't appear that way in the photo. :(

Pin this gift box idea to Pinterest: 

Supplies: Little Yellow Bicycle Once Upon a Christmas collection: OC-106 Snowflake Medallion/Red Houndstooth, OC-102 Poinsettia Quilt/Multi Starlight, OC-132 Tags & String, May Arts ribbon.

How to: Trim inside pattern paper so that there is a 1 - 1 1/2" space of the box showing around each edge. Set aside. Trim paper strips to 2x12 and then adhere them to the box so that they cover the outer edges of the box. Adhere the pre-cut inner pattern paper over the paper edges exactly in the center. Add pom-pom trim around the edge of the inside paper to cover the seam. Add smaller velvet trip over the pom poms. Tie the green ribbon around the package, adding the tag and silver leaves immediately before tying. Your shirt box goes from drab to fab!


Alright, now it's blog hop time. Make sure to hop along to each of us - follow our blogs if you like what you see, Pin images to Pinterest to spread the word, leave comments, whatever you're in the mood for today - and then stop by the Little Yellow Bicycle blog and May Arts blog! LYB is giving away an awesome Once Upon a Christmas collection! Yay!!!


Heather Leopard <--you are="are" here="here" you--="you--">

Have fun and good luck!

Tuesday, November 27, 2012

Snow Globes & Very Merry Christmas Tree Cards

Hi there! I wanted to tell you about a new challenge I'm hosting on the Lily Bee blog this month. You see, this whole week the design team gals are showcasing Christmas and Holiday cards so my challenge for all of you is to grab your favorite Lily Bee goodies and CREATE A SHAPED CARD. This means no standard size rectangle cards, unless...you create a festive holiday shape as the main embellishment on the card.

I created these two cards to hopefully spur a few ideas. First is my shaped card...a snow globe.
Snow Globe Card Heather Leopard
Click here to Pin this card to Pinterest:

Supplies: Christmas Cheer (6x6 Tiny Tablet, Figgy Pudding 12x12 paper); Autumn Spice (Nutmeg 12x12 paper)

How-to: I cut the globe portion out of thick transparency on my CAMEO but creating a circle card cutting file. I then cut another circle the same size out of white cardstock and another circle with a snowflake design and affixed them over the back of the card. I then embellished with snow covered meadows, deer and a tree.
Snow Globe Card scene Heather Leopard

Next is a standard card but I created a Christmas tree out of triangles, and used it as the main focus for the card.
Very Merry Christmas Heather Leopard  
Click here to Pin this card to Pinterest: this card to Pinterest: 

Supplies: Christmas Cheer (6x6 Tiny Tablet, Figgy Pudding 12x12 paper,Peppermint 12x12 paper, Mixed Cardstock Stickers, Clear Stamps); Autumn Spice (Nutmeg 12x12 paper)

I flipped the banner cardstock stickers over to create additional smaller trees. I stamped the sentiment using the stamp set from this collection.
Very Merry Christmas trees Heather Leopard


Here's a close-up of the tree. I simply cut triangles in cascading sizes and layered them over each other, using pop dots to make them stand out.
Very Merry Christmas tree Heather Leopard

Now I want to see your take on this Take Shape card challenge! Head over to the Lily Bee blog to get the details on how to play along. 


Thanks for stopping by today! 


Click this Pin-it button to Pin to Pinterest: 

Wednesday, November 21, 2012

Holiday Recipe Box Gift & Chocolate Crinkles Recipe

I just love getting together with family and friend over the holidays. I've got what I consider to be a very close-knit family. I may be an only child but I've always felt like a part of something bigger. Perhaps it's my Hispanic heritage that binds it all together but holiday memories for me are lots of aunts and uncles and even more cousins, catching up, playing games and mostly...EATING!

I thought it'd be fun to create a recipe box, using the Little Yellow Bicycle Once Upon a Christmas collection they sent me. 
I think this would be a great gift for family members so we can capture all the recipes and each have our own set. It would be even better to have each family member write their recipe in their handwriting so we can capture that part of them as well.
Recipe-Box-wm 
Click here to Pin this recipe box project to Pinterest:

Supplies: Little Yellow Bicycle Once Upon A Christmas collection - OC-111 Holly Berry/Green Carols, OC-105 Mistletoe/Green Starlight, OC-134 Journaling Cards, OC-135 Stickers - Favorite Pieces, OC-305 Paper Crafting Kit, OC-220 Fabric Flowers, OC-279 Chipboard Shapes, CAMEO, Lori Whitlock Recipe Box cutting file

Creative How-to: I used a recipe box cutting file from Lori Whitlock via the Silhouette store. I cut all the pieces out with my CAMEO and once assembled, I added the journaling card, "Recipes" word that I wrote and cut from my CAMEO and mistletoe. I embellished the lid with the pretty sticker trim from the Favorite Pieces Stickers and then hung the ornaments from the inside of the lid. 
Recipe-Box-Bow-wm

The top of the box needed a pretty bow, for sure! The paper crafting kit is full of different sized bows, flowers, banners, etc.

Recipe-Box-Inside-wm
The inside has tabs to separate the various categories. I also added several blank cards. I am hoping to get my family members to write their recipes during this holiday season.

Pin this recipe box project to Pinterest:

Keep reading: Not sure if you spied the recipe card I wrote in the photo at the top. It's for Chocolate Crinkles. I don't know who made this recipe but I remember making dozens and dozens of them as a child for a cookie exchange we would do with the family. All the aunts (my great aunts, actually) would get a big tin of cookies from all the nieces and nephews (my mom, my aunt, their cousins, etc). I couldn't even begin to count how many people that would be. Anyway, I remember making these cookies each year and now I make them with my kiddos. These are the cookies we leave out for Santa, with his glass of milk.


Chocolate Crinkles Pin this fabulous recipe to Pinterest:


Mix together:
1/2 C. oil
4 squares unsweetened chocolate (melted)
2 C. Sugar
2 tsp. vanilla

Add 4 eggs, one at a time and mix.

Mix together, then add to the mix above:
2 C. flour
2 tsp. baking powder
1/2 tsp. salt

Refrigerate overnight.
Roll 1" balls in confectioner's sugar
Bake at 350 for 8 minutes, no more or they will be overbaked.

As you can see, we have fun with the powdered sugar after we are done making the cookies with it!

Thanks stopping by today!

Tuesday, November 20, 2012

The Most Wonderful Time of the Year

Happy Tuesday everyone! I wanted to show you a layout I did based on this week's sketch by Cindy Liebel on the Lily Bee blog. I just love the Christmas Cheer collection Lily Bee sent me to play with. It's soo pretty and the colors are bright & cheery.


Wonderful Year Heather Leopard wm

Pin this layout to Pinterest:

Supplies: Lily Bee Christmas Cheer collection (Figgy Pudding 12 x 12 paper, 6x6 Tiny Tablet, index journaling cards, ABC Stickers, Mixed Stickers, Clear Stamps)

Creative How-to: Visit the Lily Bee blog to see the sketch and get details for playing along in the challenge. The first thing I did after choosing my photos was to pick the main papers I'd be using. These are my base, which is white, and the blue/white polka dot Figgy Pudding paper. I then measured and cut my squares and placed them on the white. I laid the blue paper over all of that and marked the two spots for the angle, leaving room to add the zig zag and scallop border. Once I cut and adhered it, I added the index journaling card at the top with a little layering, jute and banners.


wonderful year card

Then, I embellished my squares with layers, stitching, doodling, index journaling cards sticking up and out, stickers and more... I also added a border at the bottom using the same colors and the Merry Christmas sentiment to tie everything together.


wonderful year photos journaling


Pin this layout to Pinterest: 

As always, thanks so much for stopping by today! Please head over to the Lily Bee blog to see the sketch and get the deets on how to play along!

Monday, November 19, 2012

DIY Give Thanks Wreath & Tutorial

I want to show you a project I had up on the American Crafts blog last week. It was way too fun to make and I have gotten so many compliments! I'm including a quick tutorial so you can make one too!


I love to make my visitors feel more welcome by decorating the front door for the fall season. This handmade wreath is just a little something to greet them as they walk up. This can be re-created very inexpensively and is relatively easy to make. 
Fall-Wreath-Heather-Leopard-wm

Pin this wreath & tutorial to Pinterest 

American Crafts Supplies Needed: Apple Pie Paper (35885) - Pumpkin Patch, Caramel Corn Paper (35883) - Pumpkin Patch, Pumpkin BreadPaper (35882) - Pumpkin Patch, Candy Bar Paper (35876) - Pumpkin Patch, Pumpkin Pie Paper (35880) - Pumpkin Patch, Hayride Accent & Phrase Stickers (42295) - Pumpkin Patch, Chestnut Cardstock (AM710-48) - Textured Cardstock

You'll also need: Round wreath, felt & burlap cut from a fabric bolt, die cutting machine & dies or files, phrase stickers, scissors, orange, green & brown mists, ribbon, glitter glue, staple gun, liquid glue, plastic gloves.

Step 1: Cut strips of felt and burlap approximately 3.5" h x the as long as the fabric allows. Cut scallops out of the felt and burlap. It doesn't have to be perfect; just eye it.

fall-wreath-scallops

Step 2: Staple the strips to the back of the wreath and start wrapping the strips around the wreath, alternating the felt and burlap at the same time so they overlap each other.
fall-wreath-covering

Step 3: Cut pumpkin, pinecone, accordian flowers and leaves from paper (I used my electronic die cutting machine to cut these files). Mist the leaves in orange, green and brown mists and crumple them up while they are still moist. Glove are recommended. Unwrinkle them before adding to your wreath. Mat the Give Thanks sentiment on brown cardstock to give it a sturdier base. I used glitter glue to add a little sparkle to my pinecone.
fall-wreath-elements

Step 4: Layer all the leaves, flowers, pinecone and sentiments to your liking. 
Fall-Wreath-Heather-Leopard-cu-wm

Step 5: Add pretty bow and now you have a welcoming fall wreath to hang on your door.
Fall-Wreath-Heather-Leopard-wm

Pin this wreath & tutorial to Pinterest 

Thanks for stopping by today. I hope you have a great Thanksgiving week for those here in the wonderful USA. For everyone else, I hope you have a fabulous week as well!

Tuesday, November 13, 2012

Valentine's Mini Albums/Coupon Books & Blog Hop Winner

I'm not sure I feel quite right posting Valentine's Day projects when it's not even Thanksgiving yet but Imaginisce just released a new collection called Love You More and we're showing it off on their blogs soooooo, I'm debuting what I created as well.

Before I reveal it though, I HAVE to tell you how excited I am with the new direction they took with this collection. This is my favorite collection from them of all time. I love the texture of the paper (no more glossy elements) and the style is just different, in a good way! They also have really great sticker sheets and alphas! The best part is - WASHI!!!! I seriously love it and I'm not just saying that because they sent it to me to create with! Here, let me prove it to you and show you these fun things I made.


I decided to make 2 mini albums with this collection; both are for my girls. I cut the albums from all the 12x12 paper in the Love You More collection using my CAMEO and various cutting files.

Love You More
The Love You More mini will be a mini album with photos and notes documenting me and my hubby’s love story ‘cause I like to make sure they know how much we care for each other.

PIN this project to Pinterest: 
(click image to enlarge)


XOXO Coupon Book
This XOXO one is going to be a coupon book for my girls to. I’ll be adding little coupon notes to the slip in cards for fun activities we can do together as a family in February.

(click image to enlarge)

Creative How-to: Using my Silhouette CAMEO, I cut each envelope using the library pocket tag cutting file by Lori Whitlock. I used a different tag for the insert called 7 Christmas Gift Tags, also from Lori. Once the envelopes and tags were assembled I embellished the fronts an backs of each envelope with stickers, ribbon, washi, fussy cutting, pop dotting and more. If you look closely you may also notice that instead of using tags for some of the envelopes, I used the 3x4 cards from one of the 12x12 papers. These sets can be used independent of each other or I can put them together to make one mini as I planned the design of them to allow me to do that - the back of the last page of the Love You More book has some hexagon print stuff on it. :)

PIN these projects to Pinterest: 

Thanks for stopping by today. I do believe Imaginisce is giving away some of this collection this week so make sure to stop over on the blog to find out how to win!

Veteran's Day Blog Hop Winner
Before you go, the random winner of the Imaginisce goodie box from the blog hop last week is Lynda!!!
Please send an email to heather @ spottedleoparddesigns DOT com by November 30, 2012 with BLOG HOP WINNER in the subject line along with your address and I'll get this out to you. If I don't hear back from Lynda before December 1, I will donate the scrap goodies to my daughter's school's art department.

Thursday, November 8, 2012

Veteran's Day Hero Card

I want to send a HUGE THANK YOU to all who have served and are serving in our military!

My daughter's school has a Veteran's Day program every year and she is soo proud to have her Big Daddy there. My dad (her Big Daddy) served in the Navy in Vietnam and both my grandfathers served during WWII in different branches and needless to say they are/were my heroes!

The Imaginisce design team is celebrating our Veterans all week on the blog, doing little mini blog hops.  Today, it's Rebecca, Tiffany and I so I'm guessing you made it here from Tiffany's blog. If not, make sure to go back to them and see their cool stuff!  I made this project my mixing different lines and enlisting my CAMEO.
Creative How-to: I cut the heart using the "heart flag" cutting file I downloaded from the Silhouette store. It doesn't actually cut is as a card so I adhered it to a 6 x 12 piece of white cardstock and made it into a card.  After I pieced everything together, I wanted to hang a dog tag so I made one by drawing a rounded rectangle in the software program and writing the word HERO. I cut it out of white cardstock and misted it using my homemade grey mist mixture. I think using silver embossing powder would make this card really ROCK but I didn't have any at the time!  I used baker's twine to tie it around the heart shaped flag card.

Thanks for stopping by. Before you go, I'd love to have you as my newest follower. If you like what you see,  click JOIN in the upper right hand side bar. I will be doing a GIVEAWAY for some Imaginisce goodies direct from my stash and I will pick the random winner from my list of followers! Leave a comment for a 2nd chance to win (but you must also be a follower or I will draw again).

Now, head back over to the Imaginisce blog and leave some love! You gotta do it to win!

PIN this page to Pinterest

Wednesday, November 7, 2012

Merry & Bright Noel Cards

Things may appear to be a little slow over here since I haven't posted in a week but I promise you that is not the case. I have all these completed projects lined up here and I am bursting to show them to you.  Trust me, November is probably my most hectic scrappy month to date. Yikes!

Okay, so today I wanted to show you some cards I made with the newest collection Little Yellow Bicycle sent me to play with. It's the Once Upon A Christmas collection and it's just gorgeous. I'm not just saying that, it really is. I love the traditional Christmas colors and the foiling. Seriously, so pretty. 


Noel, Noel Card 
Supplies: Once Upon a Christmas - OC-304 6x6 Paper Pad, OC-160 Vellum Tape Strips, OC-305 Paper Crafting Kit, OC-279 Chipboard Shapes

Creative How-to: This card was way too much fun to make.  I saw the pretty chipboard ornaments and the chipboard frame and knew I had to cut a window out of the front of my card so that it would dangle. I adhered the paper to the card base and then placed my frame where I wanted it (without adhering it). I traced around the frame and then using my xacto knife and cutting mat to cut the inside out. I trimmed a little extra off so that that the circle is completely covered by the frame. Tip: try to keep it nicely cut because even though it's covered by the frame on the front, it's not covered when you open it up. Next, I added some wire to the ornament, placed it under the frame and adhered it all to the card. I topped it with the bow and then trimmed out the rest of the card, using the vellum tape and chipboard letters.
Merry & Bright Card
 
Supplies: Once Upon a Christmas - OC-304 6x6 Paper Pad, OC-230 Clear Cuts with foil accents, OC-220 Fabric Favorites

Creative How-to: This paper is one of those that you love but wonder what to do with it. I first saw it in the 12x12" size and instantly had thoughts for a fun layout with a very basic, simple design so I sketched that out and put it in my sketchbook for a future project because I realized that the 6x6" paper pad version of this would be PERFECT for a card. This is so easy to put together...adhere the paper to the base card. Add herringbone paper and glue dots to the back of the clear cuts plastic frame and adhere it over the small brown wreath (it's covered up so you can just barely see it peeking out). Add ribbon across the length of the card. Adhere the Merry & Bright clear cuts sentiment over the ribbon and top it off with the canvas chipboard cardinal.

Thanks for stopping by today. Make sure to head over to the Little Yellow Bicycle blog today to see what a few of the other Biker Chicks made!

Pin these cards to Pinterest: