
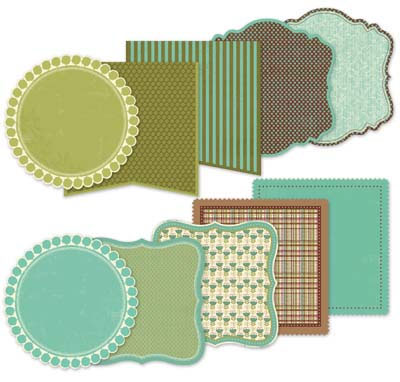
Sooo, the first thing I noticed when I pulled everything out were the die-cuts and I instantly realized how great they would be as a mini album. I'll get to that in just a sec. First, let me show you a few layouts I made.
For my first layout, I chose to use a photo of my daughter that is several years old. I'm not sure why I never scrapped it before but I'm glad because this is the perfect collection for it.
 Pin It
Supplies: American Crafts cardstock, Little Yellow Bicycle Paradise collection: PD-106 Happy Dots/All Natural, PD-108 Blissful Dots/Teal Tapestry, PD-133 6" x 6" Decorative Edge Double-sided Textured Cardstock - with glitter accents, PD-279 Chipboard Shapes - with glitter accents, PD-222 Felt Stickers - with glass beads, PD-305 Paper Flower Kit, PD-135 Cardstock Stickers - Favorite Pieces - with glitter accents, PD-140 Cardstock Stickers - Fresh Verse™ - with thermography and embossing, PD-1100 Tear Out Ticket Book - with thermography and embossing, Imaginisce i-top 2.0 and medium brad daddies, The Twinery twine, Zig Marker in Chocolate
I love to layer whenever possible. I decided to triple layer my background but of course, I cut out the insides from the papers where they would be covered up so I could use them on another project. I distressed the edges just a bit and then machine stitched around the border.
Banners are still in-style and the "HAPPY" cardstock stickers did not dissapoint.


My 2nd layout featured more banners, this time I cut them myself, using random widths and lengths and layering them over each other. I also fussy cut a few of the papers, added some punch-work and then added a top and bottom "frame" to bring the layout together.

Supplies:
American Crafts cardstock, American Crafts knock out border punch set, Little Yellow Bicycle Paradise collection: PD-109 Pleasant Plaid/Earthy Dots, PD-108 Blissful Dots/Teal Tapestry, PD-101 Paradise/Petite Pom Poms, PD-103 Simple Pleasures/Teal Too, PD-104 Splendid Stripe/Olive Leaves, PD-309 Confetti Garland - 30" long, Zig Marker in Chocolate
I did a zig-zag machine stitch over the banners at the top as well as on the main photo below to adhere them to the page and then topped them with garland for a litle bit of added flair. It's hard to tell in these photos but the circles are folded up randomly and I added a few smaller circles on top of the larger ones to make them even more interesting than they already are.


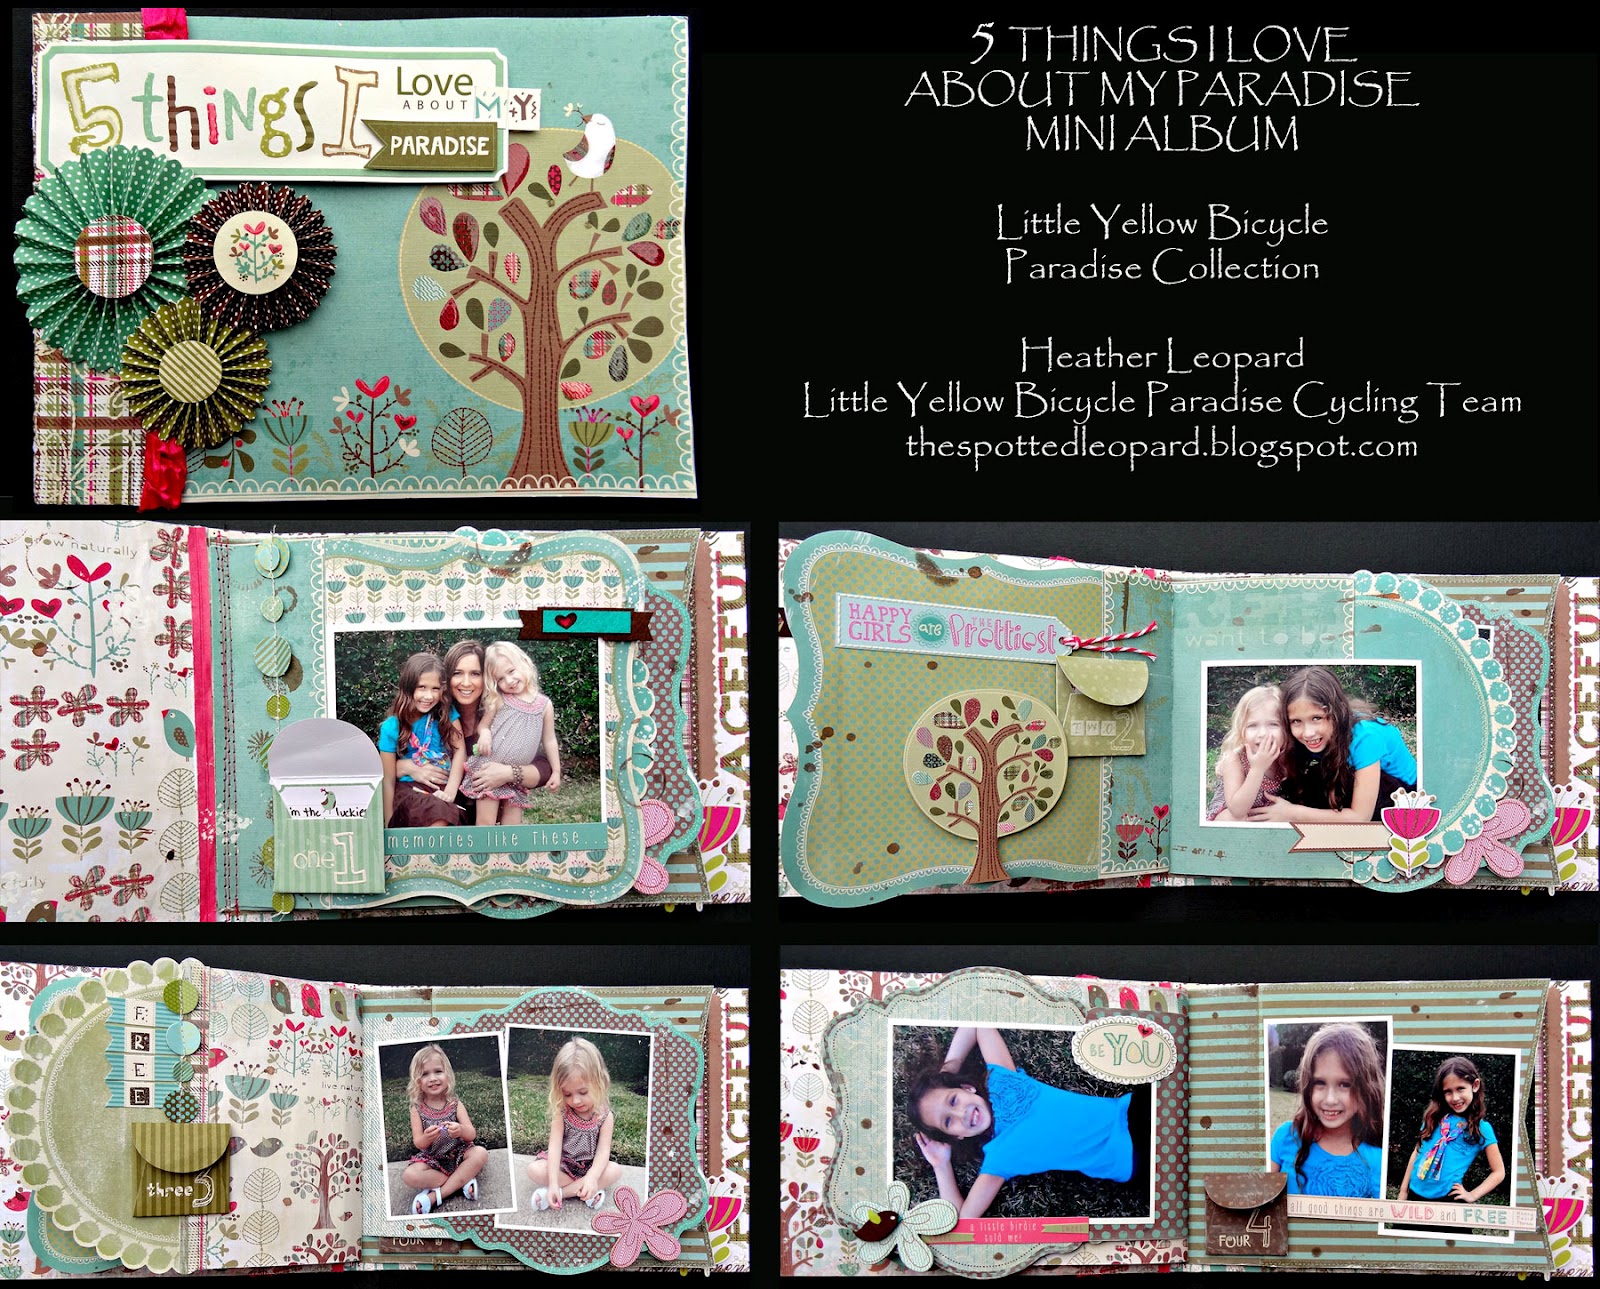
As promised, let's get back to the mini album. Like I said, I saw the dies in their packaging and it just hit me how perfect they would work as-is for a mini. Here's what they looked like in the packaging:


I then decorated the cover with cardstock stickers, DIY rosettes and Glossy Accents

Next I added coordinating paper to the dies, making sure to use a smaller width of paper for the first page, while adding more width to the next page and the next and so on so that the lengths of each page would get longer as they are added. Once I had all the base pages made, I stitched them together with my sewing machine, added mist and gesso and then added pictures and embellishments. Here are the end result pages:


Supplies:
Little Yellow Bicycle Paradise collection: PD-133 6" x 6" Decorative Edge Double-sided Textured Cardstock - with glitter accents, PD-222 Felt Stickers - with glass beads, PD-230 Clear Cut Shapes, PD-308 5 Things Envelopes - self adhesive with embossing, PD-309 Confetti Garland, PD-140 Cardstock Stickers - Fresh Verse™ - with thermography and embossing, PD-279 Chipboard Shapes - with glitter accents
Well I guess I hogged your time long enough. I hope you enjoyed browsing through my creations as much as I enjoyed playing with this new collection. Be sure to stop by the Little Yellow Bicycle blog today and leave me some love over there too! xoxo Heather
7 comments:
Gorgeous layouts!! Can't wait to get some of this line, and all of the other new ones too! LOL!
WOW--these are ABSOLUTELY amazing creations Heather! I really like the circle banner--just lovely!
These are all so great! Love the banner and garland combo - looks fun!
Beautiful work girl!! Congrats! ;)
OMG!!! These layouts are absolutely wonderful. I love the collection, it's now added to my must-buy list. You did an amazing job...thanks for sharing. :)
I am in love with your rosettes, banners and clouds on these! Amazing work, my dear!!!!!
Ok this little mini album is so stinkin cute. Great inspiration as I have never done a mini.. Thanks girl!!:)) Gabriella/madscrappertoo
Post a Comment