Thursday, August 25, 2016

You're So Sharp DIY Back to School Gift

Hello everyone. I'm here to show you how I created unique Back to School pencil boxes for all the kids in our cul-de-sac, who recently returned back to school.

The majority of the kids in our part of the neighborhood are still in elementary school. They are so excited to go back to school to see their friends and teachers. These little pencil boxes are just a small gesture from us to add to their excitement.
I used this pencil box cut file that I downloaded from the Silhouette store. Using a combination 3 different Pebbles collections, I mixed and matched colors and patterns to resemble a pencil. Then, I used the same color palette to decorate the crate that will hold the gifts. This will also serve as part of the back to school decorations in my house until we hand them out.  I'm getting a 2 for 1 deal here.

I found this crate in the Dollar isle at Target and had to get it because it's so cute.  You could easily recreate this yourself with a couple of rulers and wood glue.  It didn't need much more decorating but I wanted to add a bit of color. To do this, I added a cute little banner to the top and a school sentiment to the bottom corner.
This project involves a bit of paper piecing work but there's only 5 elements and it's so cute and really simple to do. I added little tags to the pencils so that I could add a sentiment on the front and who it's from on the back.
If you want to mix it up a bit for the pencils you could really use any fun pattern you have on hand. Afterall, pencils come in all sorts of fun prints these days.

Pebbles Supplies: Jen Hadfield Warm & Cozy Tweed Pattern Paper (733415) America the Beautiful Patriotic Posies (733346) Fun in the Sun 6×6 Paper Pad (732862) American Crafts Cardstock

Monday, August 15, 2016

Hello Farm Life Scrapbooking Layout + Free Cut by Heather Leopard

Hi everyone.  We recently celebrated Geometric Shapes on the Pebbles blog. Luckily for me, shapes are my most favorite to work with when creating a scrapbooking layout. I almost always use geometry to create fun backgrounds for my layouts. Inspiration for these types of layouts can be found everywhere, from quilts to art posters to this project right here. It's been blazing hot here in Texas so I thought I'd attempt to cool it down a bit by creating a fall layout using the Pebbles Warm & Cozy collection.

  Let me walk you through my creative process for this scrapbooking layout.
  • Choose a light colored background paper. I chose the white Cozy Comfort one that resembles a sweater.
  • Cut three 2.4" x 12" strips of similar pattern papers. I chose the Tweed paper with text.
  • Stitch the strips to the background creating evenly spaced columns.
  • Download my free Silhouette cut file. If you don't have a machine to cut these, simply cut large triangles / diamonds and octagons or circles.
  • Alternate the diamond and octagon shapes so that the top and bottom of your layout always includes a half shape and the inner part of your layout includes full shapes. Adhere with a small amount of adhesive.
  • Once all shapes are in place stitch down the middle of the columns / shapes.
  • Next, I added layers of pattern paper behind my photo, tucking in embellishments here and there.
  • Lastly, I finished it off with a title above my photo and a sentiment at the bottom in one of the embellishment clusters.
  • To complete the layout, I will journal in the open white space just under the photo.
Use a combination of different stitching types to add interest to your layout.
Don't be afraid to add layers of clusters under and around your photo.  It helps draw the eye to the photo and can really help compliment storytelling.

I hope you enjoyed a peek into my creative process for this scrapbooking layout.  Don't forget to download the free Silhouette cut file I created.  And if you create anything with it, please share a link to it here or tag Pebbles and me (@heatherleopard) on Instagram so we can ooh and ahh over it!


Supplies: Pebbles Jen Hadfield Home + Made: Warm & Cozy - Daisy Jen Hadfield Home + Made: Warm & Cozy - Log Cabin Jen Hadfield Home + Made: Warm & Cozy - Tweed Jen Hadfield Home + Made: Warm & Cozy - Fallen Leaves Jen Hadfield Home + Made: Warm & Cozy - Tartan Jen Hadfield Home + Made: Warm & Cozy - Cozy Comfort Jen Hadfield Home + Made: Warm & Cozy - Fall Bouquet Jen Hadfield Home + Made: Stickers Jen Hadfield Home + Made: Printed Chipboard Shapes Jen Hadfield Home + Made: Ephemera Jen Hadfield Home + Made: Accent Stickers American Crafts Thickers: Cozy This To That Foam Tab Adhesive – 617

Friday, August 5, 2016

"Fabulous & Lovely" Flower Scrapbook Layout by Heather Leopard


Backgrounds are some of my most favorite things to design with. You can use them over and over again with vastly different looks depending on what you use to back them. Sometimes I like to cut it out of white cardstock and layer white on white, other times, I cut it out of white cardstock and lay it over pattern paper but mostly I do what I did today - white background cut over white cardstock filled with various patterns that coordinate. The possibilities really are endless and the results look completely different each time.


I used the Spirograph Background 1 cut file for this layout. I liked that it resembled flowers. My process included cutting the background file out of white cardstock. Then I released the compound path / ungrouped everything and cut the inside petals and leaves out of pattern paper. This made it super easy to get the perfect cut. I glued them in place and then stitched circles over the center of the spirograph flowers.


I mixed & Matched Pink Paislee Paige Evans Take Me Away collection pattern papers and for the inside petals, I created an ombre effect, starting light at the top and darker at the bottom.  I just felt like it needed more solids in the middle to help ground the flowers.

Thanks for stopping by today.

Thursday, August 4, 2016

Quick Summer Mini Album and Gift Bag

Hello everyone.  Today is my big design team debut on the Pebbles blog.  I hope you'll pop over there and say hi!  

I'm super excited to show you a quick gift I made to give to my girls.  We love our  beach vacations and I thought it would be fun to give my girls a little care package to document all our summer activities.

The creative aspect of this care package includes the gift bag and mini album / journal.  These are relatively easy to make if you have a die cut machine or template you can follow.  The Fun in the Sun collection is perfect for this project.

To get started, I knew I needed to begin with the beach bags. The bags needed to be able to hold the album and other little goodies so I made it fairly large, measuring at 6" x 8".  Choosing a design that allowed for a 2 tone pattern gave it added interest.  Then it was time for the really fun part - decorating!

Each bag includes buttons where the straps attach to the bag, a fun sentiment and a coordinating embellishment or two. You could also hang a tag off one of the straps but I am letting my girls decide which ones they want.  Of course, I designed these with my girls' style and colors in mind so we'll see how it goes.

I designed the mini albums to be 4" x 6" to easily fit into the 6" x 8" beach gift bags. To create these, simply cut a 8" x 6" cover and several inside sheets measuring 3.5" x 5.5". I used 5 sheets for the inside to make 10 pages. Center the inside sheets so that there is an 1/4" border.

Then I stitched it together in the center. Once the mini album is together, it's time to decorate again!  I added a tone on tone background to cover the album and then I used the fun sentiments from the 3" x 4" cards pattern paper, framed it out and then added a dimensional sticker.

I can't wait to give these to my girls.  We're taking a road trip soon so I may even print out a few photos from the summer and put a little craft kit together to keep them busy on our way to the beach.

Supplies: Pebbles Fun in the Sun Summer Days (732850) Fun in the Sun Popsicle (732859) Fun in the Sun 6x6 Paper Pad (732862) Fun in the Sun Shaped Cards / Popsicles (732832) Fun in the Sun Puffy Phrase Stickers (732833) Fun in the Sun Layered Stickers (732836) Bazzill Cardstock (309026) American Crafts Cardstock Primaries   

Wednesday, August 3, 2016

Beautiful Smile Scrapbooking Layout and Silhouette Cut File


Recently, the Shimelle Contributing Designers participated in an Inspiration weekend. Each designer scoured through 100's of scrapbooking layouts posted on the Scrapbook Like a Super Hero page, any post in the shimelle.com archives and anything on the ‪#‎shimelle‬ or ‪#‎acstarshine‬ hashtags anywhere out there.

It was a hard decision but I was really drawn to quite a few of Laureen Wagener's layouts.  She's a woman after my own heart - mixing and matching paper patterns in fun and unique ways.  I was particularly drawn to this layout of hers because of the quilt-like look and the geometric intricacies of the page.  I also love that she created it all on a diagonal.  As much as I would have loved to copy this layout exactly as it is because it's perfection, I had to make it unique to me.


I started by designing a similar look in my Silhouette software.  I kept with the diagonal feel but to make it my own, I chose to make smaller boxes to give it a zoomed out look and instead of piecing together triangles to form the squares, I kept the squares as whole pieces.

I chose to use 5 different colors with at least 5 - 7 different patterns within the color scheme.  To cut these, I grouped the boxes together and cut multiples of each pattern in each color scheme. You can DOWNLOAD MY CUT FILE HERE. Repeat for each color scheme until you have lots of little piles of patterns for each color.


Next I used the internal offset feature, set to .79 to create smaller boxes. You can see two remaining external diamonds that still needed to be removed before I cut these.  I kept them in the photo to demonstrate the internal offset.  You can also DOWNLOAD THE CUT FILE I created with the internal offset images. Afterall, there's no need for us both to do all the work.


Once I removed the outside larger boxes, I used my sketch pen to draw a template on my cardstock.  This made it easy peasy to know exactly where to place each square.  I certainly didn't want my lines to get off and not match up halfway through the project. I went to town, adhering the squares on the cardstock with just a slight dab of liquid adhesive. I didn't want to add too much since I was going to sew over it.


Next, I really liked how Laureen stitched 3 rows over each full square so I chose to do the same.  It was quite the task for all these little boxes but I LOVE the end result!  I added layers behind my single photo, a sparkly title at an angle and a little cluster of embellishments in the corner to call this layout done.  Actually, I still need to add the journaling, which I plan to do in the open diagonal space right below my photo.


 I hope I inspired you today, the same way Laureen inspired me. If you download and use the cut files I created, please share them in the comments below, on the Scrapbook like a Superhero Facebook page AND on Instagram and tag me (@heatherleopard).  I'd love to see what you create!


Monday, August 1, 2016

Play Scrapbook Layout and Free Silhouette Cut File

There's something about stitching that pulls me in every. single. time.  I absolutely HAVE to include it on all my pages.  It certainly made it easy peasy to come up with fun layout challenge on Shimelle.com - Sewing on a layout.


While I love the look of a hand stitched layout, I don't do it on the regular because it's quite time consuming. I save those for binge watching tv or road trips (when I'm a passenger).  My go to stitching technique is to use a sewing machine.

What I love about machine stitching is that you can go as minimal or detailed as you wish in a fraction of the time so while it does add a little more time to your creative process, the results are worth it, in my opinion.  It just adds that extra finished detail that bonds the entire page together.


For this layout, I wanted to mimic the circular inner tube float in my photo so using my Silhouette software, I created a cut file and cut circles in half but with a rounded cut in the semi part of the circle. You can DOWNLOAD MY FREE CUT FILE HERE. Then I pieced them together like a quilt and stitched over them on both the inside and outside of the perimeter.  Circles are not my favorite to machine stitch but never fear, it's really hard to see if you don't make the perfect circle and you can cover little mistakes with an embellishment or two.

Monday, July 18, 2016

Scrapbooking Sketches by Heather Leopard to get your creative mojo going

Hey everyone.  If you love working with sketches you're in luck today!  I was looking though my scrapbook files and realized there are several sketches that I never posted on my blog.  I'm not entirely sure why but I don't think sketches necessarily go out of style so I thought I'd post them here.
And I have a question for you, two questions actually. Please leave you answers in the comments.

  1. Do you prefer to have a sample project to look at when working with sketches? 
  2. Do you prefer my b/w computer generated versions or colorful hand drawn sketches, like the ones below and HERE?
I've had several requests to bring back the Sketchy Scrappers posts so I'll start doing that in August, okay?  In the meantime, link up any projects you make using these in the comments.

You can always find all my sketches by clicking the sketches tag HERE or on the right hand side bar of my blog..  

Heather Leopard's scrapbooking sketches for Gossamer Blue


Heather Leopard's Other Scrapbooking Sketches


Heather Leopard's scrapbook sketches for Creative Scrappers. I was asked to create more mixed media type designs.

That's it until the next installment of Sketch Scrapper.  Between vacations and these sketches, that should keep you plenty busy, right?


Monday, July 11, 2016

Amazing Summer Adventure | Silhouette CAMEO stitching holes tutorial

As a Contributing Designer for Shimelle.com, I was super excited when Shimelle asked me to create a summer layout. So excited that I created Silhouette CAMEO stitching holes tutorial.

When I think of summer, the things that come to mind are bright cheerful colors and sandy beaches so naturally, I made that the focus of my layout.  I didn't just want to include a nod to summer, I wanted to scream SUMMER!  I knew I had to go with a big, bold title so I went to my trusty die cutting tool and pulled out 6 bold colors that coordinated with Shimelle's Starshine collection and went to work.


To get started, I created the entire design for my layout in the CAMEO software, including my photo and layering around my photo.  I created the letters using Franklin Gothic font in varying sizes between 460 - 525.  I simply enlarged the letters, overlapped them and scaled them up and down until I liked the look.


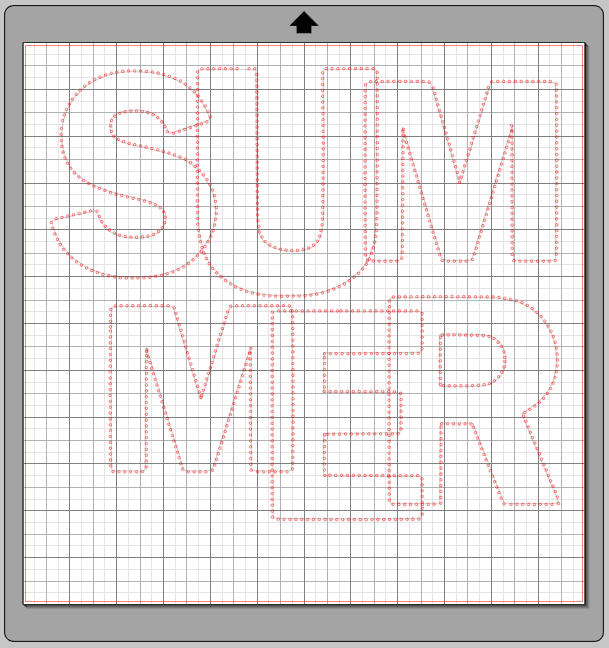
For this next step you have many options for practically perfect holes for stitching but I'm going to talk about two of my favorites. The first one is to draw the design onto your paper using your CAMEO and sketch pens, then poke the holes yourself.  The second option is a little more complicated but well worth it if you ask me. Take a look at how I added dots onto my letters in the image below. Here's how to create stitching holes using your Silhouette CAMEO...


I first saw a tutorial on this where someone used "o"'s instead of period (.) but there were several more steps involved, including using offset, ungrouping and deleting. Using periods is much, much easier.  My friend Majken gave me the tip and I can't remember who she said used a "." instead of an "o" but it's great and helps eliminate several steps.  So, let's go....

TUTORIAL: CREATE STITCHING HOLES USING YOUR SILHOUETTE CAMEO 
Usually when I want to stitch a cut file, I skip steps 1 - 3 but you have to do steps 1 - 3 this time because you can't add text to text.

1. 1st step is to create a png or jpeg of each of your letters.  Separate your letters and use your favorite snipping to to do a screen capture.

2. Import the png or jpeg back into your Silhouette designer. This turns it into a "shape" instead of editable text.

3. Trace each letter and release the compound path / ungroup them.


4. This is where you'd normally start if you were using a cut file. Using a text box and Times New Roman or some similar font, type in dot after dot after dot until you've filled up an entire row or two of dots. I prefer using a period for my dots but others use an "o". The actual number doesn't matter because you can add more dots to an image in step 6

5. Change the font size to 24 or 36.


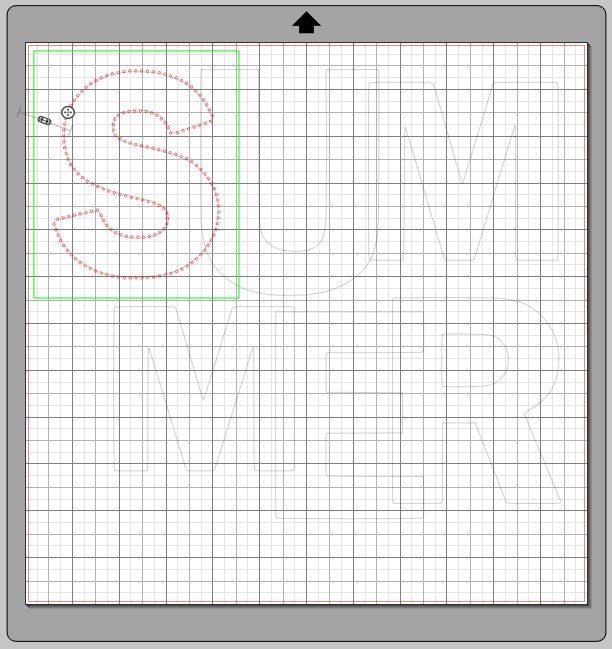
6. Click the "Select" Arrow in Silhouette and then double click the text box.


7. The text box turns to a green outline and you will see circle with a plus sign inside.  Click the circle and hold it down while dragging it to the cut file. In my case, that's the "S".


8. Your image will look similar to this.  If there aren't enough dots to cover the entire image, just click in the text box and add more. It's as easy as that.


9. Repeat until everything you want to stitch has dots for holes.

10. Cut your files as you normally would.  A few of my holes were just barely hanging on so I'll be using the double cut option next time and recommend you do that as well.


11. Put a good movie on and stitch away!