Tuesday, January 26, 2016

Bushel and a Peck...

CHA 2016 Project 8 of 10


This is one of my favorite layouts that I created for CHA. I'm so excited to share it with you today!


What's black and white with pops of color all over?  This layout, that's what!  While I love the shapes of the Invisibles and how they can really dress up a project with the fun scallops, I focused more showing you how I've used it for the sole purpose as a fun see though pattern on your layout.


To create this layout, I thought about my title and photo first and determined how much space I would need to a long title with some larger alphas wrapped around each of the circles. I also had to take into account that I would need to trim the white background around the edges so it would fit inside the black and white pattern paper border. Once I had those measurements, I cut three different sized circles using my die cut machine and then stitched the Invisibles to the back of the cuts. The title is a combo of Tiny Text alphas, letters from the chipboard icons and sticker alphas.  By mixing my alphas, I was able to fit a rather long quote on the page without overwhelming the layout and it really added some nice variety to make it more pleasing to the eye.  One thing I love so much about the Tiny Text Alphas is that you can add a longer title, you can add a sub-title or you can even use it in your journaling.


Supplies: Invisibles: Amorie, Click!, Click!, Chit Chat; Let's Go! collection: Tourist Spot, Perfect Weather, Borders 12x12 Papers, Treasures & Text, Paper Pieces, Chipboard Icons; Tiny Text Alphabet Stickers: Black; Amorie Alphabet Chipboard: Blueberry; Bella Bows: Blueberry; Enamel Dots: Blueberry, Milk White, Ice, Oreo Black; Enamel DooDads: McIntosh, Ice

Monday, January 25, 2016

Life's One Big Adventure

CHA 2016 Project 7 of 10

Life is most definitely one big adventure. My girls have been begging for a road trip, so against my better judgement (I'm kidding), we are planning for Spring Break in March. I'm going to give them this card to surprise them with the details of the when and where.


No matter the occasion, this card can be used for practically any reason. To create this, grab two of your favorite Clear Cuts chevron sheets and arrange them so that they fit perfectly between the open spaces of each other, leaving the slightest white border between the lines.  Tie some twine around the suitcases at the top of the card and then add your banner and embellishments. Simple as that and you are ready for your next big adventure.

Supplies: Clear Cuts Chevies - Pickle Juice and Blueberry; Let's Go! collection: Paper Pieces, Pumpkin Spice Cute Clips, Borders 12x12 Paper

Sunday, January 24, 2016

Bee Happy!

CHA 2016 Project 6 of 10

I absolutely love the buzzing bees in this Spring collection.  While I stay clear of them in real life, I think I used every one of them up from this collection in various projects.


This entire design was inspired by the single die cut.  I love the sentiment and as I was laying it out, I knew I wanted to portray the bees buzzing around the card.  The rest of the design was a combo on borders to bring it all together.  I hope to brighten someone's days soon with this card.

Supplies: Sweet Sweet Spring:  Borders, Daily Details 12x12 papers, Paper Pieces Die Cuts; Bella Bows: Saltwater

Saturday, January 23, 2016

Adventure Awaits

CHA 2016 Project 5 of 10

I'm posting this lovely card today on PURPOSE! Not only am I excited for all the adventures 2016 will bring for us as a family but I'm especially excited about some personal adventures I am undertaking and since it's my birthday, I thought it was fitting to share some thoughts on why this year will be different.  I'm making goals, writing them down and creating action plans for how to achieve them.  I usually make wishes each year and this year I am making ACTION! I'm talking about scrappy gals, family goals, etc., etc. I'm hoping this year is our best adventure yet!


When I created this card in December for the Bella Blvd booth at CHA, I didn't necessarily have 2016 goals on my mind.  I was more travel focused, just coming off 5 weeks of travel across Europe and America.

The new Let's Go collection will definitely give you a case of wanderlust but as I look back at this card, it's perfect for a variety of topics - graduation, birthday, wedding, GOALS, you name it.  To create this card, I used the traffic control paper for the background, anchoring the top and bottom with borders. I attached the globe to the background and then popped the plane above using foam dots. I added a green heart on the map and added a bow at the top to pull it all together.

Supplies: Let's Go! collection: Air Traffic Control, Treasures & Text, Paper Pieces; Enamel DooDads: Guacamole; Bella Bows: Blueberry

Friday, January 22, 2016

Adorable, lovely, fabulous family!

CHA 2016 Project 4 of 10: Continuing with the Bella Blvd CHA blitz, here's a layout I created to feature the new Chip Scripts + the Sweet, Sweet Spring collection.


The Chip Scripts are one of my favorite new additions to the Bella Blvd product line-up.  I LOVE that they can be stamped, inked, doodled on, you name it.


I toyed around with altering them for today's feature but I really liked the contrast of the white on this background I created so I kept them as-is.  I have a few ideas of fun things to do with them so stay tuned for that in the very near future.  I created this background by simply doing some funky, offset cuts and layering each row over the other and then stitching the seam to give it a finishing touch. Then I determined what words to use and where to place them. I waited to print my photos until that step was complete.  Once I knew that, I knew what size photos I could use. I framed them up and added embellishment clusters to complete the page.  I will add my journaling to the bottom right under the photo.


Supplies: Sweet Sweet Spring: Bloomin' Beauties, Her Bunny Hop, Easy Breezy, Borders, 12x12 papers, Treasures & Text 12x12 Stickers, Chipboard Icons, Paper Pieces Die Cuts; Ciao Chip Scripts: Hello There, So In Love, Family
Enamel Dots: Ice, Guacamole; Bella Bows: Blueberry

Thursday, January 21, 2016

She is fierce!

CHA 2016 Project 3 of 10: Today, I'm featuring the layout in the upper left hand frame in the photo below.


As a scrapper who's style is to create fun backgrounds, usually with large shapes, I super love the Tiny Text alphas from Bella Blvd.  They were perfect for documenting my littlest daughter, who at age one was already showing her fierce and sassy side - mostly around fashion with strong opinions on clothes, shoes, accessories.  We knew we were in trouble from the start but we LOVE it!


They make it easy to use a quote for a title, as I did here, wrapping around the outside of my design. These are becoming a fast favorite, go to necessity for my scrapping.  The possibilities are endless! 

To create this layout, cut 2x2 squares out of paper and then cut them on a diagonal to create triangles.  You can also cut the squares or triangles on your die cut machine.  Next, arrange the triangles in the shape of a heart and stitch over them to secure them to the background.  Stitch around the perimeter of the heart as well.  Add your title, photo, journaling and embellishments.  

Supplies: Tiny Text alphabets: Fruit Punch, Pretty Boy; Sweet Baby Girl collection: Stole My Heart, Mrs Teddy, Pretty as a Posie, Daily Details 12x12 Papers, Treasures & Text Stickers; Cute Clips: Baby Girl - Mini Bows; Bella Bows: Bell Pepper; Enamel Dots: Cotton Candy, Ice, Guacamole, Bell Pepper; DooDads: Guacamole

Wednesday, January 20, 2016

Love, love, love you!

CHA 2016 Project 2 of 10

Have I told you how much I "love" the new Bella Blvd Chip Script words?  I love, love, love, love, love them!  I used them to create this layout for the Bella Blvd booth at CHA 2016.


As I was looking through the various packages of words, I noticed a common words that was on so many of them.  I popped those babies out and turned them in to one looooong title for this layout.  I used a paper from the new baby boy collection as my background but since I was doing a layout about my baby girl, I sprinkled in some other collections.  I love how you can mix and match these collections so well.


To create the title, I pulled out as many words as I could using the Chip Scripts to create the phrase.  Then I added a little punch to it by adding in the blue chipboard alphas.  I ended up removing one of the white "love" words and replacing it with a blue one to help tie the title all together. The title takes up a little more than half the page so I added my photo and kept the embellishments to a minimum.


For the enamel stars, I didn't randomly sprinkle those on the page.  There are some green stars printed on the paper so since I wasn't using green in my layout, I covered those up with the blue stars.  Oh and I added a pink enamel dot to the moon to pull in the pink that I have sprinkled around the page. Now it has rosy cheeks instead of blue.

Supplies: Bella Blvd Cute Baby Boy collection: Barely a Wink, Daily Details, Treasures & Text Stickers; Sweet Baby Girl collection: Treasures & Text Stickers; Sweet, Sweet Spring collection: Borders; Cute Clips: Baby Girl - Mini Bows; Enamel DooDads: Ice; Enamel Dots: Cotton Candy; Bella Bows: Cotton Candy

Tuesday, January 19, 2016

I'd Travel the World with You

I'm back from CHA and had an absolute blast.  More on that to come later.  Today, I wanted to kick off a week (or more) of the projects I did for CHA.  I was primarily in the Bella Blvd booth with 10 projects, split among layouts and cards.  I also had a layout in the American Crafts booth but that's also a "more to come on that" situation.

CHA 2016 Project 1 of 10

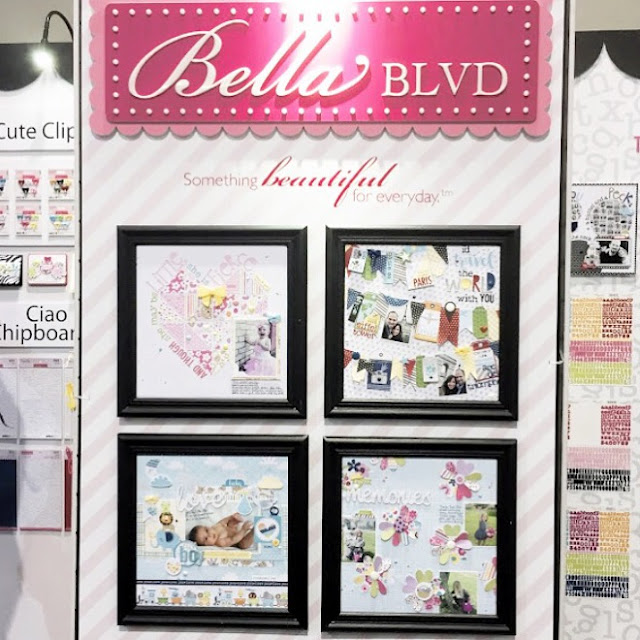
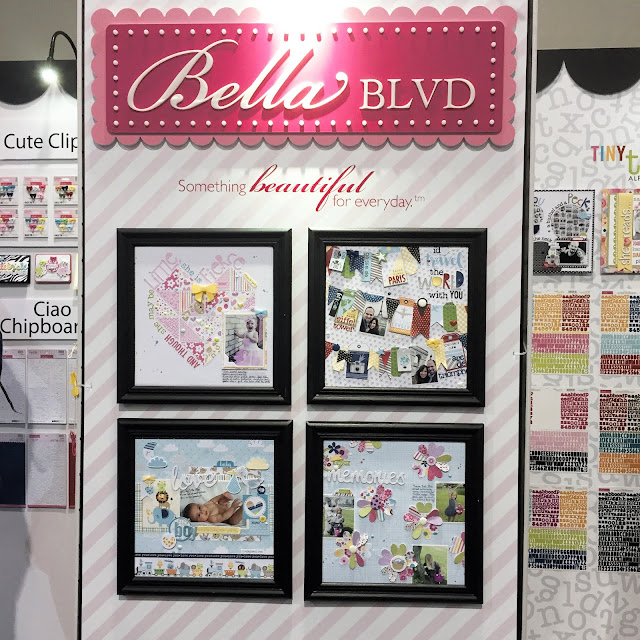
Here's a snapshot of a few of my booth projects.  I was honored to have 3 out of 4 framed front and center in the booth.

Look at that adorable baby boy layout on the bottom left. I'm not sure who designed that but I love it.  The two on the top and the one on the bottom right are my projects. And there's another one peeking out in the upper right corner.

So let's kick this off with a travel layout.  My signature style is all about playing with patterns and creating fun backgrounds and this one is no exception.  Take a look...


I was inspired to create this page by the Baggage Claim pattern paper with all the tags. I cut some out, combined them with the tickets from the Paper Pieces and started laying them out on the page.


Before I knew it I had hand cut flags, banners, tickets and more and arranged them back and forth across the page. I simply layered them over each other, added my photos as part of the banner and stitched them to the page.


One of my favorite parts of this layout is that I was able to document the location and sights we saw using the new tiny alphas, and I was able to fit them on the tags. I plan to add journaling on the red tag there in the middle. The dots will make perfect lines for guides.

Supplies: Let's Go: Air Traffic Control, Baggage Claim, Borders Papers, Treasures & Text, Paper Pieces; Cute Clips: Pumpkin Spice; Enamel Dots: Blueberry, Milk White; Enamel DooDads: McIntosh; Tiny Text Alpha Stickers: Black

Friday, January 15, 2016

Happy New Year

It's still considered appropriate to wish you all a Happy New Year right??? And it's perfectly normal to scrap last year's New Year's photo, right???


So here we are for the first design team blog hop of the year and I'm wishing you a Happy, happy new year with this layout of my youngest enjoying some New Year's Eve festivities.


A little stitching here, big title there and a super cute little girl ringing in the New Year!


So that's it for me today.  Make sure to check out the Gossamer Blue designer and member gallery for more inspiration.  And...join our blog hop to see some amazing projects from the GB design team.

Head over to the super talented Jill Keller's blog now.

Thursday, January 14, 2016

Our Love is Like XO

I’m making a bold statement about the love of my life in this month’s Pattern Play over at Gossamer Blue. Let's take a look at what at least 10 different pattern papers, two bold letters and one photo in the shape of a heart looks like...

We were taking a selfie on our recent anniversary trip to Greece and I snuck in for a smooch on the cheek to change things up. As I was looking through the Gossamer Blue January kit, I just kept singing along to the Beyonce XO song. I really only know one line from it but I couldn’t get it out of my head so naturally, I made it into a layout featuring that smooching selfie.


I cut out 5 X’s and O’s across and 4 X’s and O’s down, leaving space for a heart among them. I made the heart a tad bit bigger than the X’s and O’s so that I could have as large a photo as would fit.

Next, I took an X and O from the cut outs and used them as a template to cut out the pattern paper. I cut them about ¼” larger than the X and O so that I could add glue to the overage and adhere to the back of the XO overlay.


I did the same for the photo. I determined where I wanted it placed, added the heart cut out back in and then cut it out with a 1/4" edge for adhering to the back of the layout.


Once each X and O was adhered, I stitched around the edges. Most were done by a machine but I reserved a few special ones to add hand stitching.


The X’s and O’s were feeling a bit “eh” so I embellished them with alphas for a title, puffy stickers, buttons, flair, enamels, stickers, etc. I even added my journaling in one of them.

Thanks for stopping by today. I hope this inspires you to pull out your die cutting machine and go a little bolder with this month’s kit.

Supplies: Gossamer Blue Main kit, Main Add-on, Main Add-on 2, Life Pages kit, Life Pages Main Add-on, Life Pages Add-on 3, Bits & Pieces

Monday, January 11, 2016

Be the Best {version of} Me

Hi everyone.  I was honored when Nicole invited me to join her Just Nick design team.  I've used her files previously and guested for her recently, which you can see HERE, so how could I say no?!?!

So, I'm sharing the first layout I created for her about ME...using my January Gossamer Blue kit + Just Nick designs.


As I was looking through the Just Nick store, I was inspired by all the circle cut files.  I thought, why not create a collage of some of my favorite ones that just so happen to have great sentiments I can relate to.


How to: I mixed and matched and cut them in all different sizes, laying them out in my Silhouette software first to make sure they fit on my page. Once I had the design I liked, I separated them and cut them out of different patterns. I stitched over the background paper and then put the design I planned out onto the page. I finished it off with embellishments around the stitched areas to add a sense of flow. I'm journaling some private notes about myself for my family so I left a space for that.
Cut files used: Card SentimentsCard Sentiments 2PolaroidsRight NowScribble HeartsScribbles 3Today

Monday, January 4, 2016

Hello Love!

Happy New Year!!!

Oh my, Lori is starting 2016 off with a BANG!  I am loving the Gossamer Blue January kit so, so, so much.  It's filled with Crate Paper, Heidi Swapp and Goldie from Seven Paper, need I say more?


Oh hello, lovely Crate Paper, how do I love thee?  Let me count the ways!  Seriously, I am a nut about paper piecing backgrounds and this paper did all the work for me.  This is all from the Main January kit only and I just love it.  I think it's my favorite main kit only layout I've ever done.


I take a photo of my littlest every morning. I usually take one on the 1st day and last day of school and think "wow, she really changed so much this year."  Well this year I will do that but I plan to do a short video that shows the progression every day from the first to last day. Anyway, she always gives me the "standard" pose and then if she's not in a rush to get to her friends at the bus stop she'll give me some poses.  Today it was blowing kisses.


This crazy busy and oh so fun background paper was so fun to work with.  It made creating a breeze, adding my photo and a few embellishments in a matter of minutes. A lot of minutes but much faster than usual.

Anyway, I hope everyone has an amazing 2016!  I have lots of great things planned here this year so stay tuned and thanks for stopping by today.