Wednesday, December 12, 2012

Authentique Guest Designer - Festive Trees, Tags and even a Card

Happy 12.12.12 at 12:12 PM Day!

A couple of months ago, I won a Show Us Your Mustache contest from Authentique. I guess they liked my work that they saw on my blog because sweet Miss Emily invited me to be a guest designer this month. I LOVE working with Authentique products so I jumped at the chance.

I created a set of 3 Christmas trees with a photo tutorial, an interactive card and some fun tags using their Festive collection. I'll start with the card and tags and end with the Christmas tree tutorial. ;)
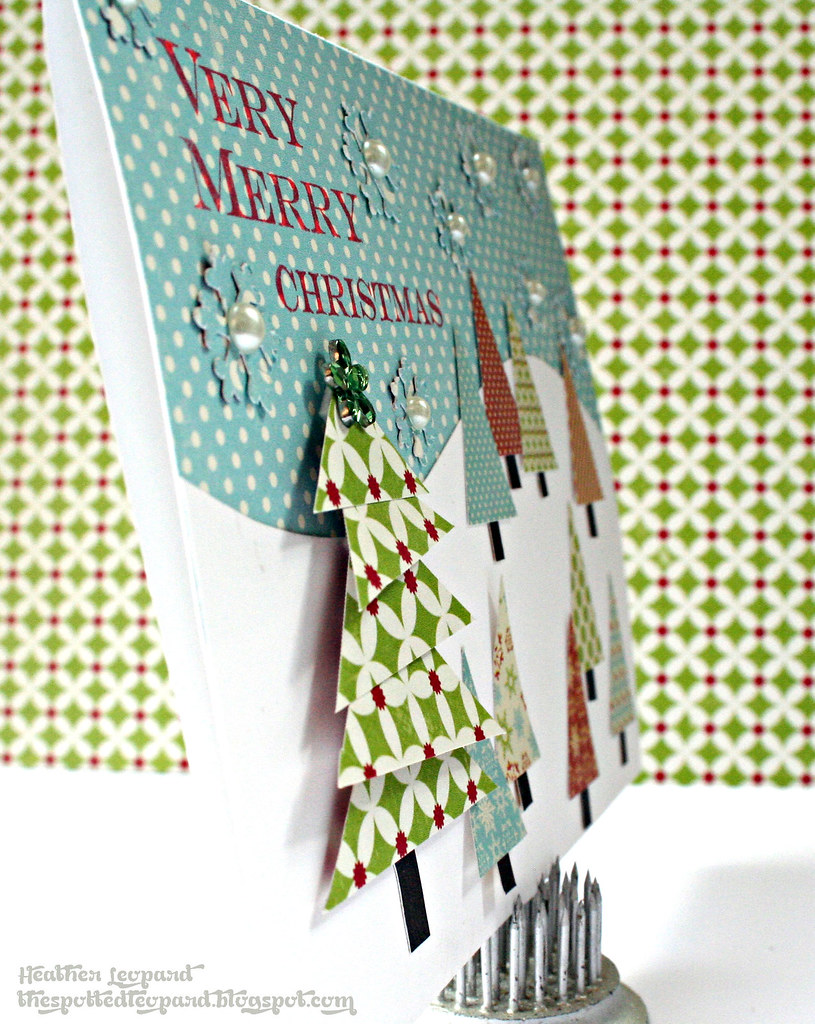

Merry & Bright Card
This card is a bit unique in that it starts out looking like a matchbook. I cut it using my CAMEO and a Lori Whitlock cutting file. The front is decorated with a simple sentiment, ribbon, poinsettia and bling.
Pin this card to Pinterest: 

The front flap is tucked in and when you pull it out, it reveals a pocket on the inside. I added some burlap under the Hope sticker but it didn’t pop off the cream pocket so I went back and added green paint. 


 You can add a gift card or a note. I chose to add a note…

Christmas Tags
I created these tags to be the focal point for several gifts I will be giving this year. After cutting the tags, I used mists and paint to dress up the base of the tags. I then used a combination of fibers, paper and stickers to create little “scenes” for each card. The papers and stickers in this collection did all the work and demonstrate the reason for the season on their own.


Merry Christmas Tag
Pin this tag to Pinterest: 

I cut this tag straight from the paper. I just love the music sheet and cardinal. I added some white feathers, twine and the sentiment and voila!


Let Your Heart Be Light Tag
Pin this tag to Pinterest: 

I was trying to go for a glowing light effect with this card, like when you see lights on a tree from a distance. I simply dripped mist on it by removing the spray nozzle and tapping it to the top of the card. The mist dripped down to give this effect. I added some red paint to the base once dried. I topped it off with paper, a sticker frame, burlap and then I addedred canvas ribbon around the sticker and a black bow to make the sentiment pop.


Merry Christmas Tag


Pin this tag to Pinterest: 

This is a simpler card but it’s one of my favorites. I just added some paint to the base and then I cut strips of the candy cane looking paper from the 6x6 pad and alternated the pattern to give it a chevron feel. I topped it off with the sticker sentiment wrapped in red/white striped twine.


Magic of Christmas Tag
Pin this tag to Pinterest: 

The paper from the 6x6 paper pad did most of the work for me on this tag. The winter scene and December calendar is my focal point with the Santa sticker. We all know the real meaning of Christmas but Santa is a good reflection of the Magic of Christmas.


Christmas Trees
I decided that I needed a new set of Christmas trees for my mantle this year and I asked (begged) my hubby to help me out with them this year. He cut 8”, 10” and 12” trees out of particle board for me and I went to town decorating them. First, I painted the tree trunks with walnut ink and then I tore paper strips and layered them over each other, starting at the bottom of the tree. I then cut poinsettias with my CAMEO and added popped up stickers to the centers that say Peace, Joy and Noel. I topped off the trees with accordion flowers. Ribbon and more stickers from this collection. 
Pin these Christmas trees to Pinterest:


I have gotten so many compliments on these trees and they were so easy to make! Here's a quick Christmas Tree Tutorial so you can make your own.

Step 1: Buy wooden Christmas trees at your local hobby store or get your hubby to cut you some! Mine are 8", 10" and 12".

Step 2: Gather your supplies. I used Mod Podge, ribbon, twine, green paint and walnut ink, 3 different sheets of pattern paper for the trees, plus additional coordinating papers to make the poinsettias, rosettes and sticker bases. Oh and speaking of stickers, you'll need those too.

Step 3: Paint the edges of your tree green in case it shows through any paper gaps. Paint the tree trunks brown.

Step 4: Tear your paper into strips (shown above and below) and start layers them over each other, leaving lots of paper over the edges so you can eventually fold them over to cover the sides of your tree, Don't worry about covering the back of your trees, unless you're putting them somewhere someone will see them.


Step 5: Fold the edged over the side for a nice, clean finish.

Step 6: "Trim your tree" however it suits your fancy. I added rosettes at the top and poinsettias at the bottom.

Step 7: Display in your home and get ready for oohs and ahhs from your guests.

Thanks for stopping by today. Make sure to visit the Authentique blog and say hi to me over there too as well as check out what their design team is up to!

Saturday, December 8, 2012

Ladybug, Ladybug, Fly Away Home

For character day at my daughter's school this year, she chose to dress as a ladybug. We didn't have a costume but I think we pulled it off by mixing and matching clothes, boots and dress up clothes from the closet, wings and antennae borrowed from her little sister. The SOHO Garden collection that American Crafts sent me had the perfect combination of colors!

She chose a book that I passed down from my childhood, Ladybug, ladybug, fly away home. I chose the background paper because of the book copy. It's a black/white paper that I painted on. I simply mixed red re-inker with water and then painted it on with a brush. I did it again with green for the leaves. After I was done, I added some paint splatter for a bit more pop. I then used more book-like paper as part of the mat.

I used a combo of different alphas for the title. The Ladybug, Ladybug letters were getting lost on the book copy background paper where I originally planned to put them so I placed them sideways over the red paper. Now they POP and I like the placement so much more than my original plan.

Lastly, I added a tag for the journaling and a little cluster of flowers and a butterfly, each popped up over the other.

Thanks for stopping by today! Check out the American Crafts November Design Team Gallery for more inspiration.

Monday, December 3, 2012

DIY Upcycled Christmas Trees


It's Holiday Inspiration week at Lily Bee and I'm excited to show you what I did with some old holiday decor I had. 
Click the Pinit button at the bottom of this post to Pin these trees to Pinterest.

Supplies: Lily Bee Designs Christmas Cheer (Mrs. Claus 12x12 paper, Christmas Wreath 12x12 paper, Peppermint 12x12 paper).

About 10 years ago, my dad made me some wooden Christmas trees. They were painted so pretty, with varying shades of green and brown to resemble a typical Christmas tree. After so many years, they were really on their last leg, with the paint starting to chip but the overall trees were still in great condition. These trees have notches so you can slide them together to make the tree. Every yer, I take them apart and lay them on top of each other in a Ziploc. I think they had gotten so hot in storage because I had to pry them apart when I took them out this year. Here's what they looked like before. I displayed their best sides so you can see all the paint work by mom and dad put into them.

I couldn't bear to part with them so I took the trees apart, traced them on paper with Christmas tree colors, then cut them by hand. 

I covered the trees with Lily Bee paper and Mod Podge and then dressed them up with some pretty bows and bells. With the exception of forgetting to trim the paper around the edges before I took these photos, the trees are back to good and proudly displayed on my mantle again.

Thanks for stopping by today. Make sure to visit the Lily Bee blog to learn more about Holiday Inspiration week and head over to Cindy's blog to see her trees!

Pin these Christmas trees to Pinterest:

Friday, November 30, 2012

Ribbon Christmas Tree Card & Gift Box

Hi friends! Today I'm playing with some yummy May Arts ribbon. Thanks, May Arts!!! A few of us on the Little Yellow Bicycle design team are doing a blog hop to show you all sorts of fun ideas and uses for ribbon.  Details on the hop are below but first, let me show you these two projects I made..

Christmas Tree Card

Pin this to Pinterst using the Pinit button here or at the end of this blog post.

Supplies: Little Yellow Bicycle Once Upon a Christmas collection: OC-304 6c6 Paper Pad, OC-190 Clear Stickers - Card Making, OC-279 Chipboard Shapes, May Arts ribbon

Creative How-to: Cut pattern paper the same size as the wrong of card. Measure 5 rows for the ribbon so that the largest is at the bottom and the smallest is at the top. Leave room at the top and bottom for the star and sentiment. Punch holes at the end of the measure lines and string the ribbon through the holes. Secure the ribbon edges to the back of the card with tape. Adhere the paper with the ribbon tree to the front of the card. Complete the card by adding the sentiment and a star.

Fancy Schmancy Gift Box
I guess I had a bad camera angle - I promise my box and the decor are nice and square; just doesn't appear that way in the photo. :(

Pin this gift box idea to Pinterest: 

Supplies: Little Yellow Bicycle Once Upon a Christmas collection: OC-106 Snowflake Medallion/Red Houndstooth, OC-102 Poinsettia Quilt/Multi Starlight, OC-132 Tags & String, May Arts ribbon.

How to: Trim inside pattern paper so that there is a 1 - 1 1/2" space of the box showing around each edge. Set aside. Trim paper strips to 2x12 and then adhere them to the box so that they cover the outer edges of the box. Adhere the pre-cut inner pattern paper over the paper edges exactly in the center. Add pom-pom trim around the edge of the inside paper to cover the seam. Add smaller velvet trip over the pom poms. Tie the green ribbon around the package, adding the tag and silver leaves immediately before tying. Your shirt box goes from drab to fab!


Alright, now it's blog hop time. Make sure to hop along to each of us - follow our blogs if you like what you see, Pin images to Pinterest to spread the word, leave comments, whatever you're in the mood for today - and then stop by the Little Yellow Bicycle blog and May Arts blog! LYB is giving away an awesome Once Upon a Christmas collection! Yay!!!


Heather Leopard <--you are="are" here="here" you--="you--">

Have fun and good luck!

Tuesday, November 27, 2012

Snow Globes & Very Merry Christmas Tree Cards

Hi there! I wanted to tell you about a new challenge I'm hosting on the Lily Bee blog this month. You see, this whole week the design team gals are showcasing Christmas and Holiday cards so my challenge for all of you is to grab your favorite Lily Bee goodies and CREATE A SHAPED CARD. This means no standard size rectangle cards, unless...you create a festive holiday shape as the main embellishment on the card.

I created these two cards to hopefully spur a few ideas. First is my shaped card...a snow globe.
Snow Globe Card Heather Leopard
Click here to Pin this card to Pinterest:

Supplies: Christmas Cheer (6x6 Tiny Tablet, Figgy Pudding 12x12 paper); Autumn Spice (Nutmeg 12x12 paper)

How-to: I cut the globe portion out of thick transparency on my CAMEO but creating a circle card cutting file. I then cut another circle the same size out of white cardstock and another circle with a snowflake design and affixed them over the back of the card. I then embellished with snow covered meadows, deer and a tree.
Snow Globe Card scene Heather Leopard

Next is a standard card but I created a Christmas tree out of triangles, and used it as the main focus for the card.
Very Merry Christmas Heather Leopard  
Click here to Pin this card to Pinterest: this card to Pinterest: 

Supplies: Christmas Cheer (6x6 Tiny Tablet, Figgy Pudding 12x12 paper,Peppermint 12x12 paper, Mixed Cardstock Stickers, Clear Stamps); Autumn Spice (Nutmeg 12x12 paper)

I flipped the banner cardstock stickers over to create additional smaller trees. I stamped the sentiment using the stamp set from this collection.
Very Merry Christmas trees Heather Leopard


Here's a close-up of the tree. I simply cut triangles in cascading sizes and layered them over each other, using pop dots to make them stand out.
Very Merry Christmas tree Heather Leopard

Now I want to see your take on this Take Shape card challenge! Head over to the Lily Bee blog to get the details on how to play along. 


Thanks for stopping by today! 


Click this Pin-it button to Pin to Pinterest: 

Wednesday, November 21, 2012

Holiday Recipe Box Gift & Chocolate Crinkles Recipe

I just love getting together with family and friend over the holidays. I've got what I consider to be a very close-knit family. I may be an only child but I've always felt like a part of something bigger. Perhaps it's my Hispanic heritage that binds it all together but holiday memories for me are lots of aunts and uncles and even more cousins, catching up, playing games and mostly...EATING!

I thought it'd be fun to create a recipe box, using the Little Yellow Bicycle Once Upon a Christmas collection they sent me. 
I think this would be a great gift for family members so we can capture all the recipes and each have our own set. It would be even better to have each family member write their recipe in their handwriting so we can capture that part of them as well.
Recipe-Box-wm 
Click here to Pin this recipe box project to Pinterest:

Supplies: Little Yellow Bicycle Once Upon A Christmas collection - OC-111 Holly Berry/Green Carols, OC-105 Mistletoe/Green Starlight, OC-134 Journaling Cards, OC-135 Stickers - Favorite Pieces, OC-305 Paper Crafting Kit, OC-220 Fabric Flowers, OC-279 Chipboard Shapes, CAMEO, Lori Whitlock Recipe Box cutting file

Creative How-to: I used a recipe box cutting file from Lori Whitlock via the Silhouette store. I cut all the pieces out with my CAMEO and once assembled, I added the journaling card, "Recipes" word that I wrote and cut from my CAMEO and mistletoe. I embellished the lid with the pretty sticker trim from the Favorite Pieces Stickers and then hung the ornaments from the inside of the lid. 
Recipe-Box-Bow-wm

The top of the box needed a pretty bow, for sure! The paper crafting kit is full of different sized bows, flowers, banners, etc.

Recipe-Box-Inside-wm
The inside has tabs to separate the various categories. I also added several blank cards. I am hoping to get my family members to write their recipes during this holiday season.

Pin this recipe box project to Pinterest:

Keep reading: Not sure if you spied the recipe card I wrote in the photo at the top. It's for Chocolate Crinkles. I don't know who made this recipe but I remember making dozens and dozens of them as a child for a cookie exchange we would do with the family. All the aunts (my great aunts, actually) would get a big tin of cookies from all the nieces and nephews (my mom, my aunt, their cousins, etc). I couldn't even begin to count how many people that would be. Anyway, I remember making these cookies each year and now I make them with my kiddos. These are the cookies we leave out for Santa, with his glass of milk.


Chocolate Crinkles Pin this fabulous recipe to Pinterest:


Mix together:
1/2 C. oil
4 squares unsweetened chocolate (melted)
2 C. Sugar
2 tsp. vanilla

Add 4 eggs, one at a time and mix.

Mix together, then add to the mix above:
2 C. flour
2 tsp. baking powder
1/2 tsp. salt

Refrigerate overnight.
Roll 1" balls in confectioner's sugar
Bake at 350 for 8 minutes, no more or they will be overbaked.

As you can see, we have fun with the powdered sugar after we are done making the cookies with it!

Thanks stopping by today!