Pages

Wednesday, July 25, 2012

Christmas Gifts in July

It's Christmas Cheer release week on the Imaginisce blog this week! I have to say that I am not really fond of walking into stores and seeing Christmas things already up. But I do like to start thinking about my Christmas crafting.  It gets me into the mindset to start my planning. There are a few things I like to start thinking about early - Christmas dress attire for the family and gifts for teachers and neighborhood pals, because we like to give out little treat to them each year. Here's a peek into some of the items I've been working on...

Mistletoe Earrings
I'm always on the hunt for unique, handmade jewelry. These earrings are the perfect accessory for a fun night in on Christmas Eve!

Supplies: Imaginisce Christmas Cheer collection, 3d necklace box by Lori Whitlock (scaled to fit my project), earring holder by Loni Stevens (scaled to fit my project), pine bough by Pebbles in my Pocket (scaled smaller)

I cut them from a pine cone file using my Silhouette CAMEO. I made them my own by using the Imaginisce Magni-top Magnet Earring Kit and a bit of twine to turn them into earrings. I made a coordinating box so that I can give them as a gift.


Christmas Treat Bags
Each year I try to think of something cute to give to the 15 kids who live on our cul-de-sac as well as to the administrative staff at my daughters' schools. This year I am going to give them homemade s'mores kits packaged neatly in this little gift tote.


Supplies: Imaginisce Christmas Cheer collection, party favor wrapper by Lori Whitlock, Imaginisce i-top and small brad, misc ribbon.

I used my CAMEO again to cut the file (by Lori Whitlock) and then I used my i-Punch to punch holes in the inside baggie. I then threaded the ribbon through the baggie and the back of the gift bag, tying it and sealing the edges in a chevron cut using my i-Magicut. 
 

I'm pretty happy, it's only July and I know what we'll be giving out this year! I hope this inspires you to start thinking about your crafty Christmas goodies. Make sure to head over to the Imaginisce blog to enter for a chance to win your own Christmas Cheer collection.


Wednesday, July 18, 2012

My CHA Sneak Peek Faves...and more to come

Since I'm not at CHA this time around, I thought I post a few of my favorite things that I've seen from the sneaks and from photos my scrappy friends are posting who are there.  Without further ado, here's my running list, in no particular order. I know I will be editing this list as I see more throughout the next couple of days!!!

Echo Pack Everyday Eclectic - love almost everything about this collection.


Echo Par For the Record 2


AC Amy Tangerine Ready Set Go - love each and every bit of this collection.  Here's a few bits:


Lilybee Persnickety


Fancy Pants The Good Life


Studio Calico Yearbook
 

My Mind's Eye The Sweetest Thing Tangerine, Honey and Bluebell...not so much the Lavendar; and have you seen the washi tape??? 


Pink Paislee Artisan Resist Papers,Chipboard and Elements - here's just a few...

Pink Paislee Portfolio

 Crate Paper On Trend

 Crate Paper Acorn Avenue


 Pebbles Walnut Grove - love all the embellies and majority of the papers


Pebbles Seen & Noted - how cute are these journaling cards and envies?


Jenni Bowlin Wired Feathers - several varieties but I see misting potential with these


Simple Stories Snap Cards - love them all but here's a few:
 

I'd love to see more of what Allison Kreft has up her sleeve


Jillibean Soup alpha beans in 5 new colors!
Elements of Jillibean Soup's Grandma's Lima Bean Soup
American Crafts Dear Lizzy 5th & Frolic, Soho Garden
Crafter's Workshop New Masks
Little Yellow Bicycle - hello, they are all great!
Always a fan of Studio Calico Classic Calico
Lilybee Autumn Spice - perfect for a fall kit

I haven't even mentioned all the great holiday collections yet...saving that for another post I think.

More to come...in the meantime, what are your favorites?

Tuesday, July 17, 2012

Little Miss Innocent

I went back a few years when digging for photos for this week's sketch at Creative Scrappers! I am trying to keep up with each year as I'm in it but sometimes I get the urge to reminisce and work on the "oldies".  Anyway, these photos are of my daughter doing what she did best at the time...pulling the toilet paper off the rolls.


I created this using Creative Scrappers sketch 219 and the Scrapbook Circle July 2012 kit, Sunshine Day.

Creative notes:
  • I faux stitched around the yellow distressed paper; the grid lines on the paper made it super easy to follow and keep my "stitching" in a nice straight line.  
  • Prior to adhering the layered pieces to the background paper, I cut some of the scallops out of the background paper and re-purposed them again over the yellow paper. 
  • I used wood circle frames to highlight the doily in the banner and the "memories" brad embellishment. It adds just the right amount of attention to those bits that might have gone unnoticed.
  • I used actual toilet paper on my layout.  I gave the toilet paper a scallop treatment by folding it in half again and again until it was the size of one scallop and then I cut a scallop with my scissors, like you do to make snowflakes. Then I ruffled them on the page under my photos.
  • To make the word "innocent" stand out a bit more I outlined around each alpha and again over the top edge of the letters.


Thanks for stopping by today.

Friday, July 13, 2012

That's My Name, Right There on the American Crafts Blog!!!

So it's been 2 - 3 days now since I got the email and I still have butterflies just thinking about this announcement.  I know it sounds ridiculous but I am just THAT excited! If you follow my blog, you probably saw that I was a guest designer for American Crafts earlier this month. Did you see the projects I created?  It was such an honor and I was so excited to see my name and photo on their blog that I took a screen shot of it. I had no idea at the time what I would use it for.

Well, I know why now. I just knew it'd be a long shot but I applied for their design team. I figured they might say no (they get hundreds of applications and only accept 20) but they might say yes! I stalked my email every day, multiple times a day until low and behold my heart skipped a beat.  Could it be? Have you figured out yet that I am walking you through all the emotions I went through? I read it and then I read it again and then I quickly replied with a YES! along with a few other descriptive words, before they could change their mind and then I read it again. I couldn't believe it! Someone wake me up! I've been asked to join the 2012 - 2013...
I am joining the team with some of the most amazingly talented ladies, many of whom I've admired for so long and several of whom I've had the chance to design with!  
Allison Waken - from Phoeniz, AZ
Amy Heller - from Newtown, CT
Andrea Budjack - Orlando, FL
Angie Gutshall - from James Creek, PA
Becky Williams - from Wolfforth, TX
Carina Lindholm - from Koping, Sweden
Corrie Jones - from Dallas, GA
Erin Stewart - from El Paso, TX
Heather Leopard - from Cypress, TX <----- That's ME!
Jenny Chesnick - from Brooklyn, MD
Jill Cornell - from Windsor Heights, IA
Kimberly Neddo - from Bigfork, MT
Leah Farquharson - from Lauderhill, FL
Leslie Ashe - from Fort Worth, TX
Lilith Eeckels - from Bertogne, Belguim
Melissa Mann - from Pensacola, FL
Michiko Kato - from Japan
Monika Glod - from Krakow, Poland
Paige Evans - from South Pasadena, CA
Patricia Roebuck - from Mandeville, LA
Sophie Crespy - from Saint Jean De Maurienne, France


Make sure to head over to the American Crafts blog to see the official announcement and new CHA releases!

Oh and you know I'll be taking a screen shot of the AC blog today! I might even scrap it! Thanks so much for celebrating with me!

Wednesday, July 11, 2012

Let Freedom Ring

Hi everyone! I am excited to share a layout I created that was inspired by a layout I found in the Gallery over at Memorable Seasons. You see, each month, they select a Member of the Month and the DT 'lifts' their layout. Of course, scraplifting can mean anything to anyone and doesn't have to look like the original at all. I usually use the original as inspiration and just go from there. 

Here's my layout...

Supplies: Pink Paislee Declaration collection, Bella Blvd. Washi tape, Maya Road chipboard, Tim Holtz Tiny Attacher

I altered the color of the cream alpha to make it rest so it would stand apart from the cream background paper and then I doodled around the blue alphas to make sure they wouldn't get overshadowed. I also sprinkled fussy cut flowers and stars like confetti.

I added one lone bracket to the layout to anchor the photos on the left and rounded it out (pun intended) with the flower-ish design and bracket frame. If you look at the layout above, you can see that I actually cut about 1/3 of the flower and used the scrap piece in the upper right corner of the layout.
And here's Emily's layout. You can see that I kept the basic layout, including the brackets but really made it my own.  Thanks for the inspiration, Emily.

Thanks for stopping by today.  Stop by the Memorable Seasons store when you get a chance. New releases are always 25% off!

Friday, July 6, 2012

Vacation Favorites from the Beach Mini Album

Hi there,everyone! I wanted to share this itsy bitsy teeny weenie...mini album. You thought I was going to say yellow polka dot bikini, huh? Are you singing the song now? LOL So, I made this using the Little Yellow Bicycle Splash collection. We’re going to the beach in a few weeks so I couldn’t resist making this “Vacation Favorites” mini for my girls. It’s a great way to list and showcase our beach weekend highlights. I created it with my Silhouette CAMEO and a Lori Whitlock "2-page book card" file. The great thing is that I only used one piece of pattern paper!!!
 
The cover has a window on the front, which is the perfect size to add my title. Once I had that down as the foundation, I layered clear elements, a banner flag and flip flops. Oh and the file I downloaded calls for a wraparound band to close in the front but I changed it to close in the back so that I could make a more embellished cover and not have it interfere with all the elements. Doesn’t this look fun? Let’s take a look at the inside of the album.


Pages 3 & 4 are actually threaded through the center of the card so when I was looking at this mini spread, I could see a gap between the pages. I solved that issue by using the vellum tape strips and layering them over each other. I topped it off with an accordion flower memory numbers.


Again, trying not to over think this last set of pages, I added another tape strip, banner and dimensional die cut and I went to my trusty tear apart tags stash and pulled the July tag out to add journaling for the back page. The canvas stickers and “happy” clear cut wrapped up this spread perfectly.

Now, all I have to do is add photos and maybe a few more embellishments here and there to finish it off.

Tip: When I’m creating a mini album I try to treat each page in it as a single or double page layout, just smaller and in this case, much smaller. It really helps alleviate some of the stress of wondering what to do with all those pages.

Supplies:
SPL-105 Skinny Stripe Multi/Deep Blue Sea Solid
SPL-220 Fabric Favorites - self adhesive
SPL-230 Clear Cuts - with glitter accents
SPL-140 Cardstock Stickers - Fresh Verse™ - with thermography and debossing
SPL-160 Vellum Tape Strips
SPL-195 Dimensional Stickers - with thermography
SPL-1100 Tear Out Ticket & Journaling Card Book - with embossing
SPL-303 Mini Flag Kit - with embossing
SPL-305 Paper Crafting Kit

Wednesday, July 4, 2012

American Crafts Guest Designer - Oh yea!

Can you tell how excited I am right now?  I JUMPED at the chance to guest design for American Crafts and the bonus was getting to work with Paige, whose work I admire and blog I stalk. Anyway, I got to work with the new Shoreline and Amy Tangerine Sketchbook collections.


I created 3 layouts, a card and an altered canvas with a vacation theme in mind.  Without further ado, please take a look...


Soak Up the Sun – I created this layout focusing on a day at the beach on a recent trip to the Gulf coast.

I wanted to create a series of suns so I cut circles using various papers and then cut them into 6 pieces each and made new circles of varying papers via paper piecing. I stitched over them and then bent some of the edges to give it dimension.
 
Supplies: Ventura Paper (35731) – Shoreline, Belmont Shore Paper (35736) – Shoreline, Carpinteria paper (35721) – Shoreline, Vero paper (35719) – Shoreline, Myrtle paper (35725) – Shoreline, Cambria paper (35726) – Shoreline, Manhattan Beach paper (35740) – Shoreline, Pacific Beach paper (35737) – Shoreline, Malibu (35722) – Shoreline, Venice Paper (35734) – Shoreline, Bits - Sand Dollar – Shoreline.


Create Adventure – vacation adventures don’t have to include zip lining, airplanes or water for that matter. This particular day, we had a staycation so we stayed and played with chalk.
 
We created all sorts of themes with our chalk but this one was a favorite. I sketched out a crown, wand and frog and my daughter colored it in. We created this silly princess scene and had soo much fun creating our own little adventure story.
Supplies: Veridian Wignette (35676) – Amy Tangerine Sketchbook, Ivory Impression (35677) – Sketchbook, Padma’s Pattern (35673) – Sketchbook, BITS DIE-CUT EMBELLISHMENTS 24/PKG SHAPES(77290) – Sketchbook, FLAT-TOP FABRIC BRADS 12/PKG (85578) – Sketchbook, REMARKS FABRIC STICKERS PAINT (42242) – Sketchbook, REMARKS STICKERS BOOK 8 PAGES ACCENTS & PHRASES (42240) – Sketchbook, BITS DIE-CUT EMBELLISHMENTS 4/PKG LAYERED TAGS (77289) – Sketchbook, Scene Glitter Foam Stickers (53340) – Amy Tangerine Thickers, Boardwalk “Pool” Printed Cardboard Letter Stickers (53361) – American Crafts Thickers


Always My Baby – We were away on Fall vacation when these candid pics were snapped of my daughter and I. She was snuggling up to me and my friend captured these moments. I just adore having such a snuggle bug.


 I used stamps for part of my titling and colored a couple of the letters to make them pop. My journaling is written on the two journaling cards tucked behind the green leaves at the top. 


Supplies: Padma’s Pattern (35673) – Sketchbook, Ivory Impression (35677) – Sketchbook, Harper’s Hue (35687) – Sketchbook, Paige’s Portraits (35691) – Sketchbook, REMARKS FABRIC STICKERS PAINT (42242) – Sketchbook, REMARKS STICKERS BOOK 8 PAGES ACCENTS & PHRASES (42240) – Sketchbook, BITS DIE-CUT EMBELLISHMENTS 4/PKG LAYERED TAGS (77289) – Sketchbook, (77290) – Sketchbook, REMARKS DIMENSIONAL STICKERS DOODLE (42243) – Sketchbook, “Muse” Printed Chipboard Letter Stickers (53343) – Amy Tangerine Thickers, Roxie Acrylic Stamp – American Crafts Stamp


Snow Cones Clear Card – Who doesn’t love a refreshing snow cone treat on a hot day in the sun? This was created using a clear card. I knew I wanted to create two scenes – one on the inside to write a message and the other on the front of the card. They would need to work together to be visually appealing when the card is closed.

I covered the inside with the blue paper and positioned the center of the circle behind the pinwheel on the front cover.

I added a journaling spot and flat embellies to the inside. Then I layered paper, fussy cut elements and the pinwheel over the front.
Supplies: Manhattan Beach paper (35740) – Shoreline, Carpinteria paper (35721) – Shoreline, Vero paper (35719) – Shoreline, Delights Seaside Pinwheels (85586) – Shoreline, Clost to My Heart Clear Card


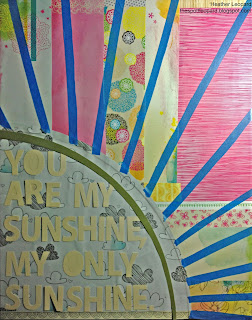
You Are My Sunshine Canvas – I’ve been wanting to do this canvas for my daughter’s room and when I think of an ideal vacation, I think of the sun. This will be hanging in my daughter’s room so she can daydream of the beach and sunshiny days when she’s playing inside or if the skies are grey.
Can you see the grey skies (Indigo Inspiration paper) behind the main portion of the sun?


Supplies: Sienna Spirit Paper (35672) – Sketchbook, Crimson Charm (35674) – Sketchbook, Kristi’s Craft (35682) – Sketchbook, Charlotte’s Shade (35684) – Shoreline, Indigo Inspiration (35686) – Sketchbook, Harper’s Hue (35687) – Sketchbook, Large 16x20 Canvas from LSS, Folk Art Paint – mix of yellow and mustard, Silhouette Cameo


I had fully intended to create a photo tutorial but I only took one prep photo. I just really got into making this and was having so much fun that I forgot to take more photos. The good thing is that the photo I have is probably the most important! Anyway, I thought I'd at least offer up a written step x step:

  1. Gather a canvas, multiple pieces of paper, adhesive - mod podge and glue dots, painter's tape, alphas (either store bought or cut from a digital file) and paint.
  2. Cut your papers into strips and mod podge them to the canvas in whatever pattern you desire.
  3. Make a large circle, you can you a plate - I used a drafting tool my hubby had. Line it up to the corner, making sure it's large enough to get all you letters in or make your letters smaller. Mod podge it to the canvas.
  4. Make a 1/2" mask for the edge of the sun, using the same tool you used to cut the circular part of the plate.  
  5. Using painter's tape, begin to tape down the rays for the sun. Keep in mind that the parts that aren't covered is where the paint will be and the taped parts are where the papers will be exposed.  You want the space between the taped areas to be wide enough to look like rays. Be sure to make the widths different sizes.
  6. I struggled with the best way to do this next part. I'll tell you what I did but it was a little risky.  I applied glue dots to the back of my letters and before I laid them on the grey skies paper I took most of the tacky off of them, simply by pressing my fingers repeatedly on the side of the glue dot that would be touching the paper.  The last thing I wanted to do was to have it rip my paper when I peeled the letters off.
  7. Once everything was laid out, I painted over the canvas. I went with a thin coat because I wanted to be able to see a faint pattern of the paper. You may choose to go heavier depending on your goals.
  8. I set it aside to dry for a short while, peeled the tape off and carefully removed each letter.

I hope you enjoyed my creations and I hope I made the American Crafts team proud!  Thanks for having me, Paige! If you started here, please head over to the American Crafts blog and leave me some love! Make sure to check out all the CHA Summer sneaks going on over there right now!