Pages

Thursday, February 26, 2015

Big LOVE!


Sometimes you just gotta go BIG and use supersized letters and numbers to make a point and express how you feel!


How to: Cut a 5.5 x 7 (11x7) card base. Using your electronic die cut machine, place the letter L at the top and VE underneath (each letter is approx. 2" w x 3"h), leaving a space above the E empty to add a colored O later.  Cut that out of pattern paper. Add coordinating patterns behind each letter. Paint an "O" in the empty space. Once dry, add the chipboard heart and banner. Adhere to the front cover of the card.
Supplies: Dear Lizzy Fine and Dandy: (370064) - Stripey Straws, (370065) - Shenanigans, (370072) - Fine and Dandy, (370073) - Bright Bows, (370087) - Darling Details Printed Cardstock Phrases & Accents

Wednesday, February 25, 2015

The BIG 18!


It may look like I am super excited that my bonus son just turned 18 but that's quite the contrary!  I'm super duper proud of him and am fortunate to have contributed to his life for the past 14-ish years. He's really grown into a wonderful young man and incredible brother to my girls.  He'll be heading off to college in the fall and I am having a really hard time with that and I know my girls will have an even harder time not having their big bro around.  Anyway, that's a blog post for another day.  

I made this card for him for his BIG birthday, as seen on the American Crafts blog.


How to:
  • Cut a 6x6 (12x6) card base. 
  • Using your electronic die cut machine, cut a supersized "18" from a piece of pattern paper and the card base. 
  • Use the negative piece for the top of the card. 
  • Before adhering, add the clear acrylic confetti paper and stitch around the "18". Adhere to the front. 
  • Next, cut another "18" the same size from a contrasting pattern paper. 
  • Adhere the "18 to the inside back of the card so that it lines up with the 18 on the front of the card. 
  • Add a banner at the top of the card and ink the edges, if desired.
 
Supplies: Dear Lizzy Fine and Dandy: (370074) - Stay Awesome Paper, (370076) - Oh Joy Paper, (370077) - Dazzling Paper, (370091) - Accent & Phrase Stickers

Tuesday, February 24, 2015

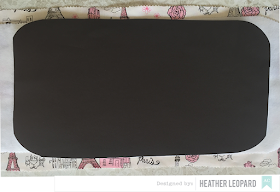
DIY Chalkboard Mat with Chalk Storage Tutorial


I created this chalkboard mat with chalk storage for my littlest to draw on and practice her sight words here at home but it's also great for road trip entertainment.

Here's a DIY Chalkboard Mat with Chalk Storage Tutorial for you...

Step 1: Gather your supplies:

  • 1 chalkboard placemat from the American Crafts DIY Shop 2 collection
  • 2 - 3 pieces of fabric
  • Scissors
  • Bias tape
  • thread
  • Chalk
  • Rhinestones from the American Crafts DIY Shop 2 collection
  • Ribbon
  • Glue
  • Tags (optional)

Step 2: 
  • Cut the scalloped edges off the placemat. It's okay to have rounded corners.
  • Cut the fleece interfacing and the fabric you'll be using for the cover so that they are the same size as the chalkmat. Mine measured 9.5" h x 18" w.

Step 3:
  • Cut 2 pieces of fabric for the inside pocket that will hold the chalk.
  • The 1st piece is 4.5 w x 9.5 h. Hem the left edge and stitch to the mat.
  • The 2nd piece is 4.5 w x 5" h. Hem top edge. Place over the 1st piece and stitch the left  side over the other.
  • Stitch both pieces to the mat on the top, right and bottom side.
  • Stitch the mat to the interfacing and fabric.
  • Trim the edges.

Step 4: Stitch bias tape around the edges for a clean finish. Make sure to add your ribbon during this step.

Step 5: Adorn with rhinestones.

Step 6: Give it to someone special to play with.
Supplies: American Crafts DIY Shop 2: (369075) - Chalkboard Placemat, (369065) - Bulk Rhinestones

Monday, February 23, 2015

Je t'aime

I love to make bold statements for my layouts by creating interesting backgrounds that help draw your eye around and keep the focus on the photo.


How to: Download the cut file from my blog HERE. Chose one pattern with a subtle design to use as your heart.  Then any range of other coordinating patterns for the outside cute.  You can choose one pattern or seven, whatever floats your boat. Cut them with your electronic die cut machine and piece it all together.  Once you have your background, add stitching, doodling, photos and embellishments. And don't forget your title.


Supplies: Dear Lizzy Fine and Dandy (370062) - Love Fest Paper, (370075) - Stay Wild Paper, (360067) - Celebrate Paper, (370087) - Darling Details Printed Cardstock Phrases & Accents, (370091) - Accent & Phrase Stickers

Monday, February 9, 2015

My Precious Girl | Continued from 2.7.15

Remember that layout I showed you Saturday?  If you missed it, check it out HERE and then come back and read this.  The two are tied together for a fun "1 idea, used 2 ways" kind of thing.

Okay, so I cut those fun triangle squares out of the journal cards paper and had a really great shell of a page leftover. It looked fun but I almost tossed it because I didn't really line up the cuts when I cut it because I had no intention of reusing it.  So some of the cuts were aligned top while others were aligned bottom, some left, others right.  The I decided I kind of sort of liked it and gave it a whirl at using it for another layout.  Here's the result.


If you look real close, you can see they aren't aligned but I am embracing it as perfectly imperfect! And if you don't want that philosophy, just align yours more perfectly when you first cut it.

How to:

  • If you used my file from Saturday, grab that leftover sheet of paper....or if you don't, just cut another sheet and cut it. You can download my free cut file HERE
  • Find photos to fit the squares or triangles.
  • Attach papers to the back sides of the remaining sections
  • Add title, journaling and embellishments.

This is what my sheet looked like.  I placed photos and moved papers around until I liked their placement.


Supplies: Gossamer Blue February Main kitMain Add-on, Main Add-on 2 and Life Pages Main kit

Saturday, February 7, 2015

Snapshots of My Girl

Howdy friends!  I'm here today with a new Play on Patterns.  I LOVE creating unique backgrounds by piecing different papers together.  I put a little twist on it this month, incorporating photos as part of the design.

How to:
  • Download the Silhouette cut file I created HERE
  • Place your favorite papers or Life Pages cards on your Silhouette and cut as many triangle squares you need.  I used one sheet October Afternoon Saturday Mornings Journal Cards pattern paper from the Main Add-on.  I simply cut 3 down and 4 across. Then I filled the rest of the spaces with photos.

  • Grab a piece of cardstock and place your photos around the page where you want them. Do not adhere them to the cardstock yet.
  • Mix and match the triangles in the spaces around your photos. Adhere those down lightly.
  • Remove your photos and stitch the triangles to the cardstock base.
  • Add your photos back to the layout.

  • Add your title, embellishments and journaling. I treated each triangle square as it's own element, embellishing each one differently.

I hope this inspires you to try something different with your photos this month by incorporating them into the background as part of the design.
Supplies: Gossamer Blue February Main kit, Main Add-on, Main Add-on 2 and Life Pages Main kit
Thanks for stopping by today!  Before you go, I'd love to know what you'd like to see me tackle in future Pattern Play features.  Just leave a comment to let me know.


And come back Monday to see how I used the Journal Cards paper that I cut the triangle squares from to create another fun layout.

Sunday, February 1, 2015

Hello 42

In case you were wondering, I am in my forties and damn proud of it.  I used to think 40 and over was old but I don't feel old. I actually feel pretty stinking young still. Perhaps it's my young kids that keep me in my youth but whatever it is, I'll take it.  When I saw the numbers 4 and 2 in the February Gossamer Blue Main kit, I knew I had to use them to document me at 42 so I dug up a photo from last year and got to planning.

I ALWAYS go to the B side when I see paper with cameras on it but I embraced it this time and figured it'd be best for the selfie I took.

How to:
  1. Cut a pattern paper to 9h x 12 w and adhere it to cardstock.
  2. Add your photo on one side where the paper meets the cardstock
  3. Add the title and embellishments around the photo and over the border where the paper meets the cardstock
  4. Using pop dots, add some embellishments and journaling cards over some of the photos.  Note: I have some reflecting to do so I'll be adding my journaling later.

So there you have it...a photo about ME! Now I just need to figure out what I want to say about myself at 42. Not only is it good for me to capture elements of me, I think this will be great for my girls to have one day.

Thanks for stopping by! Head over to Gossamer Blue. The February kit is amazing and so are the add-ons.  You can see what the design team created in the February gallery.